# RestocksAIO Documentation — Full Text
> Complete documentation for RestocksAIO, a reseller operations platform covering
> inventory, listings, pricing automation, logistics, documents and sales across
> StockX, Alias, WeTheNew, POIZON, Woovin, SneakerAsk and other marketplaces.
Canonical index: https://docs.restock.gg/llms.txt
---
# What is RestocksAIO?
Discover the key features and benefits of the program.
**RestocksAIO** is a powerful all-in-one tool designed to simplify and optimize the reselling process. It allows users to efficiently manage inventory, create and edit listings, and automate key tasks on various reselling platforms. With advanced features like price automation, offer sniping, and barcode scanning, RestocksAIO saves time while maximizing profits.
The tool supports all types of items, from sneakers to luxury, electronics, clothing, or even collectibles!
POIZON support expands the marketplace stack for sellers who want access to authenticated international demand. Eligible seller accounts connect through OAuth, then RestocksAIO can keep POIZON listing, inventory, order and fulfillment context beside the rest of your workflow instead of forcing you to manage another seller dashboard all day.
Woovin adds a different kind of channel: a marketplace built out of verified resell stores, where you keep your own stock and ship your own orders. A verified store connects with an API token, and RestocksAIO then handles the part that does not scale by hand — listings, multi-unit stock, repricing and orders — alongside every other marketplace you sell on.
SneakerAsk is a private, application-based consignment platform out of Amsterdam. Consigners are approved personally rather than self-registered, sell on two price lanes — standard and 48-hour express — and connect to RestocksAIO with an API key so listings, repricing and sales run beside the rest of the stack.
> **New User?** RestocksAIO features an interactive onboarding tour that guides you through every major feature when you first launch the application. Check out our [Onboarding Guide](/getting-started/onboarding-guide) to see what's covered!
## Supported Sites
|
StockX (API & Non Public API)
| Alias | Wethenew |
| -------------------------------------------- | ------------- | --------- |
| Klekt | Hypeboost | Laced |
| LimitedResell | NordicSneakers | KickScrew |
| POIZON | Woovin | SneakerAsk |
## Our Plans and Features
### FREE TRIAL ([**0€**](https://restock.gg/stripe/purchase/standard/trial))
Test the software at no cost before committing. Two trials are available:
* **Standard trial — 7 days.** Full access to every Standard feature.
* **Premium trial — 3 days.** Everything in Standard plus the Premium tools, with one guardrail: Bricker Mode is **limited to 5 controllers** during the trial to prevent abuse.
You can cancel at any time in the Billing Portal inside the [dashboard](https://restock.gg/dashboard). If you don't cancel before the trial ends, you'll be charged for the corresponding membership.
> During a Premium trial you get the full Premium feature set, but you can create at most **5 Bricker controllers**. Upgrade to a paid Premium membership to remove the limit.
### Premium Membership ([**30€ / Month**](https://restock.gg/))
* 🧱 **Bricker Mode** - Automatic AI that ensures you have the lowest price, decreasing and increasing prices.
* 👨💻 **Offer Sniper** - Automatically accepts WeTheNew offers within your price range!
* 🎯 **Wethenew Slot Sniper** - Be able to snipe consignment slots with the fastest tool in the market.
* 🧠 **Smart Actions** - Get your automation to the next level with custom triggers and actions.
* 🌐 **Webhook API** - Send JSON notifications from RestocksAIO to your own endpoint (Premium/Lifetime).
### Standard membership ([**15€ / Month**](https://restock.gg/))
* 📋 **Barcode Scanner** - Quickly scan shoebox barcodes to compare prices or create listings in seconds. Use a laser scanner, or scan from your phone and send items straight to the desktop with the [Mobile Barcode Scanner](/features/inventory/mobile-barcode-scanner).
* 📰 **Label Generator** - Generate custom-coded labels optimized for thermal printers, designed to save paper and streamline the labeling process.
* 💰 **Sales Analytics** - Access detailed sales analytics from all platforms, with the option to export data as CSV files.
* 🗃️ **Bulk Listing Mode** - Easily create, edit, or delete multiple listings across platforms in a single process.
* 📝 **CSV Listing** - Upload thousands of items in seconds using CSV files.
* 📊 **Price Comparator** - Compare prices across multiple reselling platforms, track monthly sales performance, view average payouts, and analyze total sales for any site.
* 🧮 **Consignment Diagnostics** - Analyze StockX/Alias averages, per-site profits and sales to decide Consign vs Resale, with profits = Avg payout − Retail and currency normalization.
* 🚚 **Free Courier Collections** - Schedule UPS and DHL pickups in just two clicks. We bypass the standard UPS pickup fee, making all pickups free of charge.
* 📜 **Proof of Delivery** - Export proof of delivery documents for UPS, DHL, and DPD with ease.
* 📄 **Entry Certificate** - Automatically generate Entry Certificates (Gelangensbestätigung) for intra-Community EU supplies, required for VAT-exempt B2B transactions.
* ☑️ **Confirm Sales** - Accept sales from all platforms, with the option to enable monitors for automatic sale confirmations.
### More Standard Features
* 🔎 **In-house monitors** - Currently supporting Wethenew and Alias Exchange Rate.
* 📱 **Telegram Bot** - Interact with your RestocksAIO instance remotely via Telegram. Get instance information, monitor status, and receive notifications through Telegram commands.
> RestocksAIO offers more advanced features and characteristics, which are detailed on its features page.
### Additional Profiles
We offer the option to purchase additional account slots to add more accounts to your instance. This can be done through our [dashboard](https://restock.gg/dashboard).
> A maximum of five slots is permitted.
---
# Installation (REQUIRED)
1. In order to run this program, you will need to download the "..NET 7.0 Runtime (v7.0.9) - Windows x64 Installer!" version. Click [HERE](https://dotnet.microsoft.com/es-es/download/dotnet/thank-you/runtime-7.0.9-windows-x64-installer) to download.
.png)
2\. Get your Discord role by clicking on the green button in the [Dashboard](https://restock.gg/dashboard).
.png)
3\. Add the correct billing information in [Billing Portal](https://restock.gg/dashboard). If you are a business seller, you can add your VAT-ID for B2B 0% invoces.
.png)
4\. Now, download the bot from our [dashboard](https://restock.gg/dashboard). You have to unzip the file and keep the extracted file at all times.\
\
Here is a tutorial on how to set it up:
https://www.youtube.com/watch?v=tznGqCkQ71I
---
# Onboarding Guide
RestocksAIO now uses feature onboarding popups instead of one long walkthrough. When you open a major tab or tool for the first time, a focused modal explains that area with screenshots, short guidance, progress dots, and **Back** / **Next** controls.
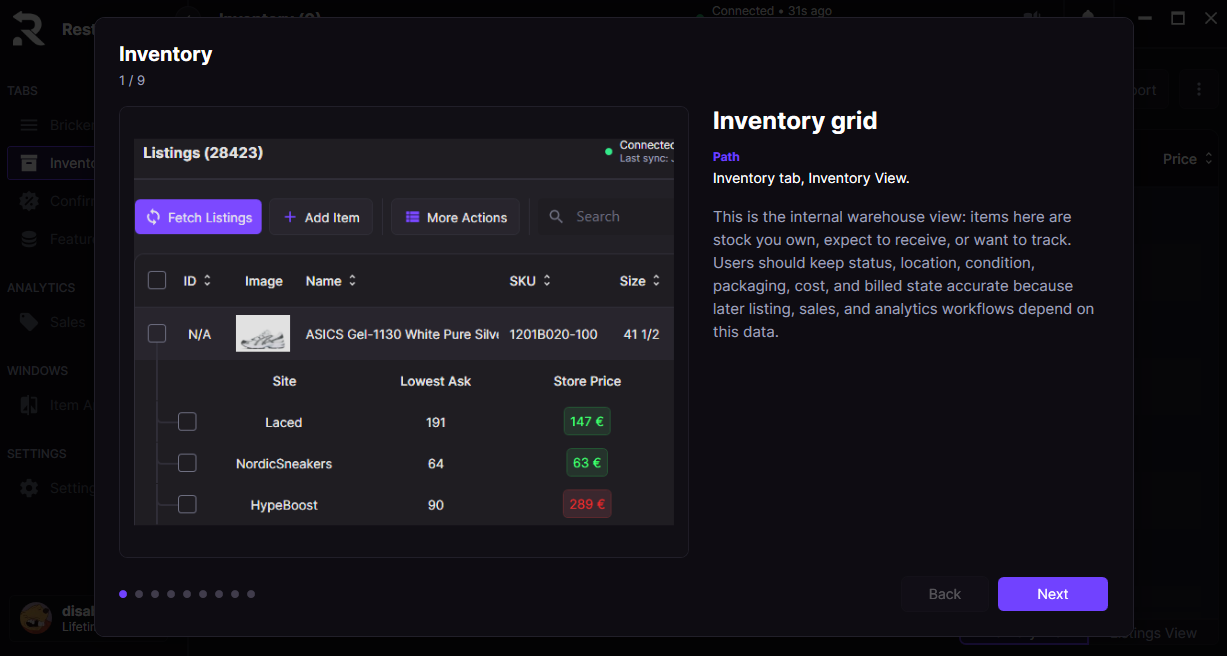
*Each feature popup shows the current feature, slide count, screenshot, path, explanation, progress dots, and navigation controls.*
## How it works
Feature onboarding appears the first time you open supported areas such as Dashboard, Inventory, Listings, Bricker Mode, Sales, Confirm Sales, Features, Label Dialog, Invoice Generation, Item Addition, Barcode Search, Consignment Diagnostics, Bricker Recommendations, Price Comparator, and Settings.
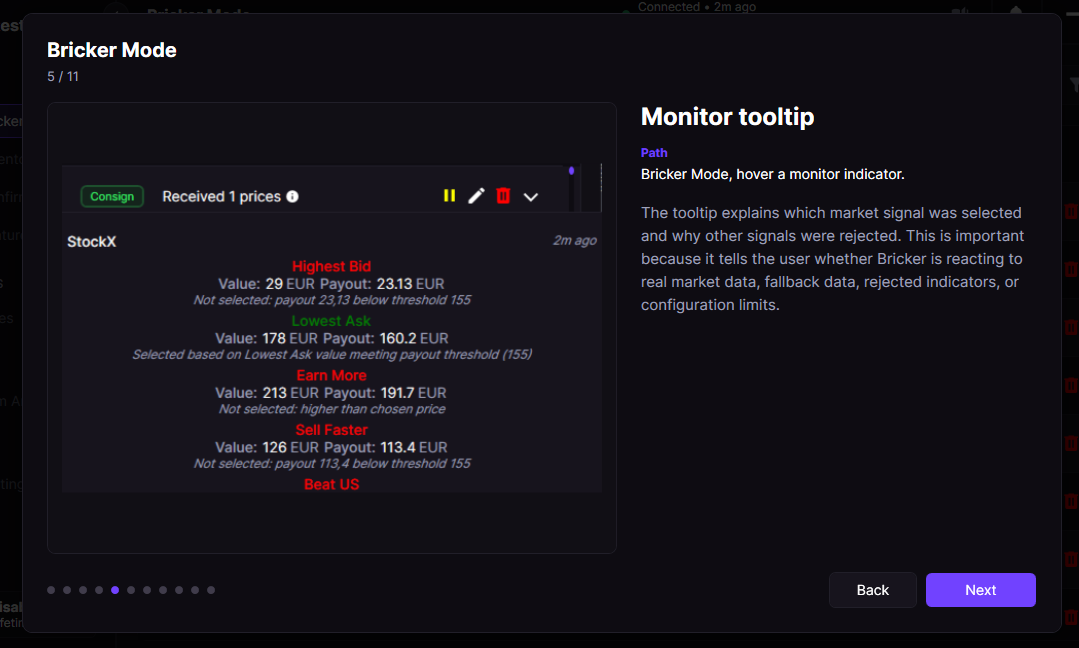
*Feature popups explain specific workflows, such as Bricker Mode monitor tooltips and why each market signal was accepted or rejected.*
Each popup is scoped to the feature you are using. For example, Inventory starts with the inventory grid and navigation between Inventory/Listings views, while Bricker Mode covers controllers, task creation, monitor data, statistics, Smart Bricker Mode, Hidden Sales, Mass Editor, and function menus.
## Navigation
- **Next** moves to the next slide in the current feature.
- **Back** returns to the previous slide.
- Progress dots show where you are inside the feature popup.
- Finishing a feature marks that popup as completed so it does not keep appearing every time.
## Covered areas
### Dashboard
Dashboard onboarding explains the business overview, marketplace/timeframe filters, inventory snapshot rows, price data status, and inventory value change signals.
### Inventory and Listings
Inventory onboarding explains the Inventory grid, Inventory vs Listings views, fetching marketplace data, search, filters, export, More Actions, right-click item actions, item integrations, and bulk maintenance.
Listings onboarding explains grouped marketplace postings, expanded groups, selected listing toolbar actions, More listing actions, right-click listing actions, Link Inventory, Price Toolbox, Pricing Window, and deleting linked Bricker tasks.
### Bricker Mode
Bricker Mode onboarding explains the controller grid, task creation, payout bounds, expanded controllers, monitor tooltip reasoning, statistics and quick filters, Smart Bricker Mode, Hidden Sales, Mass Editor, function menu, and start/stop controls.
### Sales and Confirm Sales
Sales onboarding explains the Sales grid, Inventory Sales vs Account Sales, row actions, and Proof of Delivery downloads. Confirm Sales onboarding explains loading unconfirmed sales and using Auto-Confirm.
### Features and utility windows
Features onboarding introduces the feature launcher and the main shipping/document tools: Generate Labels, Generate Invoices, Schedule Pickup, POD Downloader, Calculator, Size Chart, Barcode Search, and analysis tools.
Separate popups are available for deeper tools such as Label Dialog, Invoice Generation, Barcode Search, Consignment Diagnostics, Bricker Recommendations, and Price Comparator.
### Item Addition
Item Addition onboarding explains manual adding, editing item details, barcode scanning, saved item sets, CSV menu, More Actions, recreating Bricker tasks, Quick List vs Inventory + Listing, and Bricker task options.
### Settings
Settings onboarding explains Accounts, Site Options, Bricker defaults, account login controls, StockX routing, Alias routing, Discord notifications, notification tests, Telegram Bot, Webhook API, Proxy, Preload Fees, and Other Settings.
## Resetting onboarding
If you want to see the feature popups again, go to **Settings -> Other Settings** and click **Reset Onboarding**. This clears completed feature-popup state so the onboarding cards can appear again as you open each area.
## Need more help?
After a popup introduces a feature, use the related GitBook page for the full workflow details, edge cases, and troubleshooting notes.
---
# First Steps
This page is designed for first-time users of RestocksAIO.
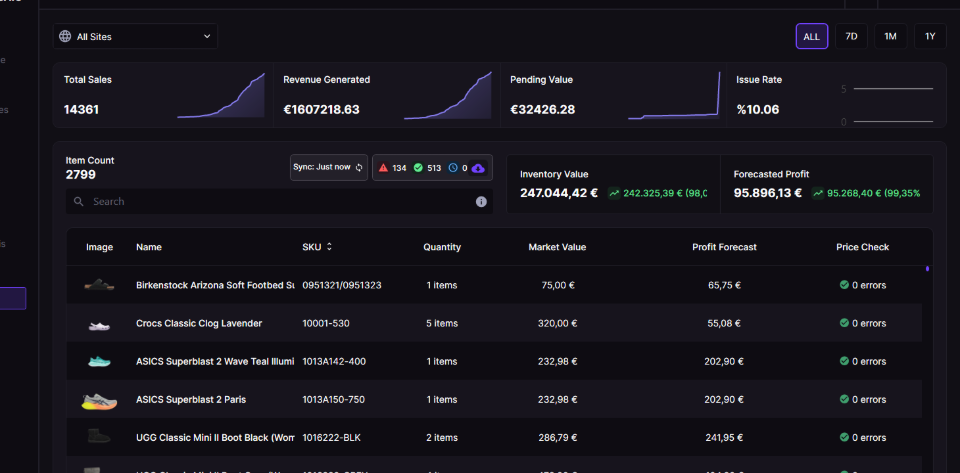
*Once you're set up, the Dashboard is where your sales and inventory metrics come together at a glance.*
Here, we'll guide you through the essential setup steps, from listing your first item to configuring basic settings. Additionally, we'll offer some helpful recommendations to optimize your profits and experience.
> **New to RestocksAIO?** When you first launch the application, you'll be greeted with an interactive onboarding tour that walks you through all major features. Check out our [Onboarding Guide](/getting-started/onboarding-guide) to learn what to expect!
> To use StockX effectively, you need access to their developer program. Follow this [link ](/problem-solving/tutorials/how-i-can-get-access-to-the-public-stockx-api)to learn how to request access.
> POIZON uses OAuth instead of a username/password login inside RestocksAIO. If you have an eligible POIZON seller account, connect it from **Settings > Accounts > POIZON > Connect POIZON**. See [Connect POIZON](/features/settings/accounts/connect-poizon) for the full flow.
## Recommended setup order
1. **Install and open RestocksAIO.** Complete the onboarding tour if it appears.
2. **Confirm your plan or trial.** Standard trial gives access to Standard features for 7 days. Premium trial gives Premium access for 3 days, with Bricker Mode limited to 5 controllers during the trial.
3. **Connect your main selling accounts.** Go to **Settings > Accounts** and add the marketplaces you actively use.
4. **Set site options before pricing.** Review VAT, fee, routing and API options under each account before creating Bricker tasks or comparing payouts.
5. **Import or add inventory.** Add one item manually first, then move to CSV import or barcode scanning once your account settings are correct.
6. **Create your first listing or Bricker task.** Start with a small test item so you can verify payout, VAT and marketplace behavior before bulk actions.
7. **Enable notifications.** Configure Discord, Telegram or Webhook API notifications so sales and automation events reach you outside the app.
## Account login notes
Different marketplaces use different login methods:
* **StockX**: use **StockX Browser Login** when your account uses passkeys, Windows Hello, Bitwarden, email verification, SMS verification or another browser-based challenge.
* **POIZON**: use **Connect POIZON**. POIZON authorizes RestocksAIO through the browser and redirects back through the RestocksAIO callback page.
* **Facebook/Google login accounts**: use the Cookie Importer when a marketplace account cannot be added with a normal username and password.
## Before bulk work
Before importing a large CSV, creating many listings, or starting Bricker Mode at scale, check these items:
* Your site-specific VAT and fee options match the marketplace account.
* The correct account/profile is selected for each marketplace.
* Proxies are configured if a feature or marketplace needs them.
* Your first test listing or scan returns the expected payout and size.
* Notifications are enabled if you want remote alerts.
---
# Dashboard
Providing a real-time snapshot of your selling business

*The Dashboard is divided into two main sections: Sales Overview and Inventory Insights.*
## Sales Overview
At the top of the Dashboard, you’ll find sales information that gives you a clear picture of how your business is performing:
* **Total Sales**: The number of items sold within your selected timeframe.
* **Revenue Generated**: The total income earned from completed sales.
* **Pending Value**: The amount of money currently in transit or being processed.
* **Net Income**: Your final earnings after accounting for fees and expenses.
## Inventory Insights
The Dashboard also provides a detailed view of your current inventory, including its value and profit potential.
* **Inventory Value**: The total market value of your current stock.
* **Forecasted Profit**: A projection of potential profit based on the current best market prices.
And here’s the best part:
* **Grouped Inventory View:** Your inventory is grouped by SKU, so you can easily see which items are performing well and which ones have the most potential right now.
> **What Does an “Error” Status Mean?**\
> \
> If a group shows as **Error**, it means we currently don’t have price data for that item. However, this is rare, as our database is regularly updated.\
>
>
> **What to do in this situation**:
>
> * Check the **Price Comparator** to look up the price manually, the price will be added to our database on the next internal update loop, and the error will resolve automatically.
## Price data and scraping
- Refresh prices: Click the refresh button to force-update price data across your inventory.
- Missing price counters: The header shows three counters:
- Errors: number of SKUs currently missing price data.
- Loaded: number of SKUs with price data.
- Remaining: pending items when an on-demand scrape is running.
- Scrape missing prices: Use the cloud button to fetch prices for SKUs that are missing data. Progress updates the counters in real time.
## Inventory change indicators
Next to Inventory Value and Forecasted Profit you’ll see color-coded trend indicators:
- Increase: green arrow and delta amount.
- Decrease: red arrow and delta amount.
These reflect the change since the last refresh.
---
# Bricker Mode
Access all Bricker Mode features and settings to automate your pricing strategy.
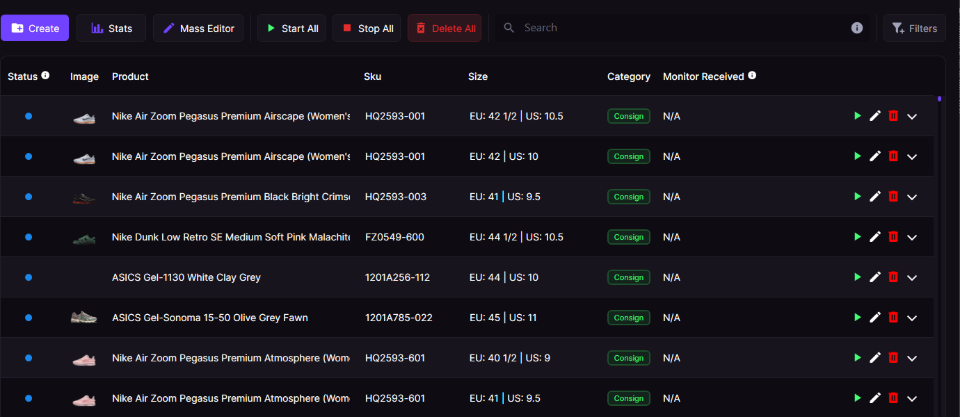
*Bricker Mode is the automated pricing and sales monitor. Each row is a controller watching a single SKU/size across the sites you've enabled.*
> For a high-level overview of automated repricing, see the [Bricker Mode feature page on restock.gg](https://restock.gg/features/bricker-mode).
- [Tasks and Controllers](https://docs.restock.gg/features/bricker-mode/tasks-and-controllers): Understand how to manage your selling automation groups.
- [Smart Bricker Mode](https://docs.restock.gg/features/bricker-mode/smart-bricker-mode): Configure automatic pauses for frequent undercuts.
- [Parallel Price Check](https://docs.restock.gg/features/bricker-mode/parallel-price-check): Control whether your listings work together or independently when adjusting prices.
- [Queue System](https://docs.restock.gg/features/bricker-mode/queue-system): Discover how the fair pricing queue operates.
- [Wethenew Sniper](https://docs.restock.gg/features/bricker-mode/wethenew-sniper): Set up instant offer acceptance when profitable deals appear on Wethenew.
- [LimitedResell Sniper](https://docs.restock.gg/features/bricker-mode/limitedresell-sniper): Set up automatic offer acceptance for profitable deals on LimitedResell.
- [Bricker Recommendations](https://docs.restock.gg/features/bricker-mode/bricker-recommendations): Get AI-powered recommendations to optimize your Bricker Mode controller payout filters.
---
# What is Bricker Mode?
Learn how automated price adjustments work across platforms.
> ****THIS FEATURE IS FOR PREMIUM MEMBERSHIPS ONLY!****
.png)
## What Does Bricker Mode Do?
Imagine you’ve listed a shoe on five different websites. To ensure your listing has the lowest price across all platforms, you’d typically have to log in to each site and manually adjust the prices.
With **Bricker Mode**, this process is fully automated. It finds the lowest price for your item across all selected platforms and updates your listings to match it—keeping you competitive without the hassle.
But it doesn’t stop there. Bricker Mode doesn’t just make you the lowest price; it also raises your price when there’s room to maximize your profit.
.png)
## **Additional Features**
* **Sales**: Whenever a sale happens, the listings on the other platforms will get deleted so you don't have duplicated sales
* **Notifications**: Stay informed with real-time updates about your listings and market changes.
* **Bid Notifications**: If a profitable bid comes in, you’ll receive a notification asking if you’d like to accept it. (This feature is active when you have listings loaded.)
* **Internal Queueing**: The tool uses an internal queue to ensure fair pricing and prevent unnecessary undercutting between users. Learn more about our Queue System by [clicking here](/features/bricker-mode/queue-system).
* **Payout matching:** Your site's payout is compared to other platforms. If any have an abnormal payout, it will be adjusted to a proportional payout, which will likely lead to increased sales.
* **Multiple currency support**: The software runs in your preferred currency; if any site uses a different currency, it will be converted to your preferred currency.
* **Statistics**: We track multiple variables that help you during your selling process.
* **Alias Price Increasing:** If enabled, every 12-24 hours, the tool will increase the prices of your items to lower them again, unblocking a new lowest ask, which in most cases is higher, leading to better payouts.
---
# Tasks and Controllers
Understand how to manage your selling automation groups.
> ****THIS FEATURE IS FOR PREMIUM MEMBERSHIPS ONLY!****
**Bricker Mode** is all about automating your listings to ensure you always have the best price across multiple platforms. To make this work seamlessly, Bricker Mode uses **Tasks** and **Controllers**. Here’s everything you need to know.
## **What Are Bricker Mode Tasks?**
Tasks are the individual automation features that run on each website where you’ve listed your item. Each task ensures your listing has the best price on that specific platform.
With tasks, you can:
* Set a **minimum payout** to avoid selling at a loss.
* Set a **maximum payout** to keep your price realistic and avoid listing at a price that’s too high to sell.
* View the **currency** you’re selling in.
* Monitor the **delay time** between price updates in real time.
## **What Are Bricker Mode Controllers?**
Controllers group together multiple tasks for the same item. They organize your listings by **size** and **quantity**, making it easier to manage multiple platforms at once.
For example:
* If you’re selling 2 pairs of EU 41 on StockX, 1 pair on Alias, 1 pair on Laced, and 1 pair on Klekt, all these tasks will be grouped into **one controller** for EU 41. (As seen on the picture below)
> **StockX exception:** if you are running both **Direct** and **Resale** for the same SKU and size, RestocksAIO can keep them in separate controllers. This is intentional because Direct and Resale use different market pools and should not always share the same pricing logic.
### Bricker categories
Every task belongs to one of three **categories**, which the tool derives automatically from the task configuration:
* **Resale** — default category for flat-fee resale listings.
* **Direct** — StockX tasks with Buyer-Direct Seller Mode enabled.
* **Consign** — Consignment / Flex listings.
Categories are independent of each other: the same SKU and size can exist simultaneously as Resale, Direct, and Consign tasks without colliding. Each category is queued and monitored separately, and the category label is surfaced in sale notifications so you know which bucket a sale came from.
.png)
## Controller Settings
* **Smart Bricker Mode** [**(Click for in-depth guide)**](/features/bricker-mode/smart-bricker-mode)**:** Pauses the task if your item is undercut too many times or by too much.
* **Parallel Check** [**(Click for in-depth guide)**](/features/bricker-mode/parallel-price-check):
* _Enabled_: Each task works independently, without comparing prices across platforms.
* _Disabled_: The tool compares prices across platforms and adjusts them to avoid selling for a lower payout than the best available price.
* **Retrieve Alias Prices from Global Indicator**: Pulls pricing data from Alias’s global market trends.
* **Retrieve StockX Prices from Algorithmical Indicators**: Uses StockX’s guidance data (Sell faster / Earn more) for smarter pricing.
* **Allow non-Flex indicators for StockX Flex items:** Uses non-Flex price data for Flex-eligible items when running Consign StockX tasks.
* **Delete matching Direct/Resale category on sale**: If you keep both Direct and Resale live for the same product and size, the opposite category can be cleared automatically after one side sells. Consign/Flex tasks are not affected.
## Expanded controller view
Click the chevron at the right end of any controller row to expand it and see one row per active task — each marketplace, its product ID, current delay, payout settings, the chosen price, and the resulting payout.
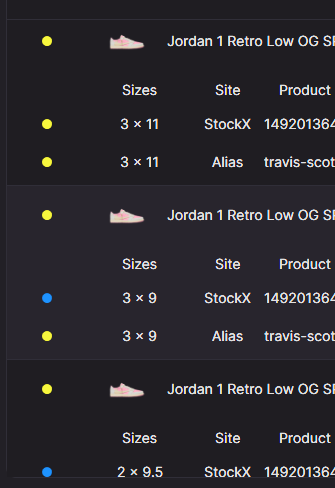
*Expanded controller showing per-site task rows. Status dot (yellow=running, blue=monitoring), per-site Lowest Payout / Max Payout filters, currency, current chosen price, and resulting payout.*
## Merge controllers
Use **Merge with...** when the same physical pair is split into separate controllers on different sites and you want one sale to pull the other listing, so the item cannot sell twice.
Open the controller you want to edit and click **Merge with...** in the **Editing Bricker Mode Task** window.
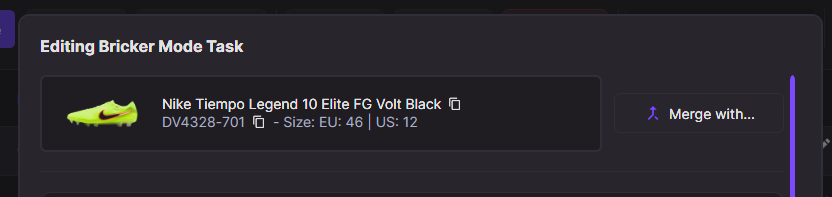
*The Merge with... button appears in the Editing Bricker Mode Task window.*
The merge window shows the controller you are editing at the top, then lists other controllers that can be merged into it.
1. Use **Search** if you need to find the matching controller faster.
2. Select the controller for the same product and size on another site.
3. Choose which controller to **Keep as target**.
4. Click **Merge**.
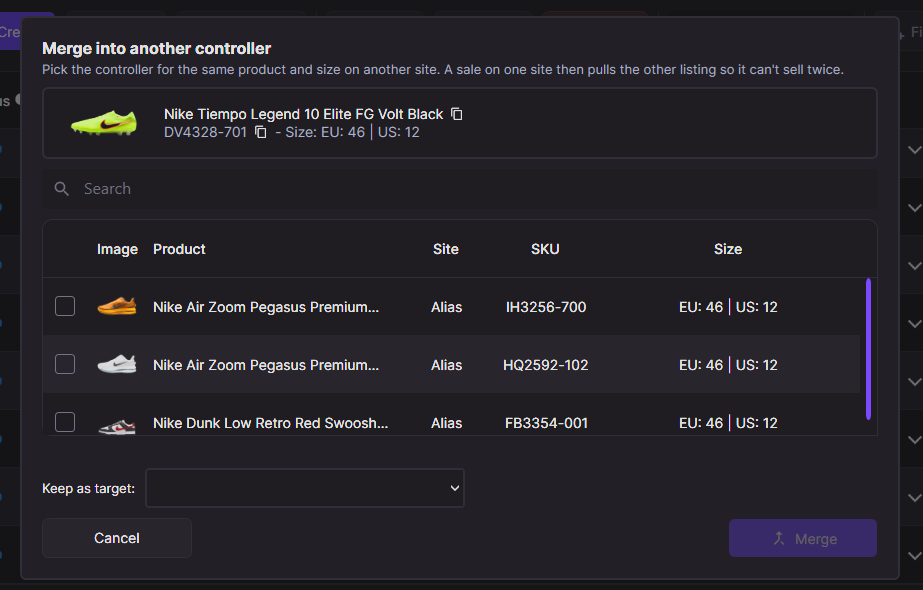
*Select the matching controller, choose which one stays as the target, then click Merge.*
RestocksAIO only allows a merge when the controllers have the same physical size, the same category, and no overlapping site. If nothing is selected, or the selected controller is not a valid match, the **Merge** button stays disabled.
Both controllers are stopped during the merge. Start the merged controller again when you want monitoring to resume.
## Monitor Received: per-task pricing breakdown
Hover over **Received N prices** in any controller row to open a tooltip showing the live per-site indicator data the bot used for its pricing decision.
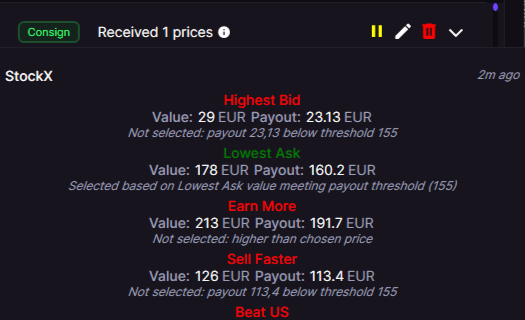
*For each indicator (Highest Bid, Lowest Ask, Earn More, Sell Faster, Beat US, plus Flex variants) the tooltip shows the value, projected payout, and the reason it was either chosen (green) or rejected (red).*
## Statistics & quick filters
Open the statistics popup on the Bricker Mode page to access controller-level insights and one-click filters:
- **24h Price Changes**: Total number of price updates made in the last 24 hours. Use the filter button to show only controllers that had price changes.
- **Alias Price Increases (24h)**: Controllers where Alias price increases were applied in the last 24h.
- **Not Lowest Ask**: Show controllers whose tasks are not at the lowest ask on their marketplaces.
- **Session Sales**: Filter controllers that had sales during the current session.
- **Has Errors**: Surface controllers with errors that may need attention.
These filters add tokens to the Bricker search box, so you can combine them with text filters like name, style code, or site.
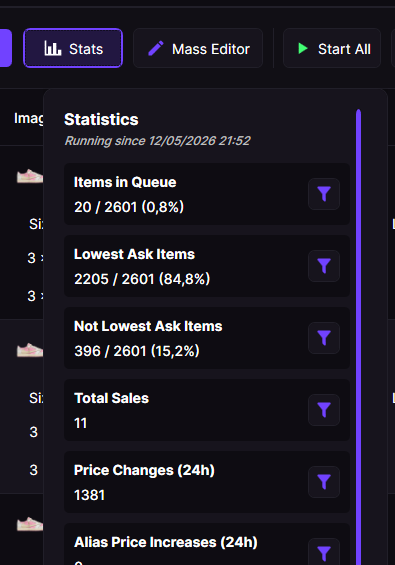
*The Statistics popup shows live counters: Items in Queue, Lowest Ask Items, Not Lowest Ask Items, Total Sales, Price Changes (24h), Alias Price Increases (24h), Total Errors, plus shortcuts to View Sales during Session and Open Recommendations.*
## Mass Editor
Use the **Mass Editor** to apply changes (LP, MP, settings, site removal) across many controllers at once.
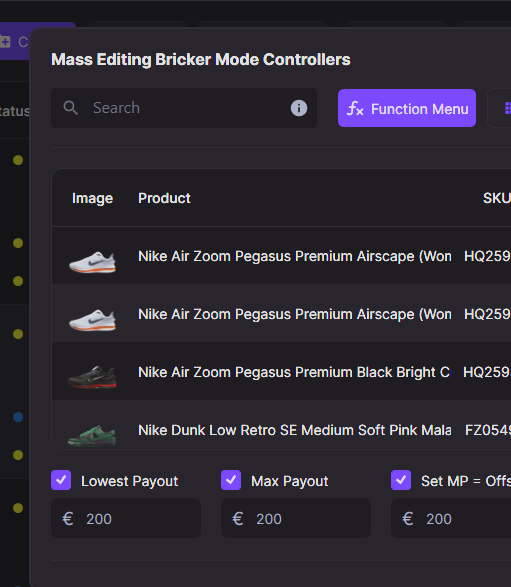
*The Mass Editor lists every active controller and lets you bulk-edit Lowest/Max Payouts, toggle Smart Bricker Mode and indicator behaviors, and trigger batch actions through the Function Menu.*
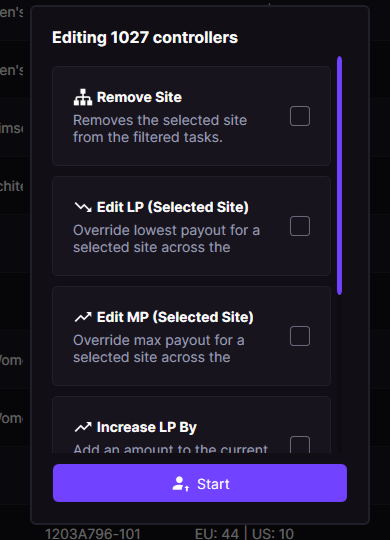
*The Function Menu inside the Mass Editor exposes batch operations: Remove Site, Edit LP / MP for a selected site, Increase LP By, and more.*
---
# Queue System
Discover how the fair pricing queue operates.
> ****THIS FEATURE IS FOR PREMIUM MEMBERSHIPS ONLY!****
## The use of the Queue System
To prevent prices from dropping too low, we’ve implemented a fair **Queue System.**

*The Bricker Statistics popup shows your live queue position counters. Items in Queue tells you how many of your active tasks are currently waiting their turn in the fair queue.*
## How does it work?
* **Your Spot in Line**: If multiple RestocksAIO users are selling the same item, you’ll join a queue. Your place in line depends on when you started the task.
* **Moving Forward**: You’ll move up the queue when:
* The people ahead of you sell their item.
* The people ahead of you remove their listing / stop their task.
* **One Spot = One Item**: Each spot in the queue is for one item. \
For example, if you have 10 items listed and sell 1, you’ll move to the back of the line for the remaining 9.
* **Important Note**: The queue is specific to the **site**, **SKU**, **size**, and **category** (Resale / Direct / Consign). This means you can have the same SKU and size listed on multiple platforms (e.g., Alias and StockX), but your position in the queue may differ for each site. For example, you might be able to sell on Alias but remain queued on StockX.
* **Separate queues per category**: Resale, Direct, and Consign tasks are tracked in independent queues. Running both a Resale and a Direct task on StockX for the same SKU and size will put you in two separate lines — your spot in one does not affect the other. See [Tasks and Controllers](/features/bricker-mode/tasks-and-controllers#bricker-categories) for how categories are assigned.
## Frequently Asked Questions about the Queue System
> **What happens if I restart my bot? Will I lose my spot in the queue?**\
> \
> Don’t worry—your spot in the queue is reserved for **6 minutes**. As long as you restart within that time, you won’t lose your place.
> **Why did my prices jump to 700€ when I started my tasks?**\
> \
> If you’re not first in the queue, the tool automatically increases your prices to prevent creating a “wall” of listings. This ensures fairness and avoids oversaturating the market with the same item.
---
# Smart Bricker Mode
Configure automatic pauses for frequent undercuts.
> ****THIS FEATURE IS FOR PREMIUM MEMBERSHIPS ONLY!****
**Smart Bricker Mode** is a safety feature that pauses the task if your item is undercut too many times or by too much. You can customize:
* The **delay time** (how long the task is paused).
* The **number of times** your item is undercut before pausing.
* The **amount** by which your item is undercut before pausing.
## How do I set it up?
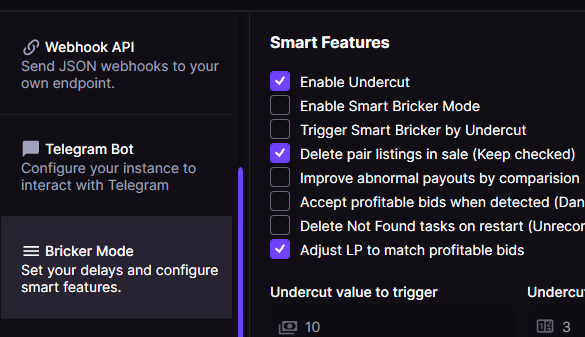
You can activate Smart Bricker Mode in **the Settings** tab at the **Bricker Mode Settings** or by editing a task in **Bricker Mode**. Before enabling it, make sure to set your preferred values:
1. **Undercut value to trigger:** Set the amount someone needs to undercut your price for Smart Bricker Mode to activate.
2. **Undercut amounts to trigger:** Set how many times someone needs to undercut your price for Smart Bricker Mode to activate.
---
# Parallel Price Check
Control whether your listings work together or independently when adjusting prices.
> ****THIS FEATURE IS FOR PREMIUM MEMBERSHIPS ONLY!****
## What is Parallel Price Check?
Parallel Price Check determines how tasks interact with each other and whether they should adjust their prices. You may have this option as:
* _Disabled_: The tool compares prices across all platforms, selects the best payout option, and adjusts the price on that platform. Other listings will have their prices increased to avoid selling.
* _Enabled_: Each listing operates independently, without comparing prices across platforms. You can also toggle a controller-level option to avoid parallel price checks for the tasks in that controller.
## How do I use it?
You can **activate or deactivate** Parallel Check at any time—whether you’re editing an existing task or creating a new one.
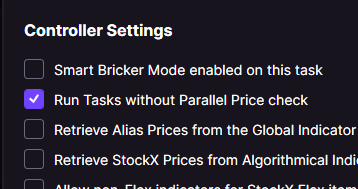
*Creating a new task.*
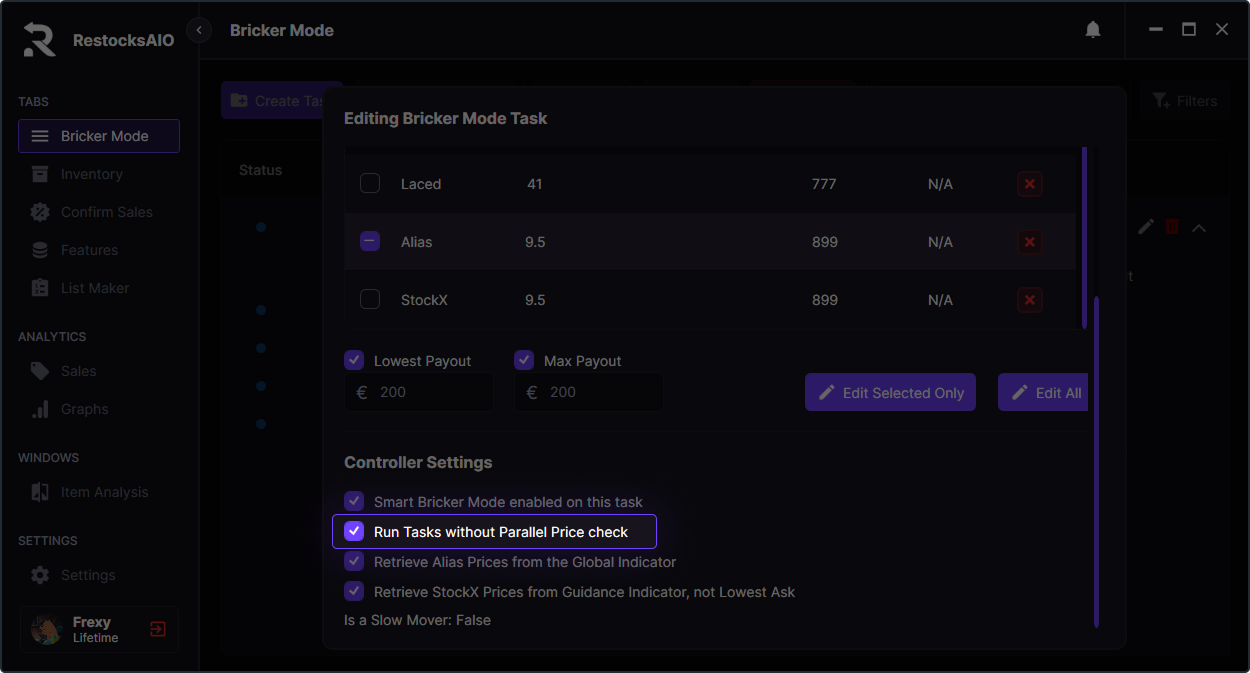
*Editing an existing task.*
---
# Wethenew Sniper
Set up instant offer acceptance when profitable deals appear on Wethenew.
> ****THIS FEATURE IS FOR PREMIUM MEMBERSHIPS ONLY!****
Our **Wethenew Sniper** is built into **Bricker Mode** and works alongside a standard **Bricker Task**.
.png)
## How does it work?
Simply create and run a **Bricker Mode** task like every other site, and the sniper will handle the rest.
* The bot **does not** adjust your price—it only monitors incoming offers.
* If an offer matches or exceeds your **Lowest Payout Possible (LP)**, the bot will **instantly** snipe it.
## **Why did the sniper miss an offer?**
* Most likely, another **RestocksAIO** user secured the sale before you.
* If this happens too often, check out our **detailed guide** for troubleshooting.
If you feel it’s happening too often, check out our guide here:
- [My wethenew tasks are not sniping offers](https://docs.restock.gg/problem-solving/errors/my-wethenew-tasks-are-not-sniping-offers): Troubleshooting guide for Wethenew sniper functionality issues.
> The Wethenew tasks are not affected by the queue as the offer system is FCFS.
---
# LimitedResell Sniper
Set up automatic offer acceptance for profitable deals on LimitedResell.
> ****THIS FEATURE IS FOR PREMIUM MEMBERSHIPS ONLY!****
Our **LimitedResell Sniper** is built into **Bricker Mode** and works alongside a standard **Bricker Task**.
## How does it work?
Simply create and run a **Bricker Mode** task for LimitedResell like every other site, and the sniper will handle the rest.
* The bot monitors your pending offers on LimitedResell.
* If an offer's payout matches or exceeds your **Lowest Payout Possible (LP)**, the bot will **instantly** accept it.
* Offers below your LP are automatically refused.
* You will be notified via your Discord webhook about accepted, refused, and failed offers.
## VAT Configuration
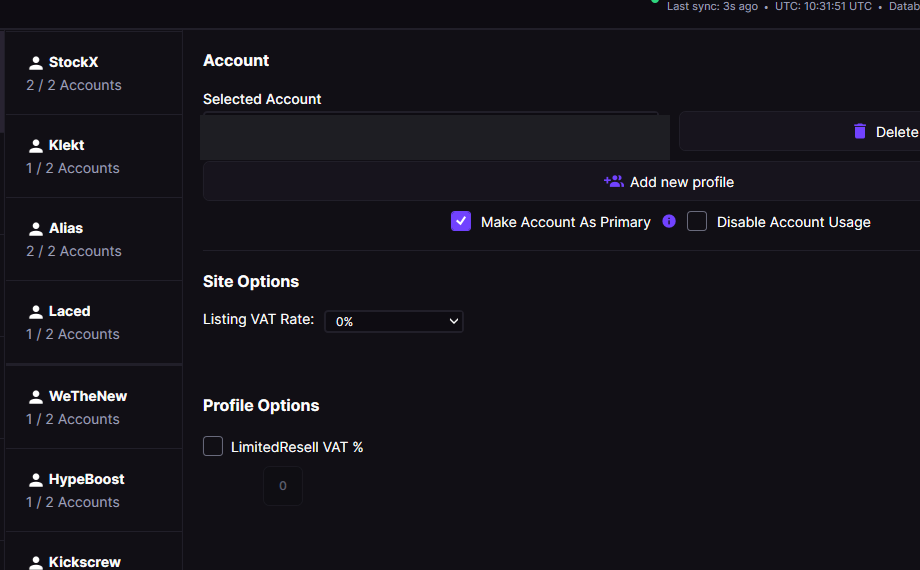
*Set the Listing VAT Rate under the LimitedResell account's Site Options to match your actual LimitedResell VAT mode.*
LimitedResell supports three VAT modes that affect payout calculations. You can configure this per account in **Settings > Accounts > Site Options**:
* **Marge** — Margin scheme (default), no VAT added to payouts.
* **0%** — Zero-rated VAT.
* **20%** — Standard 20% VAT applied.
> Make sure your VAT type matches your actual LimitedResell account settings to ensure accurate payout calculations in Bricker Mode and the Price Comparator.
---
# Hidden Sales
Subscribe to keep your sales private and hidden from public view.
> ****THIS FEATURE IS FOR PREMIUM MEMBERSHIPS ONLY!****
We understand that you might not want to show the world what you are selling through our platform, so we allow users to purchase a monthly subscription to avoid this.
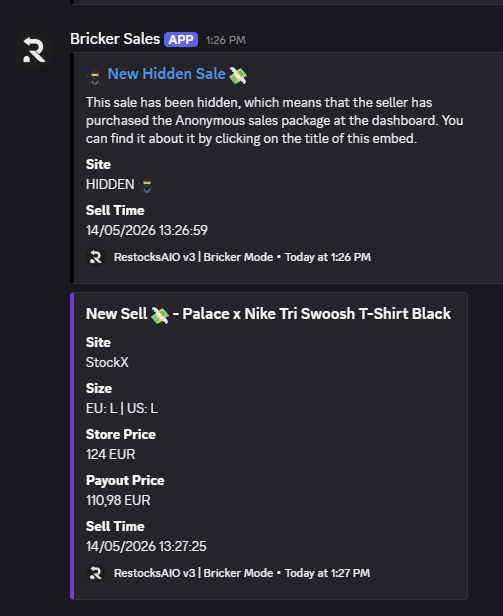
You can purchase the membership to Hidden Sales through our [dashboard](https://restock.gg/dashboard).
---
# Bricker Recommendations
Get AI-powered recommendations to optimize your Bricker Mode controller payout filters.
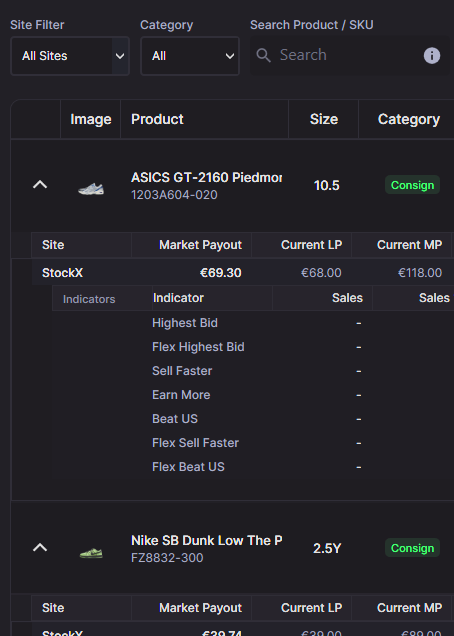
*Bricker Recommendations shows controller-level LP/MP suggestions with expandable per-site and per-indicator detail rows.*
The **Bricker Recommendations** window gives controller-level and per-site suggestions so you can tighten LP/MP filters quickly, based on live task payouts plus monitor indicators.
## Where to open it
Open **Bricker Recommendations** from the Bricker Mode view. It lists your active controllers and lets you apply changes in bulk or per-site without leaving the window.
## What you see in the window
### Toolbar filters and actions
- **Site Filter**: Limit the grid to a single marketplace.
- **Only Above Market**: Show controllers priced above market.
- **Hide Increase Recommendations**: Hide rows where the suggestion is to raise prices.
- **Show analyzed only**: After running indicator analysis, hide sites without indicator data.
- **Analyze Indicators**: Pulls per-site indicators and fills the nested “Indicators” table.
- **Refresh**: Reloads recommendations with the latest data.
### Controller rows (top grid)
- **Image / Product / SKU / Size**
- **Consign / Resale badge**
- **Sites**: Count of active marketplaces for the controller.
- **Current LP / MP**: Current filters (blended across sites).
- **Market Payout**: Blended market payout estimate.
- **Suggested LP / MP**: Rounded suggestions based on market data.
- **Difference %**: Suggested change vs current LP.
- **Actions**: `Apply All` (applies to all active sites on that controller) and `Focus` (jumps to the controller in Bricker Mode).
### Per-site rows (nested list)
- **Market Payout / Current LP / Current MP / Suggested LP / Suggested MP / Difference %**
- **Reasoning**: Site-specific explanation.
- **Action**: `Apply` (switches to `Accepted` after success).
### Indicator rows (shown after **Analyze Indicators**)
- Sales count, Sales %, Ask %, Avg Payout, Avg Price
- Suggested LP / MP per indicator
- Quick apply button per indicator
## How recommendations are calculated (short version)
- Uses recent task payouts plus monitor indicators; old or noisy points are down-weighted or ignored.
- Per-site market payout is blended, then controller-level values average the per-site results.
- Suggestions focus on meaningful changes and avoid tiny tweaks; “Hide Increase Recommendations” can suppress price-raise suggestions.
## Applying recommendations
**Apply All** updates every active site for that controller. Use the per-site **Apply** buttons when you only want to change a specific marketplace. After applying, the button switches to **Accepted** and values refresh.
Use **Focus** to jump back to Bricker Mode with the controller highlighted if you need a deeper review.
## Filtering and sorting tips
- Click column headers to sort.
- Combine **Site Filter** with **Only Above Market** to find overpriced controllers fast.
- Use **Hide Increase Recommendations** to focus on reductions.
- Run **Analyze Indicators**, then toggle **Show analyzed only** to inspect sites with indicator data.
## Troubleshooting
- **Empty table**: Make sure you have active controllers and recent monitor/task data.
- **Indicator rows hidden**: Run **Analyze Indicators**, then toggle **Show analyzed only** off/on.
- **Apply disabled**: The row will show `Accepted` after a successful apply; refresh to recalc if needed.
- **Recommendations look off**: Check the reasoning text; if data looks inconsistent, refresh or verify monitor feeds.
---
# StockX Direct Shipping
Understand StockX Direct Shipping (DFS) and how it works in RestocksAIO.
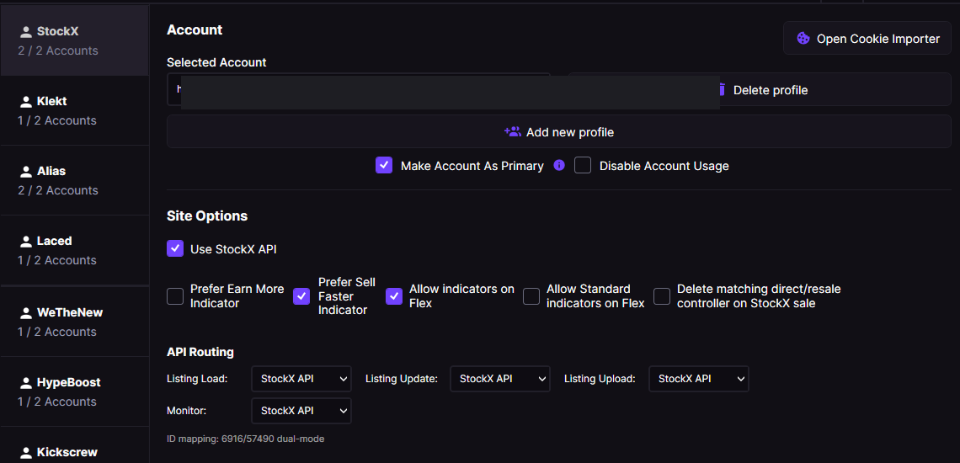
*The Enable StockX Buyer-Direct Seller Mode toggle lives on the StockX account's Site Options panel.*
## What is StockX Direct Shipping?
**Direct** is RestocksAIO's internal label for the seller-direct fulfilment route offered through StockX's invite-only **Verified Seller Program**. An approved seller ships an eligible item directly to the buyer instead of sending that order through a StockX Verification Center first.
This means:
* **Account-specific economics** — Use the payout and charges shown for your approved account. StockX does not publish a universal special fee discount for every Verified Seller.
* **Faster delivery** — Buyers receive their items sooner since the package doesn't need to make a stop at a StockX verification center.
* **Separate market data** — The direct marketplace has its own set of bids and asks, which can differ significantly from the standard marketplace.
## Who can use Direct Shipping?
StockX Direct is **not available to all sellers**. To qualify, you typically need:
* **High sales volume** — StockX offers this program to sellers who consistently move large quantities of items.
* **Low cancellation rate** — Your account must maintain a very low cancellation rate, demonstrating reliability.
* **Good seller metrics** — Overall seller performance, including shipping speed and accuracy, is taken into account.
> If your StockX account is not approved for Buyer-Direct shipping, **do not list items as Direct or enable the Direct Seller Mode setting**. Doing so will cause the tool to use incorrect market data and may result in failed listings.
## Listing Categories
RestocksAIO supports three listing categories for StockX:
| Category | Description |
| ------------ | -------------------------------------------------------------- |
| **Resale** | Standard listing. You ship to StockX, they authenticate and forward to the buyer. |
| **Consign** | Consignment/Flex. The item is already stored at StockX's warehouse. |
| **Direct** | You ship directly to the buyer, bypassing authentication. |
The **Category** column in your Listings View, Inventory, and Bricker Mode tables shows which category each item belongs to.
> In Bricker Mode, **Direct** and **Resale** are treated as separate StockX selling pools. Even if the SKU and size are the same, they can live under different controllers because they use different market data and different sale handling.
### How to list items as Direct
You can set the listing mode when adding items:
1. Open the **Item Addition Window** (Add Item button)
2. In the **Mode** column, select **DIRECT** from the dropdown
3. Use the **header dropdown** at the top of the Mode column to batch-set all items to Direct at once
4. Proceed with **Inventory + Listing** or **Quick List** as usual
You can also set the mode via **CSV Import** by using `DIRECT` in the **Listing Mode** column.
If you want the same StockX item listed as both categories, select **Resale + Direct** in the Mode dropdown, or use `RESALE/DIRECT` in CSV import. RestocksAIO expands that row into separate Resale and Direct listings when you submit it.
> Direct and standard (Resale) items are processed separately during listing creation. The tool automatically batches them with the correct payload for each type.
## Running Direct and Resale at the same time
Some sellers keep both **Direct** and **Resale** active for the same SKU and size to compare which route sells first.
RestocksAIO supports this setup, but it is important to understand that:
* **Direct** and **Resale** do not share the same market data.
* Bricker Mode keeps them separated so pricing decisions stay accurate for each category.
* A sale on one side does not automatically mean the other side should remain active.
Because of that, the tool can now treat the two categories as distinct controller identities instead of merging them together.
## Delete the opposite category after a sale
If you run both **Direct** and **Resale** for the same item, you may want the opposite category to be cleared automatically once one side sells.
You can enable this in:
* **Settings > Bricker Mode** using **Delete matching Direct/Resale category on sale**
When enabled:
* Selling a **Direct** listing can remove the matching **Resale** controller for the same product and size.
* Selling a **Resale** listing can remove the matching **Direct** controller for the same product and size.
* **Consign/Flex** tasks are not affected.
This helps avoid leaving duplicate exposure live after one StockX category has already sold the item.
## Direct Pricing in Bricker Mode
When Direct Seller Mode is enabled, the **Bricker Mode** monitor uses StockX's direct market data as the primary source for pricing indicators:
| Indicator | Direct Pricing OFF | Direct Pricing ON |
| ------------ | -------------------------------- | ---------------------------------------------- |
| Lowest Ask | Standard market data | Direct market data (falls back to standard) |
| Highest Bid | Standard market data | Direct market data (falls back to standard) |
| Earn More | Standard market data | Direct market data (falls back to standard) |
| Sell Faster | Standard market data | Direct market data (falls back to standard) |
The tool prioritizes direct market data first. If a direct value is unavailable (zero), it automatically falls back to standard, then top-level market data. This ensures you always have the most accurate pricing for your specific seller type.
> **Consignment (Flex) items** are not affected by the Direct Pricing setting. Custodial inventory always uses top-level market data regardless of the toggle.
## How to enable Direct Seller Mode
You can toggle StockX Direct Seller Mode in three places:
1. **Settings > Accounts > Site Options** — Applies to the account profile. Look for **"Enable StockX Buyer-Direct Seller Mode"**.
2. **Bricker Mode > Edit Task** — Toggle per-task when editing a StockX bricker controller.
3. **Bricker Mode > Mass Edit** — Apply the setting across all selected controllers at once.
## Why does this matter for pricing?
Direct sellers operate in a **separate marketplace pool**. The lowest ask and highest bid in the direct market can be significantly different from the standard market. Without this setting enabled, the tool would use standard market prices to make decisions — which may not reflect the actual competition and payouts in your direct marketplace.
Enabling Direct Seller Mode ensures:
* Your prices are competitive against **other direct sellers**, not the general pool.
* Payout calculations use the **account-specific Direct market data and charges** available to the approved seller.
* Bricker Mode makes accurate undercut/match decisions based on the right market data.
---
# Inventory
Track and manage your entire product stock and active listings in one place.
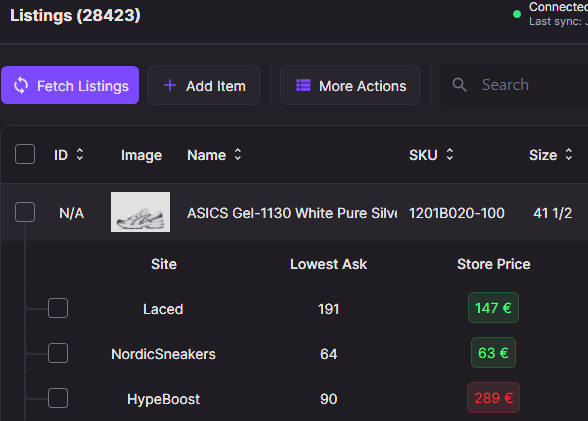
*The Inventory tab shows your listings grouped by SKU, with per-site prices, categories, and quick actions.*
> For an overview of unified stock and listing management, see the [Inventory & Listings feature page on restock.gg](https://restock.gg/features/inventory-and-listings).
- [How does the Inventory work?](https://docs.restock.gg/features/inventory/how-does-the-inventory-work): Track stock, listings, and profits in one unified system.
- [Adding Items](https://docs.restock.gg/features/inventory/adding-items): Learn how to add products to your inventory or list them for sale.
- [CSV Import](https://docs.restock.gg/features/inventory/csv-import): Bulk-upload items via spreadsheet for quick inventory updates.
- [Barcode Scanning](https://docs.restock.gg/features/inventory/barcode-scanning): Scan your inventory and upcoming shoes with our Barcode Scanner. Our database contains over 2.3 million barcodes, so there's no product we don't have!
---
# How does the Inventory work?
Track stock, listings, and profits in one unified system.
Our new inventory system lets you manage both your **stock** and **listings** in one place. The system has two main views:
* **Inventory View**: Acts like a virtual warehouse—each row represents one item in your stock.
* **Listings View** – Manages your active listings across platforms.
## **How Inventory and Listings Work Together**
Each item in the **Inventory View** can be linked to multiple listings in the **Listings View**. This means the same item may appear in different marketplaces, but it all connects back to one inventory entry.
.png)
*#3084 Item is listed on 3 different platforms.*
## Loading your Items
The **Sync Data** button ensures your inventory and listings are always up to date. It uses incremental sync to load only new items, making it significantly faster than a full refresh.
> **Shift + Click** the **Sync Data** button to perform a full refresh instead of an incremental sync. Use this when you want to re-fetch all listings from scratch rather than just new ones.
**In Inventory View**:
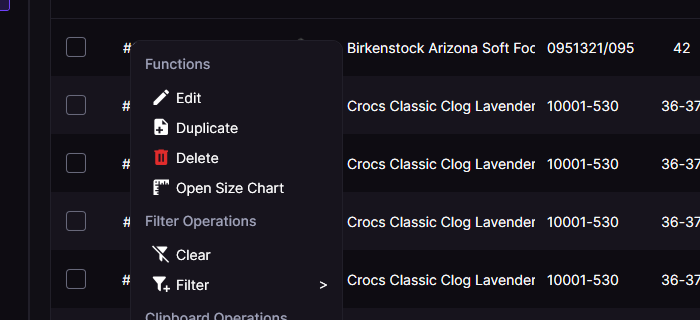
*Right-click any inventory item to access Edit / Duplicate / Delete, Filter and Copy shortcuts, bulk Item Editing (Set Date, Status, Condition, Packaging, Billed), and Integration actions (List Item, Check Prices, Find Barcodes, Consignment Analysis).*
* The tool checks for missing listings (sold or deleted) and new listings.
* For missing listings: Mark them as sold or deleted using the checkbox at the start of the row.
* For new listings: The tool automatically creates inventory items and links them to the new listings. You can accept these changes or make manual adjustments.
**In Listings View**:
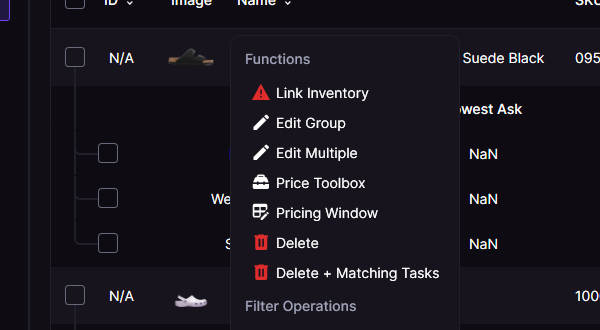
*Right-click any listing row to access the full context menu — Link Inventory, Edit Group, Price Toolbox, Delete, plus Filter, Copy, and Integration shortcuts (Check Prices, Search Barcodes, Open Size Chart, Consignment Analysis).*
* The tool scans all platforms for listings.
* New listings appear as _“Listing is not linked to any inventory item.”_
* To link them: Select the listing, right-click, and choose **Link Inventory**.
* The tool checks if the listing matches an existing item by:
1. Verifying the size.
2. Ensuring the platform isn’t already linked.
* If no match is found, the tool creates a new inventory item and links it automatically.
## Re-listing unlisted StockX Flex inventory
If you have Flex (consignment) items sitting at the StockX warehouse with no active ask, RestocksAIO now surfaces them in your **Listings View** so you can put them back on sale directly from the app — no StockX website needed.
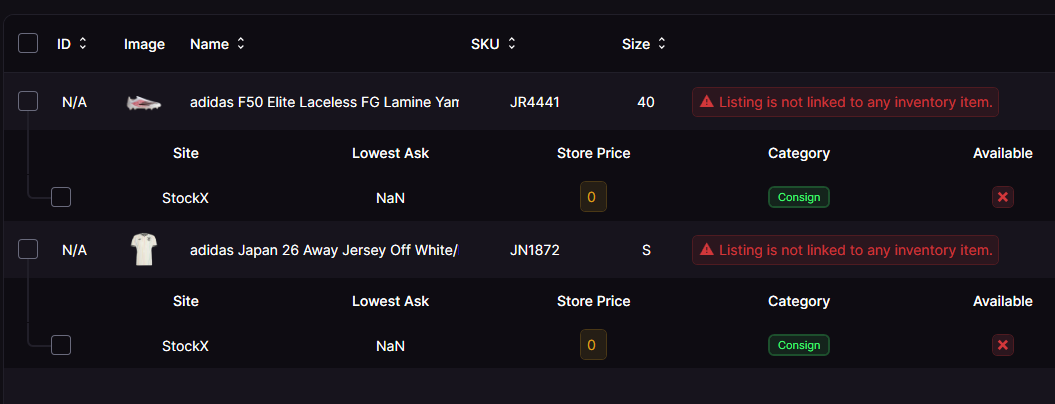
*Unlisted StockX Flex items appear as Consign rows with a red Available mark and no Lowest Ask, ready to be re-listed.*
You can recognize these rows because they are **Consign** category, show a red ✗ in the **Available** column (the item is at the warehouse but not currently active), and have no Lowest Ask or store price yet.
To list them:
1. Select one or more of these unlisted Flex rows.
2. Right-click and choose **List Unlisted Flex**. _(This option only appears when unlisted Flex items are present.)_
3. Enter the ask price you want to list them at, then confirm.
RestocksAIO submits the listings to StockX and flips them from inactive to active at your chosen price. A confirmation shows how many items were listed; any that fail are reported so you can retry.
> This is StockX-only and applies to Flex / consignment (also called Custodial) inventory. The physical items already exist at StockX — this simply re-activates them with a fresh ask.
---
# Adding Items
Learn how to add products to your inventory or list them for sale.
.png)
## Adding Items
Clicking the **"Add Item"** button opens the **Item Addition Window**, where you first select the items you want to add. You can do this:
* **Manually**: Search items from our database.
* **CSV Import**: Bulk upload items using a CSV file. [**(Click for in-depth guide)**](/features/inventory/csv-import)
* **Barcode Scanning**: Quickly add items by scanning their barcodes. [**(Click for in-depth guide)**](/features/inventory/barcode-scanning)
Once your items are added, pick the ones you want to work with and decide what to do next.
* **Only Inventory**: Stores the item in your virtual warehouse without listing it.
* **Inventory + Listing**: Adds the item to your stock and lists it on platforms, automatically linking them.
* **Quick List**: Creates listings without adding them to inventory. You can link them later, as explained [here](/features/inventory/how-does-the-inventory-work).
### Recheck Sites
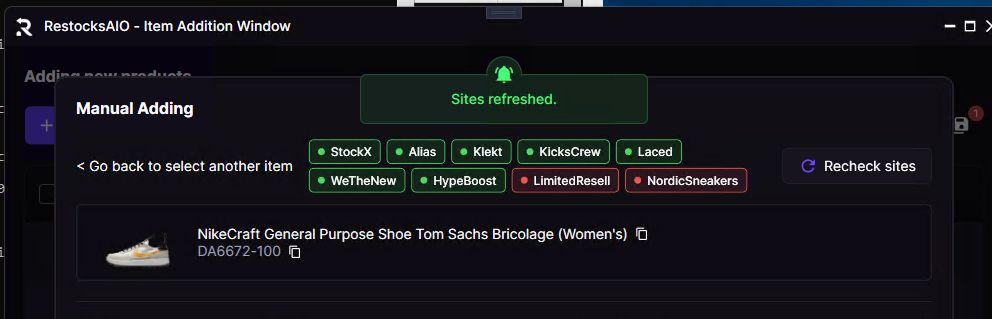
*Site availability pills and the Recheck sites button in the Item Addition Window.*
After picking an item, the Manual Adding panel shows the site availability pills (**green** = item is on the site, **red** = missing). If one or more sites are marked red, click **Recheck sites** to re-scrape that SKU directly from our database without leaving the app.
* Refreshes the product across every supported site and updates the availability pills in place.
* Keeps your current size region, size type, and selected sizes. If a size is no longer available after the refresh, it is dropped and a count is shown in the confirmation message.
* Runs on the single SKU you have selected — no need to use `/add-item` in Discord for this case.
> Use this whenever a site just released or delisted a product and you want the tool to pick up the change immediately. For brand-new style codes that are not in the database yet, follow [Add Item to Database](/problem-solving/tutorials/add-item-to-database).
### Listed quantity per size
When you pick sizes in the Size Selector, each size tile shows a small badge in the top-left corner with **how many listings you already have** for that size across your loaded accounts. This lets you see at a glance where you are already covered and avoid double-listing a size you have plenty of.
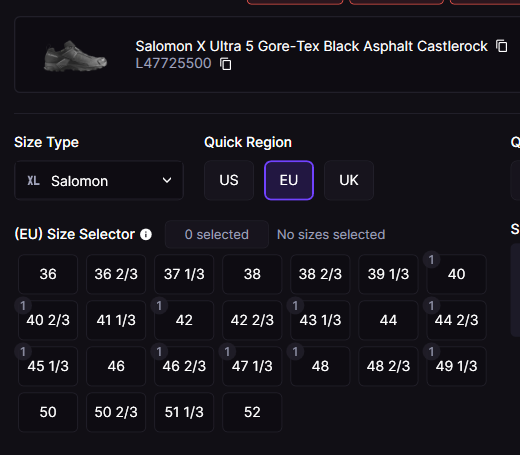
*The badge on each size tile shows how many active listings you already have for that size.*
The badge reflects your current region and size type, so it updates when you switch **Quick Region** (US / EU / UK) or the size type.
### Listing Mode
There are three listing categories:
* **Resale** — Standard listing where you ship the item to the buyer after authentication.
* **Consign** — The item is stored at the platform's warehouse (consignment/flex). Available on StockX (Flex) and Alias.
* **Direct** — The item ships directly from you to the buyer, bypassing the platform's authentication center. Available on StockX for approved sellers only. [**(Click for in-depth guide)**](/features/bricker-mode/stockx-direct-pricing)
You can set the listing mode per item, or use the **header dropdown** in the Mode column to batch-set the mode for all items at once.
The Mode dropdown also includes **Resale + Direct**. Use this only when you intentionally want the same StockX pair listed in both categories. When submitted, RestocksAIO creates the supported listings separately. Direct is StockX-only, so other selected sites continue through their supported category.
> If you intentionally list the same StockX SKU and size in both **Direct** and **Resale**, RestocksAIO can keep those paths separated in Bricker Mode so each category follows the correct market data.
### Extra Options
* **Create Bricker Mode Tasks**: If the items include a minimum payout, the tool will automatically generate these for you.
* **Create WTN Actions**: After listing, the tool will search for items on the WTN Consignment site and create sniping tasks for those uploaded listings.
### Saved Bricker payouts
If you have previously priced a product in Bricker Mode, RestocksAIO remembers your **Lowest Payout (LP)** and **Maximum Payout (MP)** per marketplace and per size. When you add that same product again, those values are loaded automatically into the **LP** and **MP** columns, so you don't have to re-enter payouts you already decided on.
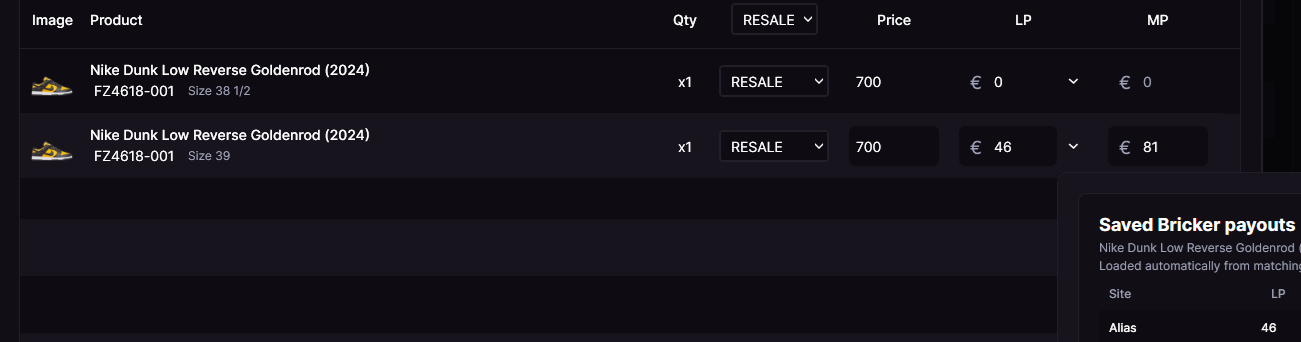
*Saved payouts populate the LP and MP columns automatically, and the side panel shows which site each value came from.*
* The **Saved Bricker payouts** side panel breaks the loaded values down per site, so you can see exactly where each payout came from before listing.
* Any size without a saved payout stays blank for you to fill in.
* You can still edit any LP/MP value before submitting — the saved figures are a starting point, not a lock.
> These payouts feed directly into **Create Bricker Mode Tasks** (see Extra Options above): when a minimum payout is present, the generated Bricker task uses it for the matching destination site.
### Multiple SKU Discovery
Before listings are created (Inventory + Listing or Quick List), RestocksAIO automatically checks for valid alternative SKUs (e.g., slash-variants or brand-specific formats like OFF-WHITE and ON RUNNING).
When alternatives are found, a window appears showing:
* The original item (image, name, SKU)
* A large arrow separator
* The suggested alternative (image, name, SKU)
Select the alternatives you want and click Confirm to duplicate those items under the new SKU. Click Skip to proceed with your original items only. Duplicates are treated as independent listings; the backend unifies them in analysis as needed.
> The discovery also detects brand-specific patterns (for example replacing hyphen/dot formats for ON RUNNING, or toggling a dash before the last 4 digits for OFF-WHITE) to surface more matches automatically.
### Saved Item Sets (Snapshots)
Quickly save and reuse the current selection of items in the Item Addition Window.
* **Save Current**: Stores the current set with an auto-generated name (you can rename it later).
* **Load**: Restores a saved set back into the working list.
* **Rename / Delete**: Manage your saved sets directly from the list.
Use snapshots to experiment with different listing strategies or keep a “ready-to-list” set you frequently reuse.
> Saved sets are persisted in your database backup. They include the items in the set, their quantities and options, and are restored across sessions. A dedicated barcode buffer is also saved and restored so you don’t lose recently scanned items.
### More Actions
The item list contains a menu. You can do the next:
* Edit and remove the selected items.
* Clipboard Operations
* Export the selected items.
* **Compare**: Outputs the anomalies compared to your inventory or listings, helping to determine if you have more or fewer pairs than you should.
* **Open in Price Comparator**: Opens the selected item in the Price Comparator to analyze prices, payouts, and recent sales.
* **Select Items**: With the various options, you can select either the matching or non-matching items, which can help you choose items to remove if needed, for example.
* **Create Tasks for Matching Listings**: After importing your CSV (which must include at least the lowest payout variable), you can trigger Bricker task creation for matching listings found in your loaded accounts. Use **Create Tasks (Resale, All Sites)**, **Create Tasks (Consign, All Sites)**, or **Create Tasks (Direct, All Sites)** when the same SKU/size exists in multiple selling categories.
> Scoped task creation prevents Direct, Resale, and Consign listings for the same SKU/size from being rebuilt into the wrong Bricker category.
---
# CSV Import
Bulk-upload items via spreadsheet for quick inventory updates.
You can import your listings or inventory items through our CSV Import feature located in the CSV Menu.
1. Get the template by clicking "Download Template".
2. Fill out the template. Do not add any columns.
3. Import it and ensure all statuses are correct. If any are incorrect, you can download the errors and re-import them after fixing the issues.
4. Press confirm.
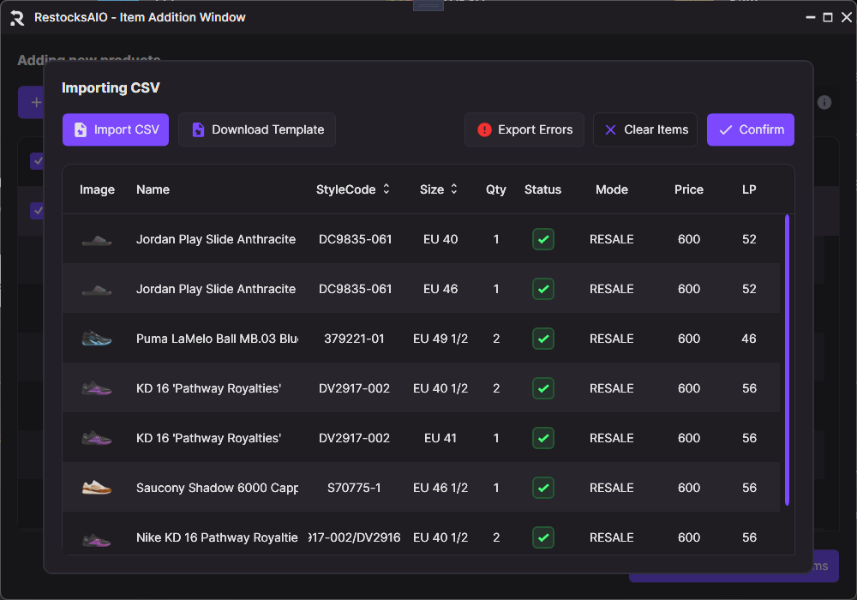
> Now that all your items are imported, you can follow the past [article](/features/inventory/adding-items) on how to list them.
### File Structure
The CSV file contains several columns, which are explained below:
* **StyleCode**: product identifier
* **SizeType**: product size region used (US, EU, and UK are supported)
* **Size**: product size (can contain decimals or half/third sizes)
* **StorePrice**: price that will get listed at
* **Quantity**: product quantity
* **BrickerTaskCreationLowestPayout** (optional): lowest payout option for the bricker task
* **BrickerTaskCreationMaxPayout** (optional): max payout option for the bricker task
* **Listing Mode**: RESALE / CONSIGN / DIRECT / RESALE/DIRECT
* **BoxNumber** (optional): if a FLEX consignment, you can number the listings so they get merged under the same flex manifest
> Use **DIRECT** only if your StockX account is approved for Buyer-Direct shipping. See the [StockX Direct Shipping guide](/features/bricker-mode/stockx-direct-pricing) for details.
> Use `RESALE/DIRECT` when you want one CSV row to create both StockX categories for the same item. You can also import separate **DIRECT** and **RESALE** rows for the same StockX SKU and size; the tool can manage them as separate Bricker paths instead of forcing them into one shared StockX controller.
> When listing an item, it is advisable to set a high price, such as 700. If you are using [Bricker Mode](../bricker-mode/), the tool will later price it for you, so there is no need to worry about it.
---
# Barcode Scanning
Scan your inventory and upcoming shoes with our Barcode Scanner. Our database contains over 2.3 million barcodes, so there's no product we don't have!
> This feature is compatible with a laser barcode scanner **and** with your phone — see [Mobile Barcode Scanner (Scan to Desktop)](/features/inventory/mobile-barcode-scanner) to scan with your phone camera and send items straight to the desktop.
For a high-level overview of our 2.3M+ barcode database, see the [Barcode Scanner feature page on restock.gg](https://restock.gg/features/barcode-scanner).
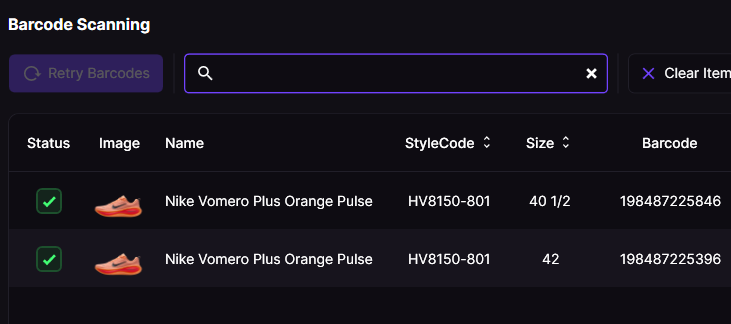
### Recommended Barcode Scanner
Any laser barcode scanner works, that can work connected to your computer via USB or Bluetooth.\
Example [here](https://www.amazon.es/dp/B07CBRTWS5).\
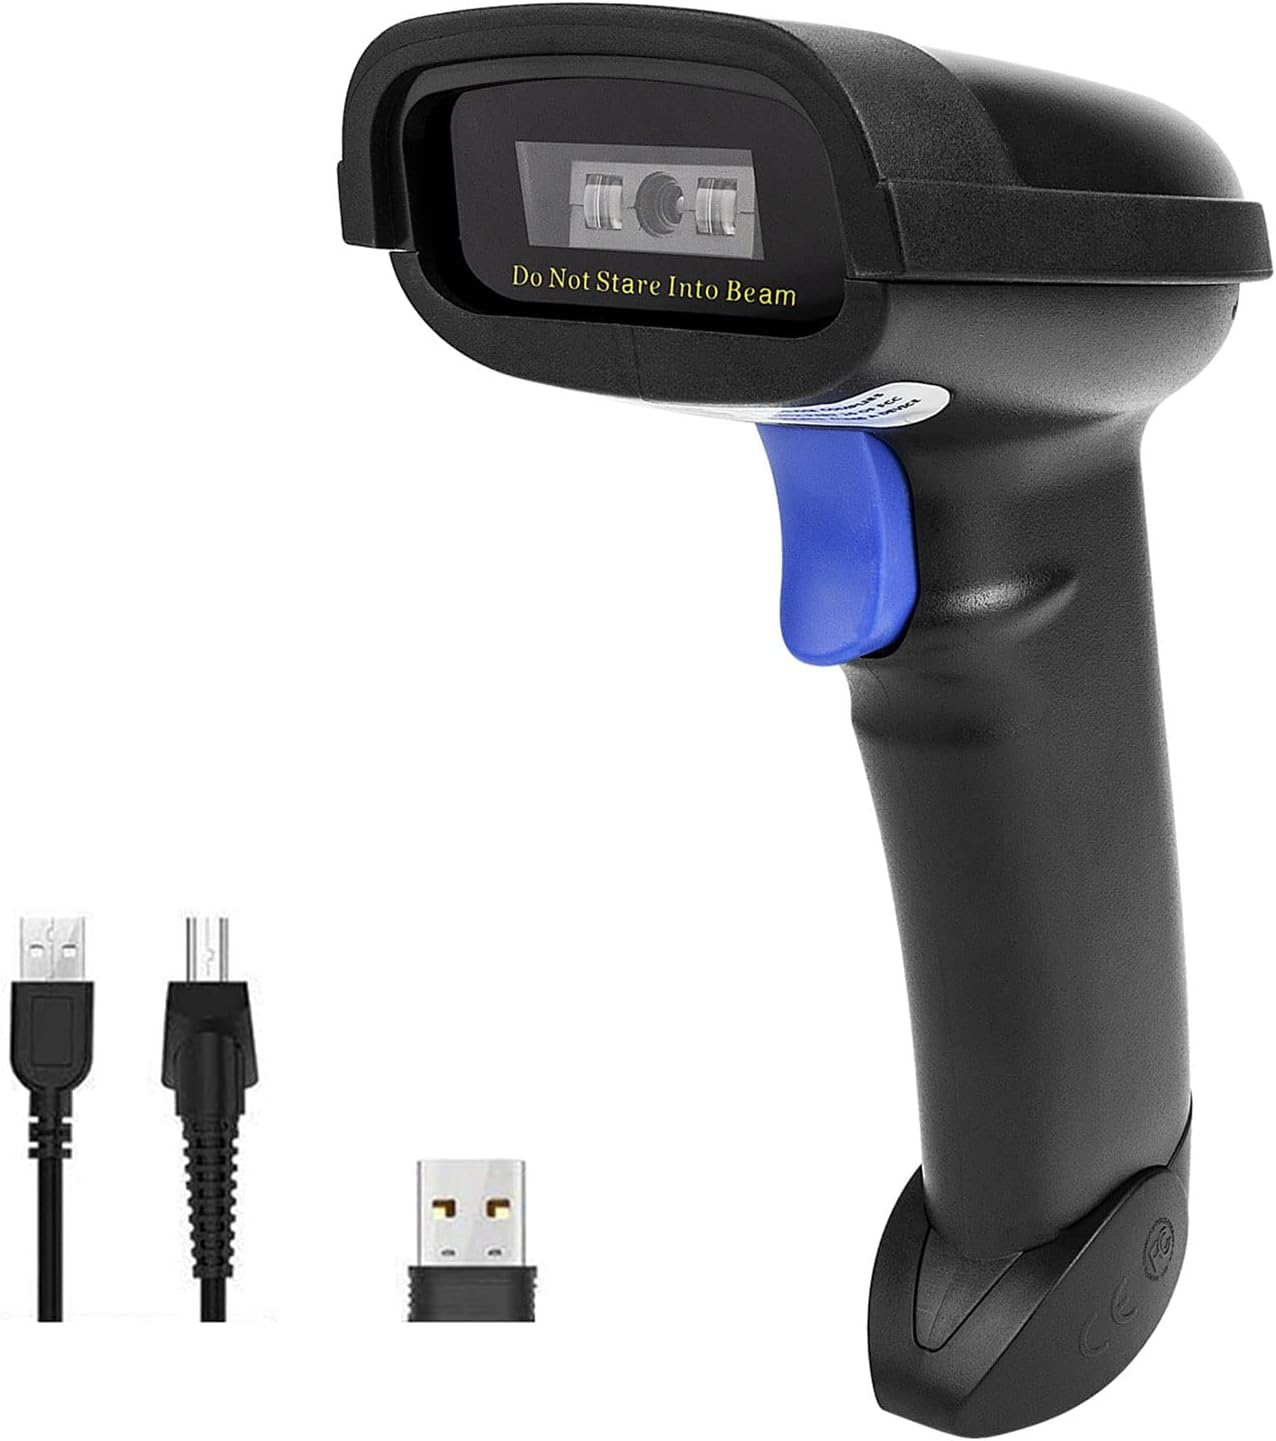
> Recently scanned items are kept in a barcode buffer and restored across sessions in the Item Addition Window. This buffer is saved together with your Saved Item Sets (Snapshots).
---
# Mobile Barcode Scanner (Scan to Desktop)
Scan shoebox barcodes from your phone, review a persistent queue, and add confirmed items to RestocksAIO desktop.
> Your phone camera can scan EAN and UPC labels without a separate laser scanner. Camera support and permission behavior depend on the mobile browser.
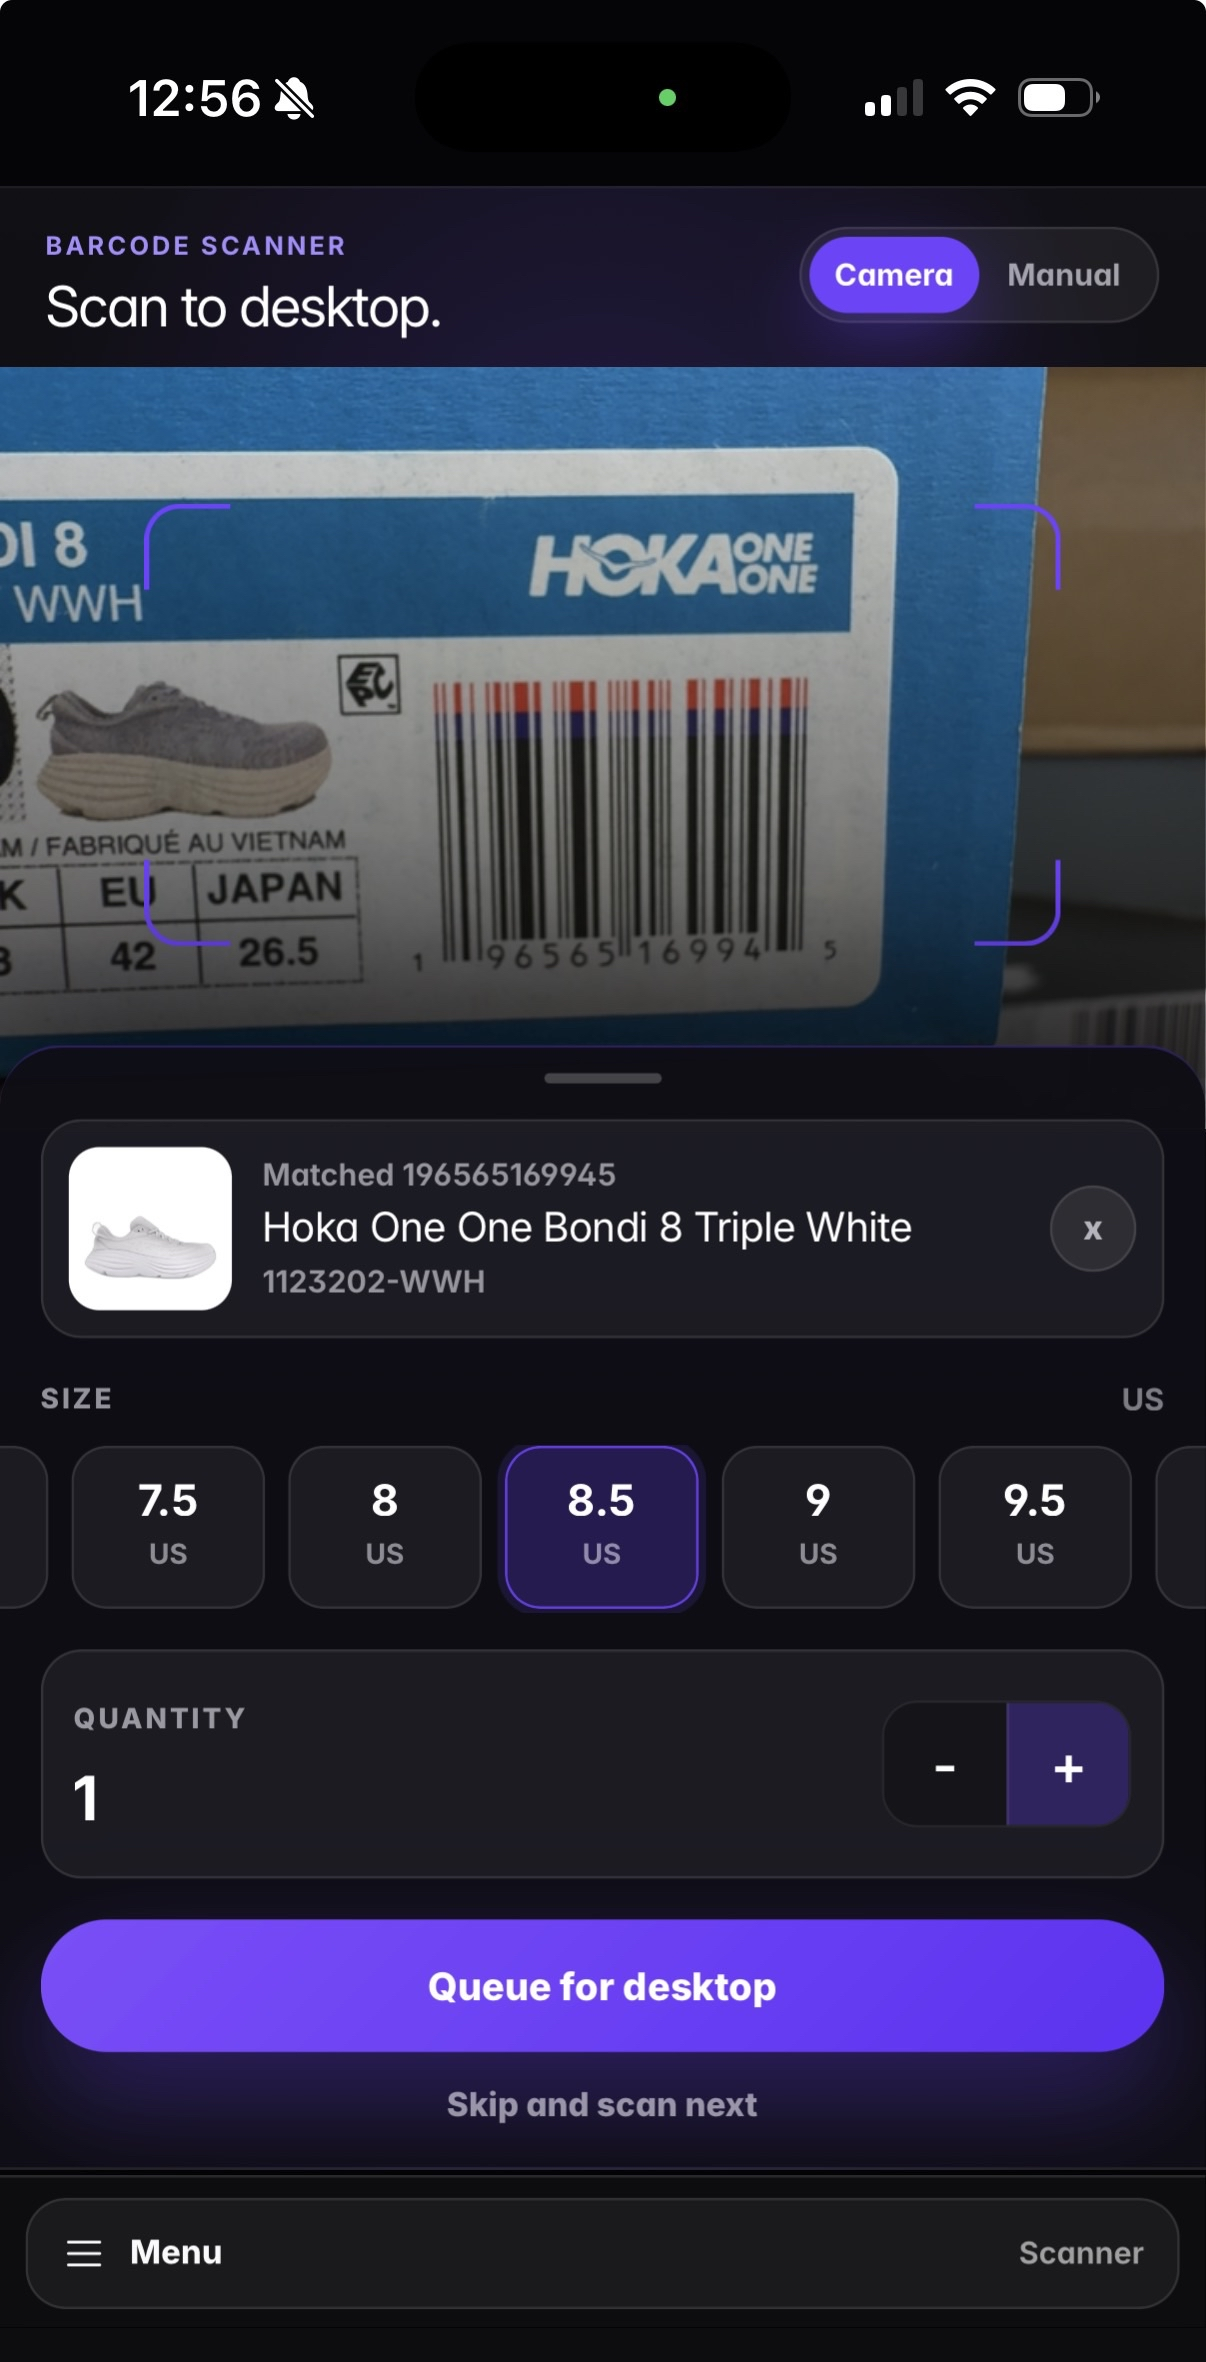
*Scan on your phone, confirm the match, and queue the item for RestocksAIO desktop.*
The mobile scanner lets you intake stock with your phone while RestocksAIO is open on your computer. The website stores queued items on the phone and removes an item only after the desktop confirms that it was added to the Item Addition collection.
## Before you start
1. Update and open **RestocksAIO V4** on your computer, then sign in.
2. On your phone, go to **restock.gg/scanner** and sign in with the same account.
3. Check the connection banner. It must say **Desktop connected** before you send the queue.
> If the banner says **Desktop offline**, the account is signed in on the website but no desktop instance is connected. Open RestocksAIO V4, confirm that it is signed in, and tap **Check again**.
If the banner says that an update is required, install the latest desktop version first. Verified remote scans require acknowledgement support in both the bridge and desktop client.
## Scanning
The scanner has two input modes:
* **Camera** (default): Point the phone at the shoebox barcode. The scanner confirms two close reads before looking it up, which reduces accidental matches. It remembers the selected rear camera when the browser exposes camera device information.
* **Manual**: Type the EAN or UPC into **Manual barcode** and tap **Match**. Use this for a damaged label or to verify a barcode supplied by another operator.
The camera stops while you use manual entry, review a matched product, or open the queue. This avoids leaving the camera active when it is not needed.
When a barcode is found, the match card shows the barcode, product name, SKU, product image when available, and the size conversions returned for that exact label.
## Picking size and quantity
The barcode's own size is selected first. For example, a women's US label may also show its men's US and EU equivalents.
* **Size**: Keep the barcode size unless the physical label is incorrect. Tap **Choose another size** to reveal the product's other sizes; the scanner warns when you override the barcode value.
* **Quantity**: Use the minus and plus controls to set 1 to 999 units.
Tap **Queue for desktop** when the match is correct. Exact matches for the same product, size region, and size are consolidated by increasing their quantity. Tap **Skip and scan next** to discard the current match.
## The queue and desktop confirmation
Queued items are saved in the phone browser, so a refresh or interrupted session does not discard unsent work. Each item keeps the same scan ID when retried, which lets the connected desktop recognize an uncertain retry instead of adding it again.
Before sending, open the queue to adjust quantity, review size, or remove an item. Then tap **Send to desktop**.
* **RestocksAIO confirmed** means the desktop accepted the scan and added it to the Item Addition collection.
* A failed or unconfirmed item stays in the queue with its specific error. Reconnect or update the desktop as instructed, then retry it.
* If the connection drops during delivery, do not recreate the item. Retry the existing queued item so it uses the same scan ID.
On the desktop, remotely scanned rows follow the same canonical product and size identity rules as local barcode scans. Processing failures are also recorded under **Barcode Scanner** in Error Manager. See [Barcode Scanning](/features/inventory/barcode-scanning) and [Adding Items](/features/inventory/adding-items) for the desktop workflow.
> The phone queue is browser-local. Clearing site storage, using private browsing, or switching browsers can remove or isolate it.
---
# Confirm Sales
Set up manual or automatic confirmation of your sales.
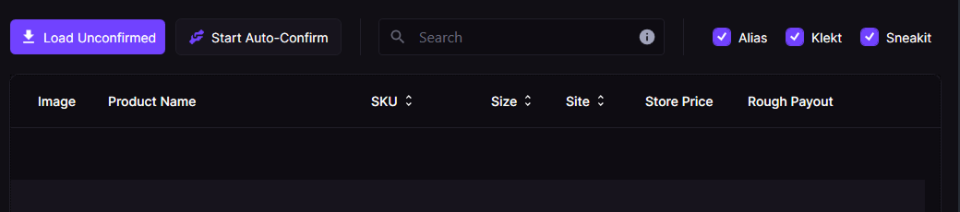
For an overview of automatic and manual sale confirmation, see the [Confirm Sales feature page on restock.gg](https://restock.gg/features/confirm-sales).
You have two ways to confirm your sales:
* **Manual Confirmation** – Click **"Load Unconfirmed"** to manually approve or decline pending sales.
* **Auto-Confirm** – Click **"Start Auto-Confirm"**, and the bot will automatically confirm pending sales every **5 minutes** for the platforms you’ve enabled (top right).
> If you sell on **Alias**, we highly recommend keeping **Auto-Confirm** enabled. Alias sales can be canceled by the buyer at any time until confirmed. By running the monitor, sales will be automatically accepted every **5 minutes**, preventing buyers from backing out.
---
# Notifications & Logs
Understand in-app notifications, errors, and event logs.
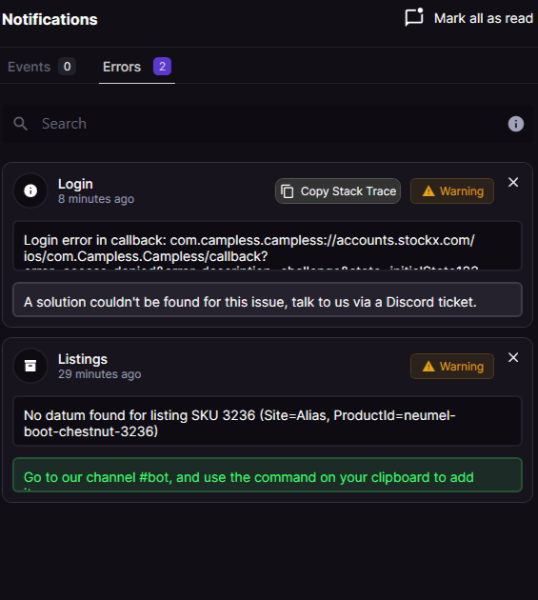
*The notifications panel (bell icon) has two tabs: Events (background activity) and Errors (exceptions with optional solution text and a Copy Stack Trace button).*
RestocksAIO provides real-time notifications for successes, warnings, and errors, plus an events feed to track background activity.
## Notifications
You’ll see context-aware snackbars at the bottom-right for actions like saves, downloads, or errors. Typical messages include:
- **Success**: confirmations when actions complete.
- **Processing**: long-running operations (e.g., loading listings).
- **Error**: actionable messages with short hints.
> If a message references a specific feature (e.g., PoD, Price Comparator, Cookie Importer), check the corresponding page for detailed steps.
## Error log
The error log aggregates recent exceptions with a short description. Use it to:
- Identify which feature failed (Bricker Mode, Sales, Actions, etc.).
- Copy the message if you need to open a support ticket.
- Cross-reference with our **Errors** section for fixes.
- [Errors](https://docs.restock.gg/problem-solving/errors): Error explanations and solutions.
## Events
Events record major background actions like task state changes, sales detections, or scheduled pickups. This helps you audit what happened while you were away.
## Sale notifications: category field
Bricker Mode sale notifications (Discord and Telegram) include a **Category** field that indicates which bucket the sale came from:
- **Resale** — standard flat-fee listing.
- **Direct** — StockX Buyer-Direct Seller sale.
- **Consign** — consignment / Flex sale.
On Discord the category appears as a dedicated embed field labeled **Category**. On Telegram it appears as a `Category: ` line in the message. This replaces the previous yes/no "Is Consign" indicator, so you can tell Direct and Resale sales apart at a glance.
---
# File Storage Locations
Where RestocksAIO saves files and data on your machine.
RestocksAIO saves data in a working directory (StartupPath) next to the app. Below are the key folders and files created by different features.
## Folders
- **Delivery PDFs/** – Proof of Delivery (PoD) files from carriers. One PDF per tracking number.
- [Proof of Delivery (PoD)](https://docs.restock.gg/problem-solving/tutorials/proof-of-delivery-pod): Learn how to download and access Proof of Delivery documents for your shipped orders.
- **Labels/** – Generated labels. Sites may create subfolders (e.g., `Labels/StockX/`). Files can be PDF, GIF, or HTML depending on the site.
- [Generate Labels](https://docs.restock.gg/features/functions/generate-labels): Create shipping labels efficiently.
- **Sales/** – CSV exports created from the Sales and analytics flows (e.g., `all_sales.csv`).
- [Sales](https://docs.restock.gg/features/sales): Monitor payments, profits, and shipments across all sales channels.
- **Profiles/** – One JSON per saved account/profile.
- **DatabaseBackups/** – Encrypted database backups with timestamped filenames.
> If you can’t find a recent export, sort the working directory by “Date modified” to surface the most recent folders/files (e.g., Delivery PDFs, Labels, Sales).
## Files at the root (working directory)
- `database__mp.enc` – Main encrypted database.
- `invoice_presets.bin` – Saved Invoice Dialog presets (languages/labels/toggles).
- `invoice_profiles.bin` – Saved billing profiles for invoices.
- `proxies.bin` – Saved proxy groups.
- `tasks.bin` – Saved tasks configuration.
- `actions.bin` – Saved Smart Actions configuration.
- `fees.bin` – Preloaded fee settings.
- `viewed_items.bin` – Recently viewed cache for research.
## User-chosen export paths
Some exports are saved where you choose via a file picker:
- CSV templates: `listings_import_template.csv`, `inventory_import_template.csv`
- CSV exports: `exported_items.csv`, `listing_errors.csv`, other ad‑hoc exports
These do not live in the working directory unless you point the file dialog there.
---
# Bulk Listing Mode
Best practices for creating and managing large batches of listings.
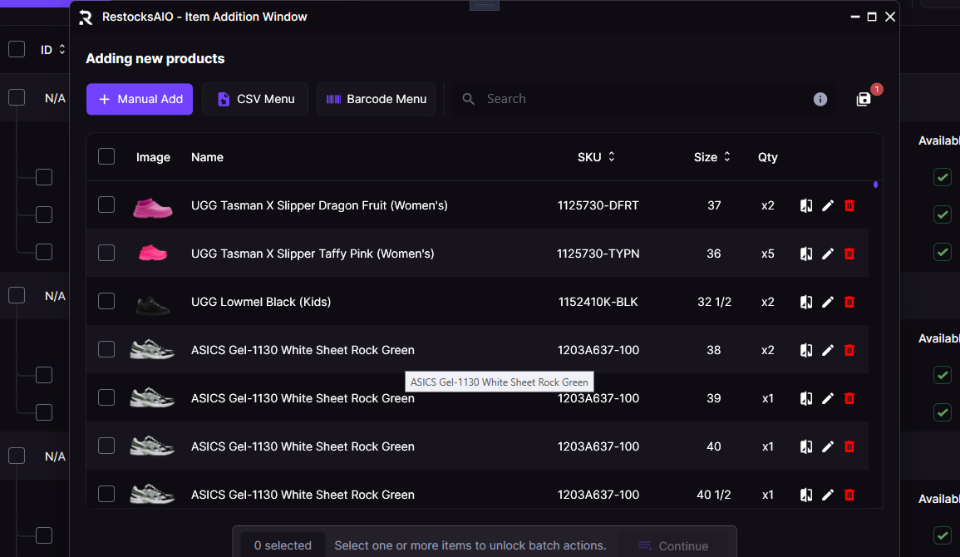
*The Item Addition window is the entry point for bulk listing — add products manually, via CSV, or by scanning barcodes.*
Use Bulk Listing Mode to create, edit, or delete many listings efficiently. If you’re working from Item Addition or CSV Import, you may prefer to follow the Inventory docs below—this page is a focused overview.
For a high-level overview of listing at scale, see the [Bulk Listing Mode feature page on restock.gg](https://restock.gg/features/bulk-listing-mode).
## Entry points
- **Item Addition**: Add items, then choose **Inventory + Listing** or **Quick List**.
- **CSV Import**: Prepare a CSV and import to build large sets fast.
- [CSV Import](https://docs.restock.gg/features/inventory/csv-import): Bulk-upload items via spreadsheet for quick inventory updates.
- [Adding Items](https://docs.restock.gg/features/inventory/adding-items): Learn how to add products to your inventory or list them for sale.
## Quick List vs Inventory + Listing
- **Quick List**: Creates listings without adding to Inventory. Fastest path for uploads; you can link later.
- **Inventory + Listing**: Adds items to Inventory and creates linked listings—ideal for ongoing tracking and analytics.
## Tips for large batches
- **Set LP/MP in your CSV** to enable automatic Bricker tasks creation where supported.
- **Group similar items** to simplify editing common fields (price, VAT, status).
- **Validate sizes and brand sizing** to avoid mismatches later.
- **Use Price Comparator** to fine-tune pricing before upload.
- [Price Comparator](https://docs.restock.gg/features/item-analysis): Compare prices, payouts, and sales across sites.
## After upload
- Use **Compare** in Item Addition to reconcile CSV vs live listings.
- Optionally create **Bricker Mode tasks** for matched listings.
## Bulk pricing and editing
After your listings are live, two purpose-built dialogs let you adjust prices in bulk:
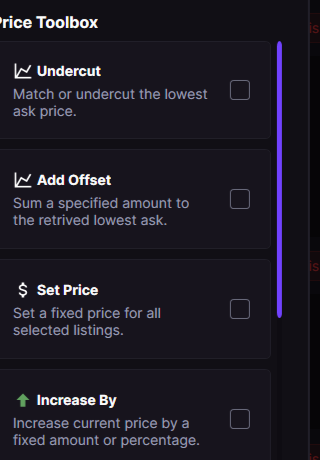
*The Price Toolbox applies one rule across every selected listing: Undercut, Add Offset, Set Price, Increase By, Decrease By, or Extend Expiration.*
Price Toolbox actions:
- **Undercut / Add Offset**: Price selected listings against the current market with an optional offset.
- **Set Price**: Push one exact price to every selected listing.
- **Increase By / Decrease By**: Move current prices by a fixed amount or percentage.
- **Extend Expiration**: Re-send the current price without changing it so supported marketplaces refresh the listing's expiration timer. Use it when listings are near expiry but the price is already correct.
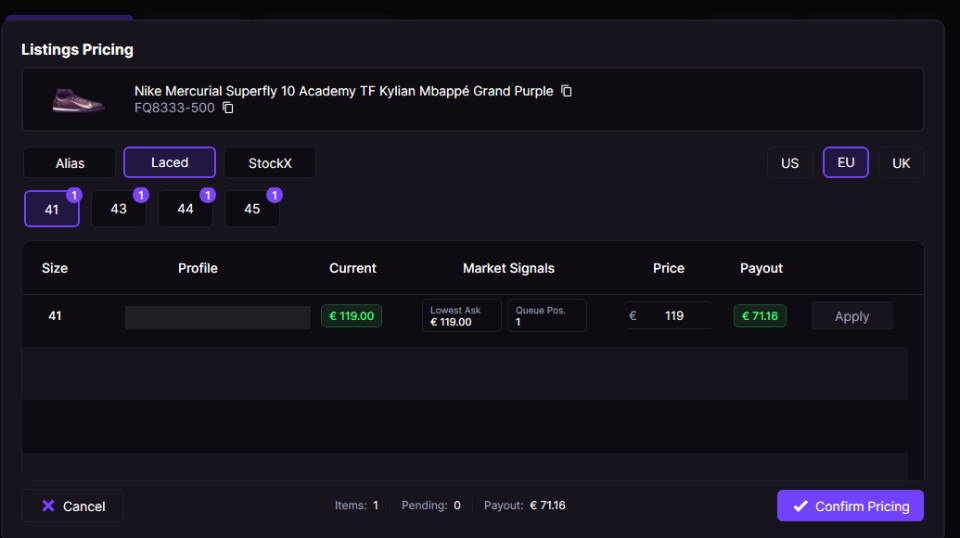
*The Pricing Window opens a per-size, per-site grid for fine-grained pricing — see Lowest Ask and Queue Position from Market Signals before pushing a final price and payout.*
---
# Functions
Explore additional tools and features to enhance your selling experience.
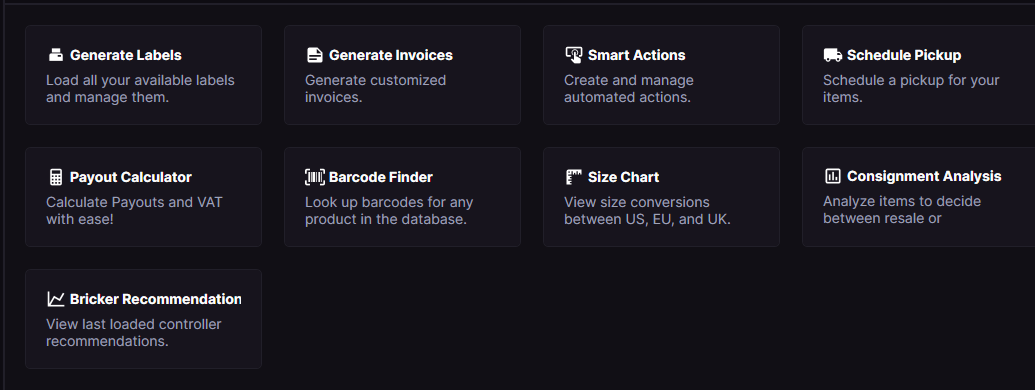
*The Features tab groups every helper tool in one place — labels, invoices, calculators, barcode search, size chart, and more.*
- [Generate Labels](https://docs.restock.gg/features/functions/generate-labels): Create shipping labels efficiently.
- [Generate Invoices](https://docs.restock.gg/features/functions/generate-invoices): Speed up your invoice creation.
- [Smart Actions](https://docs.restock.gg/features/functions/smart-actions): Smart Actions let you create your own automated workflows.
- [Schedule Pickup](https://docs.restock.gg/features/functions/schedule-pickup): Arrange bulk item pickups.
- [Barcode Search](https://docs.restock.gg/features/functions/barcode-search): Search items by name or SKU to view sizes and barcodes for easy copying/export.
- [Calculator](https://docs.restock.gg/features/functions/calculator): Quick Payout and VAT calculators to price accurately.
- [Size Chart](https://docs.restock.gg/features/functions/size-chart): View and convert sizes across regions for any product.
---
# Generate Labels
Create shipping labels efficiently.
For a high-level overview of bulk shipping label creation, see the [Label Generator feature page on restock.gg](https://restock.gg/features/label-generator).
## Where to find the Label Dialog Window?
You can access the Label Dialog Window from the **Features tab** in the tool.
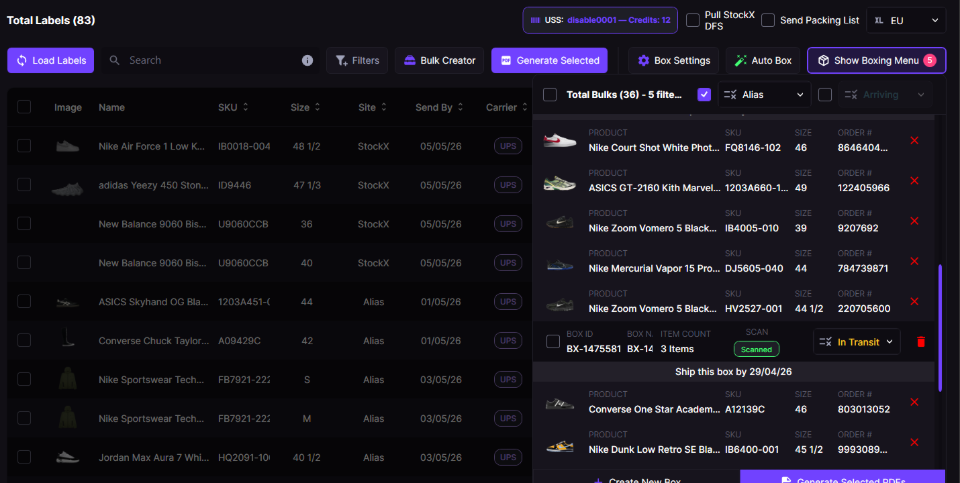
*The Label Dialog with labels loaded and Bulk Creator mode active — toolbar exposes Filters, Bulk Creator, Generate Selected, Box Settings, Auto Box, and Show Boxing Menu.*
## Get Started
After clicking **‘Load Labels’**, all your available labels will load into the system. From here, you can:
* **Generate Labels Individually**: Create labels one by one for specific items.
* **Manually Create Bulk Boxes**: Use the **‘Bulk Creator’** button to select items and group them into a single box. For a detailed walkthrough, check out our guide \[here].
* **AI Boxing Algorithm**: Use the **‘Auto Box’** button to automatically sort items into boxes based on your settings in the **‘Box Settings’**.
### StockX Electronic / Clothing Bulk-Shipping
Find out about shipping different types of items together [here](/problem-solving/tutorials/how-can-i-ship-electronics-sneakers-t-shirts-and-all-type-of-stockx-sales-in-a-bulk-shipment).
### StockX Request Ship Extension
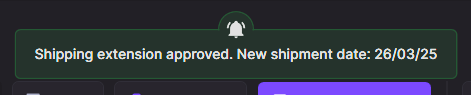
You can request ship extensions from the tool. Select the item, right click, and click 'Request Ship Extension'.
If the ship extension is accepted, you will be granted a success message, and the date will be updated in the item.
## AI Boxing Algorithm
The **AI Boxing Algorithm** will calculate the boxes based on your settings and automatically create them for you.
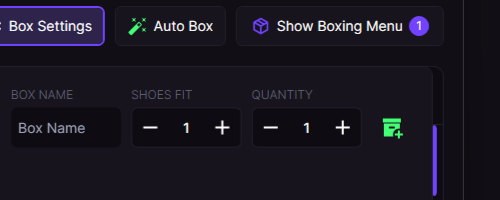
*Inline Box Settings popup in the Label Dialog toolbar — set Box Name, Shoes Fit, and Quantity, then save with the green plus button.*
After **Auto Box** runs, the algorithm proposes a shipment with the items it grouped together. Review the box contents and click Create Shipment to confirm.
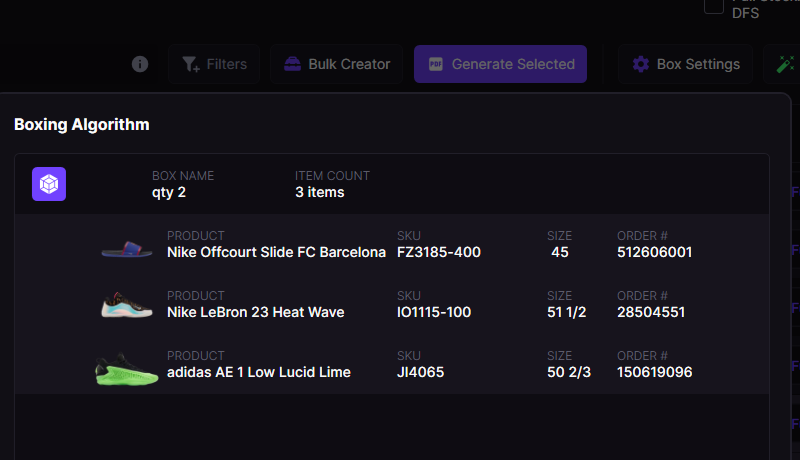
*The Boxing Algorithm result — for each suggested box, see the Box Name, Item Count, and a per-item breakdown with Product, SKU, Size, and Order #.*
Select the items you want to pack and click **‘Auto Box’.** The tool will automatically sort these items into boxes, and you can manage them on the **‘Show Boxing Menu’** panel. Here you can find:
* **Box Status**: Like individual items, each box has its own status (e.g., Arriving, In Hand, Packed).
* **Shipment Deadline**: The tool calculates a _“Ship this box by…”_ date by checking the items inside and displaying the earliest deadline.
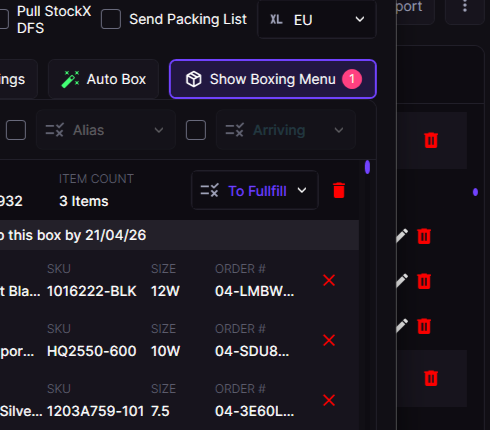
*Boxing Menu*
## USS (Scanuss) Package Scanning
The Label Dialog has a built-in integration with **USS (Scanuss)** for package-scanning UPS shipments. After generating a label you can right-click the row → **Send to USS** (or click the per-row Scan pill) to have USS handle scanning and dispatch.
See [USS (Scanuss) Package Scanning](/features/functions/uss-package-scanning) for the full guide on linking your account, eligibility, regions, credits, and status pills.
## Filtering & Status
You can filter all labels—individual items or grouped into boxes. \
Easily update their status and use filters to sort them.
## Label example
The label contains indicators on each page so you know what page refers to what label. Also contains a description with name, style code, size, and with the QR of the sale ID, which the selling site uses to scan your sale faster.
---
# USS (Scanuss) Package Scanning
Submit your UPS labels to USS (Scanuss) for package-scanning verification.
USS (provided by **LIMITED STORE, s.r.o.** at [scanuss.com](https://scanuss.com)) is an external package-scanning service integrated directly into the **Label Dialog**. After you generate a UPS label, you can send it to USS to have the shipment's scan signal sent to the carrier on your behalf.
## What is a USS scan?
When you sell on platforms like StockX or Alias, you typically have **2 business days** to ship before your order is flagged as late. USS extends that window to **5–7 business days** by registering your UPS label with the carrier ahead of physical dispatch.
* **How it works** — USS sends a data signal tied to your label to the carrier's system, which the platform reads as confirmation your shipment is in motion.
* **What you gain** — extra time to consolidate orders, source inventory, or arrange logistics without triggering a late-shipment penalty on your seller account.
* **What it is not** — a substitute for shipping. You are still required to physically dispatch the parcel within the deadline that follows the scan (see [Shipping deadlines](#shipping-deadlines) below).
## Where it lives in the tool

*The Label Dialog with the USS integration — note the USS pill in the top toolbar (link state + credit balance), the Scan pill column on each row, and the per-box Send to USS / Scanned indicators in the Bulk Boxes panel.*
The integration adds three things to the Label Dialog:
* A **USS header pill** at the top of the right panel showing your link state and remaining credits.
* A **Scan column** on each row, displaying a per-label USS status pill.
* New **context-menu actions** (right-click a row): _Send to USS_, _Refresh USS status_, _Open USS dashboard_.
> USS is a third-party service with its own [Terms and Conditions](https://scanuss.com). By using the integration you agree to those terms — most importantly, that you **physically possess the shipment** at the moment of scanning and will dispatch it within the deadline (see _Shipping deadlines_ below).
## Linking your account
USS is tied to your Discord account. Before you can submit any label you need to link RestocksAIO to USS.
1. Open the **Label Dialog** and look at the top of the right-hand panel — the strip labelled **USS:** with a `—` balance is the entry point.
2. Click the strip. Because you are not yet linked, the tool opens the USS Discord OAuth page in your default browser.
3. Authorize with the same Discord account you use to log in to RestocksAIO. USS sends a callback back to the tool once the OAuth flow completes.
4. Once linked, the header pill switches to show your **credit balance** and clicking it again refreshes the balance.
> USS uses your RestocksAIO Discord UID as the account identifier — the same account you log in with. There is no separate username/password.
> If the link callback does not fire (firewall, browser hijack, etc.), close and reopen the Label Dialog after authorizing — the tool will pick up the linked state on the next session refresh.
## Eligibility
A row can be sent to USS only when **both** of these are true:
* **Carrier is UPS** — USS only handles UPS shipments today.
* The row has a **valid tracking number** (not empty, not `untrackable`).
Rows that do not meet these conditions show a **No Tracking** or **Non-UPS** pill in the Scan column and cannot be submitted. If you bulk-select a mix of eligible and ineligible rows, the ineligible ones are skipped and counted in the confirmation dialog.
> USS prohibits use for **peer-to-peer transactions** (Vinted, eBay, Facebook Marketplace, etc. — anything sent directly to a consumer). The service is intended for logistics flows to platform verification centres only. Misuse can result in your USS account being blocked without refund.
## Sending labels to USS
You can submit either a **single row** or a **bulk selection**.
### From the Scan-column pill
Click the **Send to USS** pill on any eligible row. If you have multiple rows checked _and_ the row you clicked is one of them, the tool treats the action as a **bulk submit** for all checked rows. Otherwise it submits just the clicked row.
### From the right-click menu
Right-click any row (or a selection of checked rows) and choose **Send to USS**. The same single-vs-bulk rule applies: if more than one row is checked the action targets the whole checked set.
### Picking a region
USS needs to know which courier region to dispatch through (e.g. `UPS - Germany`, `UPS - Italy`). The tool loads the available regions from USS on first use and caches them.
* If only **one region** is available, it is selected automatically.
* If **multiple regions** are available, a small popup appears next to the pill/menu — pick the region you want.
### Confirmation
Every submission — single or bulk — opens a **confirmation dialog** showing:
* The number of labels being submitted.
* The selected region.
* The credit cost (USS charges **1 credit per label**).
* Your current available credits.
This dialog is mandatory: USS deducts credits per order, so the tool never submits without explicit confirmation.
After you confirm, the tool submits each row to USS and updates the Scan-column pill as responses come back. A snackbar summarises successes, failures, and any rows skipped for ineligibility or insufficient credits.
## Status pill values
The Scan-column pill reflects the current USS state for the row:
| Pill | Meaning |
|------|---------|
| **No Tracking** | The row has no tracking number — cannot be submitted. |
| **Non-UPS** | Carrier is something other than UPS — not supported by USS. |
| **Send to USS** | Eligible but not yet submitted — clickable to submit. |
| **Pending** | Submitted; USS has accepted the order and is waiting for handoff. |
| **Processing** | USS is processing the package. |
| **Scanned** | The scan signal has been sent successfully. Triggers a Discord/Telegram notification (see below). |
| **Shipped** | The package has been dispatched. |
| **Cancelled / Voided** | The order was cancelled or voided on the USS side. |
| **Failed** | Submission failed — check the snackbar for the reason. |
## Refreshing status
USS state lives on the USS server, not in your local database. The tool hydrates submitted orders when the Label Dialog opens, and you can also force a refresh:
* **Right-click → Refresh USS status** — re-fetches the latest status from USS for the selected rows. Works on any row that has a tracking number, even if you submitted it through a previous session.
* **Click the USS header pill** when linked — refreshes your credit balance.
When a row transitions from **Pending/Processing → Scanned** during the active session, the tool sends a notification through your **Labels Discord webhook** and **Telegram label-notification** channel (if configured). Orders that are already Scanned at the time of the initial dialog hydration do not re-notify.
## Shipping deadlines
USS requires that you physically dispatch every scanned shipment within a fixed deadline:
* **Alias** sales: **3 business days** (Saturdays count) from the scan.
* **All other platforms** (StockX, etc.): **5 business days** from the scan.
You can request a paid deadline extension directly from USS (charged at **0.5 credits per day**, paid in advance via the USS dashboard). Missing the deadline without an extension triggers a contractual penalty (0.5 credits per day late) and, on repeated violations, can lead to your USS account being blocked.
> The deadline starts the moment the scan signal is sent — that is, when the row reaches **Scanned** status, not when you click _Send to USS_.
## Credits, top-up & dashboard
* **Minimum purchase:** 3 credits. **1 credit = 1 scan attempt.**
* **Expiration:** unused credits expire **12 months** after purchase.
* **Refunds:** credits are non-refundable except for technical defects on the USS side. Rejections caused by platform/carrier API changes, IP detection, or account flags do **not** qualify for a refund.
* Click **Open USS dashboard** in the right-click menu — opens `scanuss.com/dashboard` in your browser, where you can buy credits, request deadline extensions, and review your full order history.
* The header pill always reflects your latest known balance; click it to force a refresh after topping up.
## Troubleshooting
| Problem | What to check |
|---------|---------------|
| _"USS regions not loaded yet"_ snackbar | The region list is fetched on link — wait a moment and retry; the tool will auto-retry up to 4 times. |
| _"Insufficient USS credits"_ | The bulk selection costs more credits than you have. Top up at scanuss.com/dashboard or reduce the selection. |
| _"No eligible UPS rows with tracking to submit"_ | None of the selected rows are UPS + have a non-empty tracking number. |
| Pill stays on **Pending** for a long time | Right-click → **Refresh USS status** to pull the latest state from the USS server. |
| Scan rejected by the marketplace / carrier | Per the USS T&Cs this is not refundable — platform-side patches, IP detection, and account flags are outside USS's control. |
---
# POD Downloader
Bulk-download Proof of Delivery PDFs from UPS, DHL, and DPD.
The **POD Downloader** is a standalone window for fetching **Proof of Delivery** PDFs in bulk straight from the carrier's website. Instead of pulling each PDF one-by-one for disputes or accounting, you paste a list of tracking numbers (or tracking URLs), choose a carrier, and the tool downloads every PDF into a single folder.
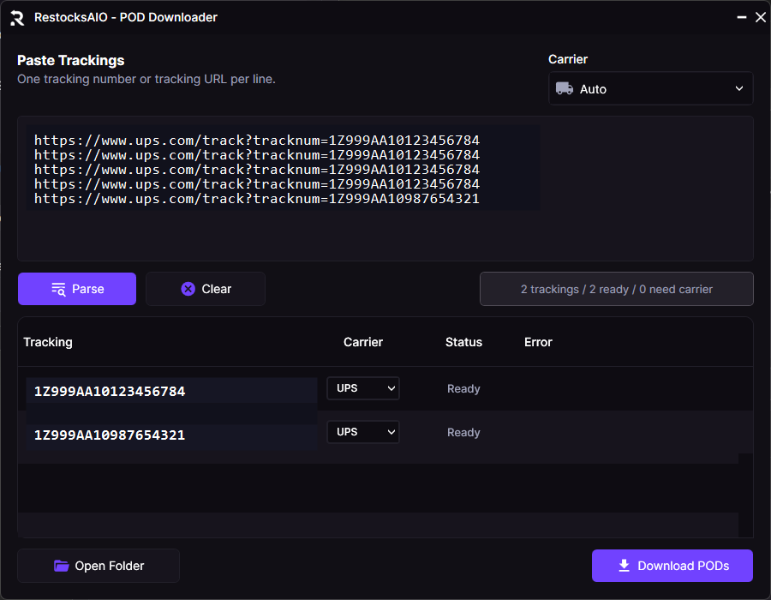
*The POD Downloader window — paste one tracking number or tracking URL per line, pick a carrier, parse, and click Download PODs.*
## Where to find it
You can access the **POD Downloader** from the **Features tab** in the main window (POD Downloader button under the Functions section).
## Supported carriers
The POD Downloader currently supports:
* **UPS**
* **DHL**
* **DPD**
Any other carrier will show **Needs carrier** in the row Status column and will be skipped during download.
## How to use it
### 1. Paste your trackings
Paste one tracking per line into the **Paste Trackings** textbox. Each line can be either:
* A bare tracking number (`1Z999AA10123456784`)
* A full carrier tracking URL (`https://www.ups.com/track?tracknum=1Z999AA10123456784`)
The parser extracts the tracking number from URLs automatically.
### 2. Pick a carrier mode
Use the **Carrier** dropdown in the top right:
* **Auto** _(default)_ — detects the carrier from the URL host or the tracking-number format.
* **UPS / DHL / DPD** — forces every line to be parsed as that carrier. Useful when you have raw tracking numbers without URLs.
### 3. Parse
Click **Parse**. The tool:
* Splits the textbox into lines and trims whitespace.
* Deduplicates by `carrier:tracking` (so pasting the same tracking twice is fine).
* Resolves each line into a row with a detected carrier.
The summary strip on the right shows a live count: _`N trackings / X ready / Y need carrier`_.
### 4. Adjust per-row carrier (optional)
Each row has its own **Carrier** dropdown. If a row was detected as the wrong carrier, or shows `Needs carrier`, pick the correct one inline — the row's status updates immediately.
### 5. Download
Click **Download PODs**. The tool walks every row that is **Ready** and:
* Calls the carrier's POD endpoint and saves the PDF.
* Updates the row's status as it goes (`Downloading` → `Downloaded` / `Saved` / `Failed`).
* Shows a final snackbar: _`PODs finished. Downloaded: X, skipped: Y, failed: Z.`_
### 6. Open the folder
Click **Open Folder** to jump straight into the destination folder in Windows Explorer.
## Where the PDFs are saved
PODs are written to a **`Delivery PDFs`** folder next to the tool's startup directory. Each file is named after the tracking number — `1Z999AA10123456784.pdf` etc.
The folder is created automatically the first time you download. Files already present in this folder are **not re-downloaded** — the row status switches to **Saved** instead, so you can paste the same list across multiple sessions without re-hitting carrier APIs.
## Status reference
| Status | Meaning |
|--------|---------|
| **Ready** | Row has a valid tracking + supported carrier — will be downloaded. |
| **Saved** | A non-empty PDF for this tracking already exists in the Delivery PDFs folder. |
| **Downloading** | The tool is currently fetching this row's PDF. |
| **Downloaded** | PDF was just saved. |
| **Needs carrier** | Carrier is `NaN` or unsupported — pick UPS, DHL, or DPD from the row dropdown. |
| **Invalid** | Tracking code is missing or `untrackable`. |
| **Failed** | Download failed — hover the row to see the error reason. |
## Tips
* **Mixing carriers in one batch is fine** — leave the Carrier dropdown on **Auto** and paste a mix of UPS/DHL/DPD URLs. Parse handles them per-row.
* **Re-runs are cheap** — a second click of Download PODs on the same list will only retry the rows that previously failed; everything else is already on disk and shows **Saved**.
* **Empty list?** Click **Parse** without any text to clear the rows, or use the **Clear** button to wipe both the textbox and the row list.
---
# Generate Invoices
Speed up your invoice creation.
> The Invoice Dialog Window only creates invoices for **PAID** sales. If you are looking at how to create invoices without missing sales every quarter, have a read here.
> If you want to sell in B2B, please follow our guide [here](/problem-solving/tutorials/how-to-do-proper-invoices). For any questions regarding the validity of your invoice, please talk to your accountant or tax advisor.
For a high-level overview of automated invoicing, see the [Generate Invoices feature page on restock.gg](https://restock.gg/features/generate-invoices).
## Where to find the Invoice Dialog Window?
You can access the **Invoice Dialog Window** from the **Features tab** in the tool.
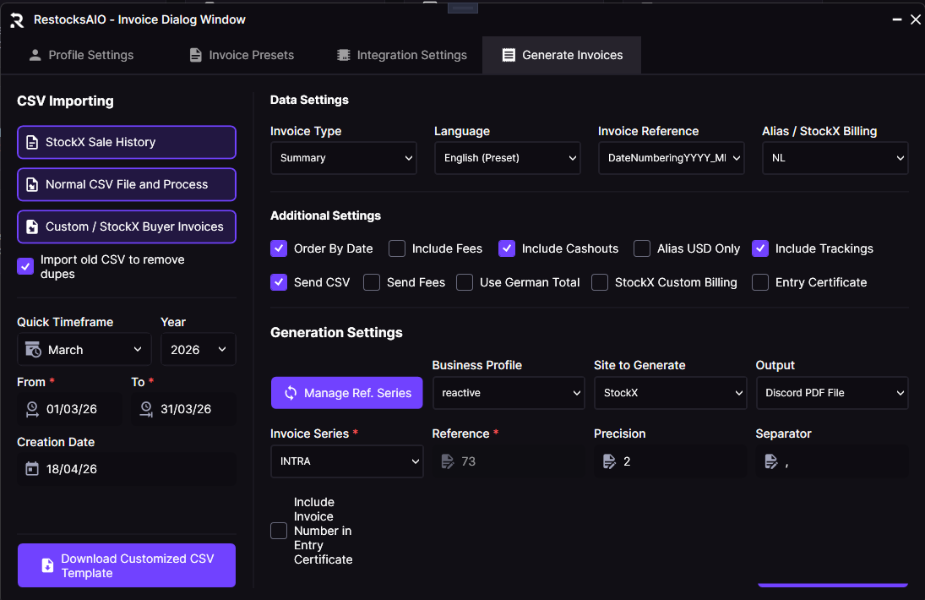
## Profile Settings
Profile settings is the first of the 4 tabs. \
Here you can create profiles containing your business information, which can be later selected when generating the invoice.
## Invoice Presets
The next tab is **Invoice Presets** (previously called "Invoice Settings"). \
Here, you can visualize default presets and edit them as you wish. This will be the language pack used on your generated invoice. Currently, we have the following presets: English, Español, German and Polish.
You can also toggle or modify if you want several dates to appear on your invoice.
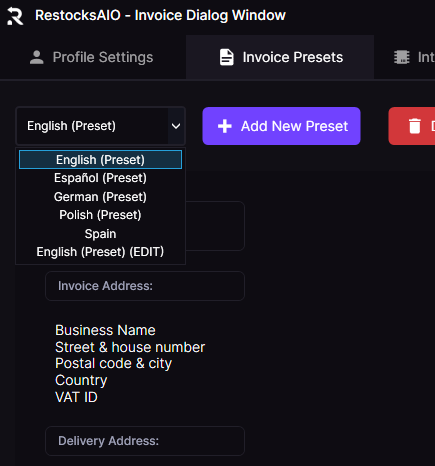
## Integration Settings
Users can set their favorite accounting platform to upload invoices automatically. \
Currently, we support LexOffice, SevDesk and Fakturownia.
## Generate Invoices
Here, you will find several settings, ways of importing, and generation settings to process your invoice.
### Creation Date
The **Creation Date** field (with the calendar icon) sits directly on the Generate Invoices panel, below the From/To range. It defaults to today's date and is applied to the invoices produced by the current generation run.
> Creation Date used to live inside Invoice Presets and was saved as part of the preset. It has been moved to the Generate Invoices panel so you can pick a fresh date per generation without editing a preset — useful when backdating invoices for a past period or aligning multiple batches to the same accounting date.
There are three ways of generating invoices:
* Normal Invoice Generation: This function creates invoices on the selected Selling Site according to the timeframe set by the user.
* StockX Sale History: Generate invoices for your StockX sales. The sales can be downloaded from this [page](https://stockx.com/buying/current) by clicking the VAT export button.
* Normal CSV File and Process: Once the CSV is exported after generation, you can modify it as needed and import it back to process your changes.
* Custom / StockX Buyer Invoices: Create custom invoices using our Customized CSV Template or generate StockX purchase invoices with the StockX historical buyer CSV file.
> Alias Invoice Generation works by looking at cashouts in your timeframe. Without cashouts, we cannot determine the EUR rate for your sales, so it's impossible to generate invoices.
>
> If you want USD invoices, these can be generated by selecting Alias USD Only.
### Invoice Types
We support different amounts of invoice generations, which might be available to use depending on the site:
* **Summary**: Merges all the sales under a single invoice
* **SummaryByCashout**: Extracts all the sales that pertain for each cashout and generates invoices per cashout. (StockX / Alias only)
* **SummaryByVatRates**: Extracts all the sales, and separates them into B2B and VAT sales. It will also follow the cashout system if the cashouts are included. (Alias only)
* **Individual**: An invoice per sale.
* **Simplified**: Single invoice containing an item which is the sum of all the sales totals.
### Custom Invoice Generation
You can download the template from the Invoice Dialog Window to generate custom-made invoices. On this template, you will find several columns that you will need to fill in to create these invoices.
You can merge items under the same invoice by setting the same invoice number.
.png)
---
# Entry Certificate
Generate Entry Certificates (Gelangensbestätigung) for intra-Community supplies within the EU.
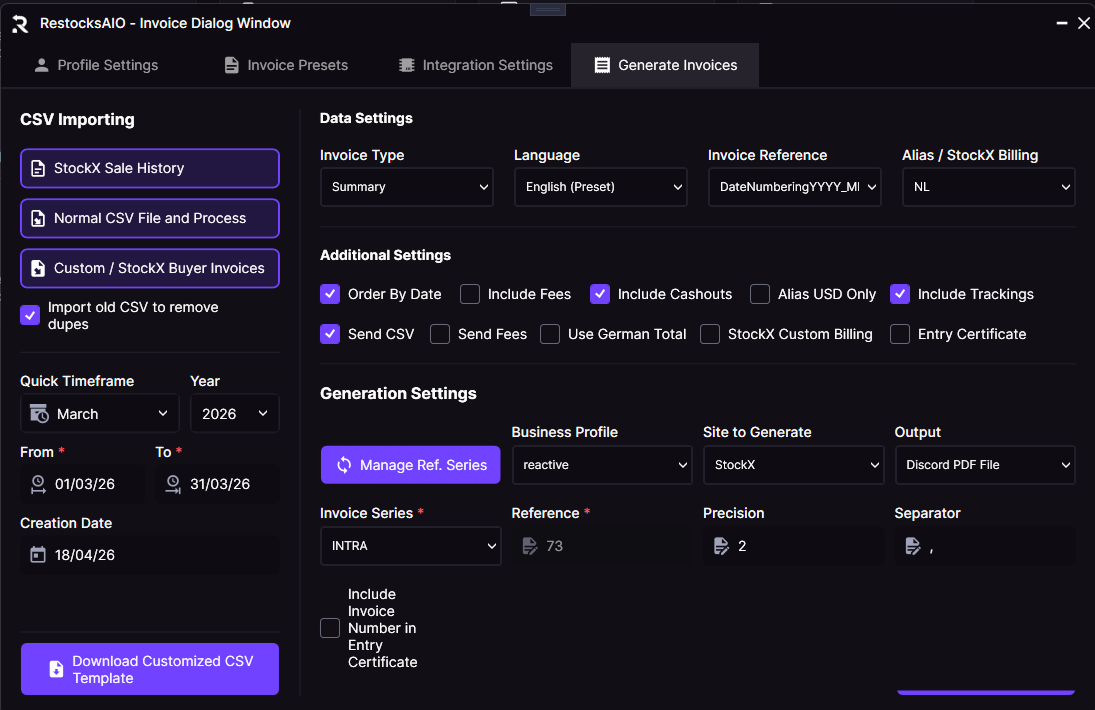
*Enable the Entry Certificate checkbox under Additional Settings in the Generate Invoices tab to include the Gelangensbestätigung PDF alongside your invoices.*
## What is an Entry Certificate?
An **Entry Certificate** (German: **Gelangensbestätigung**) is an official document required by German tax authorities to prove that goods have been delivered to another EU Member State as part of an intra-Community supply. This document is essential for VAT-exempt B2B transactions within the European Union.
When you sell items to platforms like StockX that receive goods in another EU country (e.g., Netherlands), you need this certificate to prove the goods crossed borders and qualify for VAT exemption under EU tax law.
> The Entry Certificate is particularly important for German sellers shipping to StockX's Netherlands authentication center, as it serves as proof that goods left Germany and entered another EU Member State.
## Why Do You Need It?
* **VAT Compliance**: Required to claim VAT exemption on intra-Community supplies
* **Tax Audit Protection**: Provides documentation if questioned by tax authorities
* **Legal Requirement**: Mandatory under German tax law (§17a UStDV) for B2B EU transactions
* **Professional Record-Keeping**: Maintains organized records of your cross-border sales
## What's Included in the Certificate?
The Entry Certificate generated by RestocksAIO includes:
### First Page (Certification)
| Section | Description |
|---------|-------------|
| **Supplier Information** | Your business name, address, and VAT ID |
| **Customer Information** | StockX's EU address and VAT ID (Netherlands) |
| **Certification Statement** | Official declaration of goods receipt |
| **Quantity** | Total number of items supplied |
| **Commercial Description** | Product categories (e.g., Sneakers, Slides) |
| **Month/Year of Receipt** | When goods were received |
| **Month/Year Transport Ended** | When transportation was completed |
| **Place of Entry** | EU Member State where goods arrived |
| **Date & Signature Fields** | For official signing |
### Attachment Pages (Itemized List)
A detailed table in landscape format listing every item:
- Line number
- Invoice number
- Order ID
- Product name
- SKU/Style code
- Size
- Delivery date
- Ship from/to countries
- Tracking number
## How to Generate an Entry Certificate
The Entry Certificate is automatically generated alongside your invoices when you use the **Generate Invoices** function.
### Steps:
1. Go to **Features** → **Generate Invoices**
2. Select your sales for the period you want to document
3. Configure your invoice settings as usual
4. Click **Generate**
5. The Entry Certificate will be automatically created and sent to your Discord webhook along with your invoices
> **Automatic Generation**: You don't need to do anything special! The Entry Certificate is automatically generated whenever you create invoices for StockX sales that involve intra-Community supplies.
### Output
The Entry Certificate is delivered as a PDF file named:
```
Entry_Certificate_YYYY-MM.pdf
```
Where `YYYY-MM` corresponds to the month and year of the invoice period (e.g., `Entry_Certificate_2025-01.pdf`).
## Requirements
To generate Entry Certificates, ensure you have:
* ✅ A complete **Invoice Profile** with your business details and VAT ID
* ✅ **Discord webhook** configured for receiving documents
* ✅ Sales data from platforms with EU delivery addresses (e.g., StockX)
## Example Use Case
**Scenario**: You're a German reseller who sold 50 pairs of sneakers to StockX in January 2025. All items were shipped to StockX's authentication center in Veldhoven, Netherlands.
**Result**: When you generate your January invoices, RestocksAIO automatically creates an Entry Certificate that:
- Lists you as the supplier with your German VAT ID
- Lists StockX Netherlands as the customer with their Dutch VAT ID
- Contains all 50 items with their individual details
- Provides the official certification text required by German tax law
This document can then be archived and presented to tax authorities if needed to prove your VAT-exempt intra-Community supplies.
> **Important**: Always consult with a tax professional regarding your specific VAT obligations. The Entry Certificate is a tool to help you comply with regulations, but tax requirements may vary based on your individual situation.
---
# Smart Actions
Smart Actions let you create your own automated workflows.
> ****THIS FEATURE IS FOR PREMIUM MEMBERSHIPS ONLY!****
## Where to the Smart Actions?
You can access the **Smart Actions Window** from the **Features tab** in the tool.
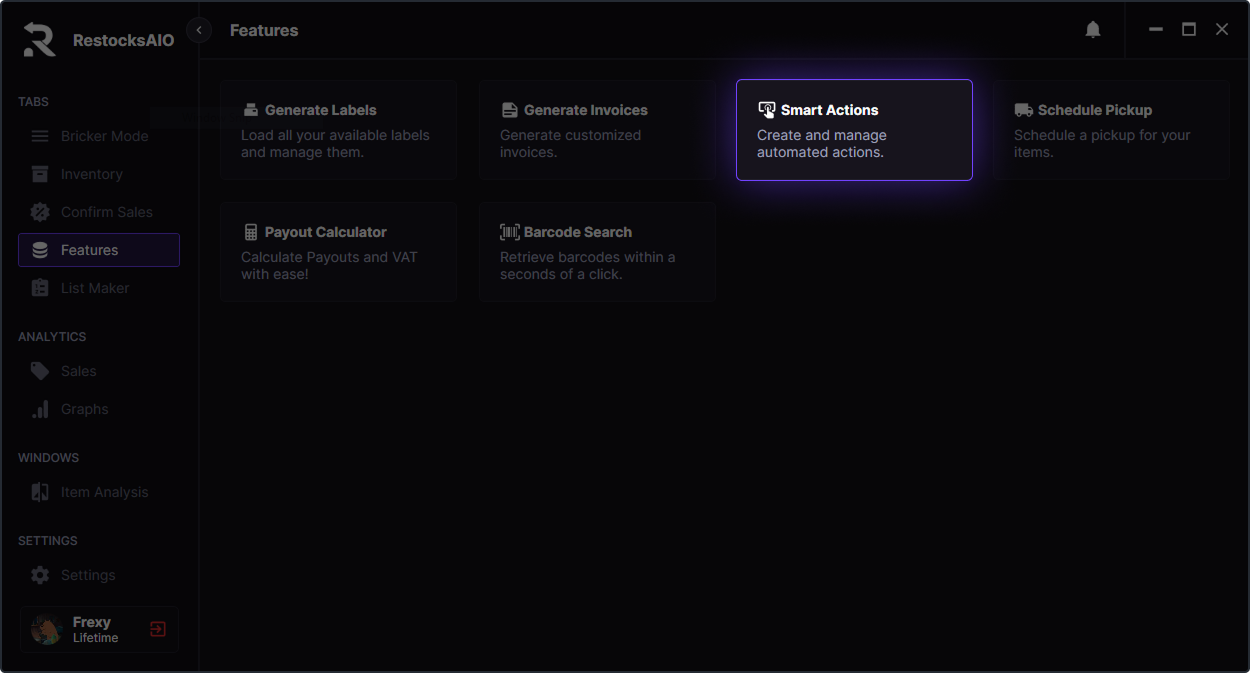
## How it works?
**Set a Trigger:** Decide when the action should activate.
* **Bricker Mode Sale** – Triggers when a Bricker Mode sale occurs.
* **Consignment** – Triggers when an item becomes available for consignment.
* **Status Change** – Triggers when a sale status updates.
**Apply a Filter:** Narrow down the conditions for the action.
* **Site Filter** – Choose a specific marketplace where a consignment slot is available.
* **Item Filter** – Select an item from your database, along with its size and quantity.
**Choose an Action:** Define what happens when the trigger activates.
* **Upload a Listing** – Automatically submits a listing to the selected platform.
* **Delete Listing Group** – Removes a group of listings from other platforms.
## Using Pre-Built Templates
Instead of creating a custom actions from scratch, you can use our ready Smart Action templates:
* **Wethenew Consignment Sniper** – Automatically lists an item on Wethenew when a consignment slot opens.
* **Delete Pair Listings** – Removes sold sizes from Bricker Mode to keep your listings up to date.
## Enabling the Action
After setting up your Smart Action, enable it by ticking the checkbox beside it.\
This is how one finished and active running Wethenew Consignment Action looks like:
.png)
> The Actions Window can be closed and it will stil be active.
---
# Schedule Pickup
Arrange bulk item pickups.
## Where to find the Schedule Pickup Window?
You can access the **Schedule Pickup Window** from the **Features tab** in the tool.
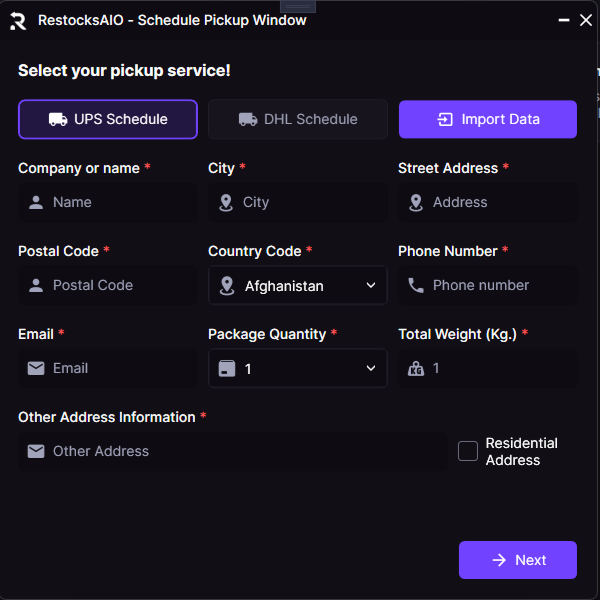
*The Schedule Pickup window — pick a carrier (UPS Schedule, DHL Schedule, or Import Data) and fill in the address, package quantity, and total weight.*
## How it works?
After entering your data and setting up your first schedule, the tool will auto-generate a reusable template for easy imports in the future.
.png)
> We bypass the fee that UPS has to generate a pickup, meaning that the pickups generated by RestocksAIO are free.
> Both **UPS** and **DHL Express** pickups are supported. Select your carrier in the Schedule Pickup window.
> **Other Address Information** is optional for UPS and DHL. For UPS, **Instructions to the UPS Driver** is also optional. Fill these fields only when the carrier needs extra delivery details, such as a door code, floor, or pickup note.
## My Pickups
Every pickup you book is saved to the **My Pickups** tab, so you always have a record of your scheduled UPS and DHL collections in one place.
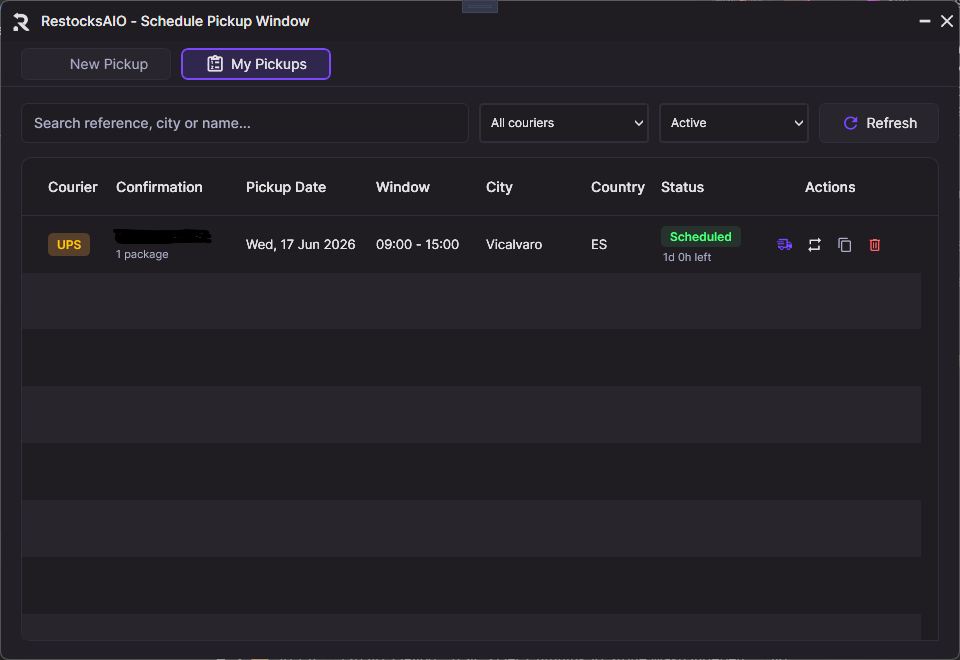
*The My Pickups tab — every scheduled pickup with its confirmation number, date, window, location, live status, and quick actions.*
Each row shows the courier, confirmation number, pickup date and time window, location, and a live **status** with how long is left before the pickup window closes (or whether it has already expired). Use the search box and the **courier** / **status** filters to quickly find a specific pickup.
The action buttons on each row let you:
* **Track** — open the carrier's tracking page for that pickup.
* **Repeat** — pre-fill the New Pickup form with the same details so you only need to choose a new date.
* **Copy** — copy the confirmation number to your clipboard.
* **Remove** — delete the pickup from your history.
> The **Repeat** action remembers your carrier, address, and package details — handy for re-booking the same collection without re-typing everything.
---
# Barcode Search
Search items by name or SKU to view sizes and barcodes for easy copying/export.
## Where to find the Barcode Search Window?
You can access the **Barcode Search Window** from the **Features tab** in the tool.
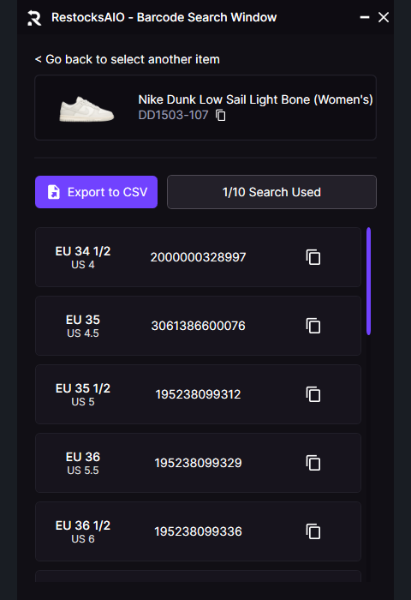
## How it works?
Look up items in our database by searching for their name or SKU. The tool will display all available sizes along with their barcodes, which you can quickly copy or export as a CSV file.
> Each user can make up to **10 searches per day.**
---
# Calculator
Quick Payout and VAT calculators to price accurately.
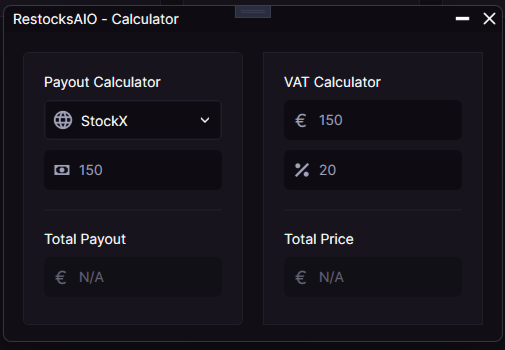
*The Calculator window combines a per-site Payout Calculator and a quick VAT Calculator.*
## Where to find the Calculator Window?
You can access the **Calculator** from the **Features tab** in the tool.
## Payout Calculator
Choose a site (StockX, Klekt, Alias, Laced, Wethenew, HypeBoost), enter a price, and instantly see the projected payout for that marketplace.
> Ensure your site/account settings (fees, VAT options, currencies) are configured so payouts match your expectations across the app.
## VAT Calculator
Enter an amount and a **VAT %** to see the total price with tax. Useful when pricing B2B or adjusting retail to a target after-tax amount.
---
# Size Chart
View and convert sizes across regions for any product.
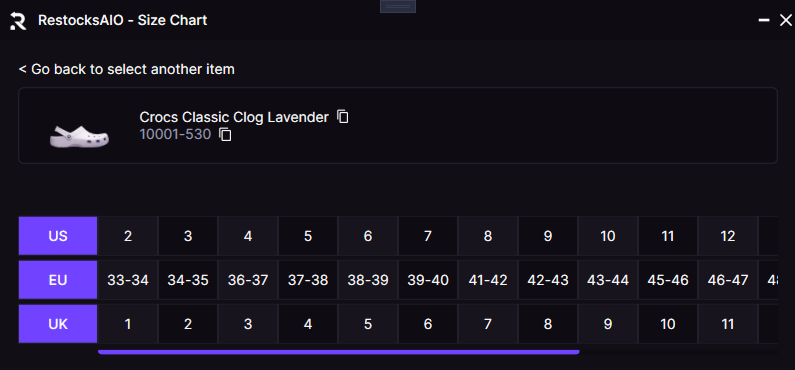
*The Size Chart window shows synchronized US, EU, and UK sizing for any selected product.*
## Where to find the Size Chart Window?
You can access the **Size Chart Window** from the **Features tab**. You can also open it from context menus in several places:
- Inventory: right-click an item and select **Open Size Chart**
- Listings: right-click a listing and select **Open Size Chart**
- Label Dialog: right-click an item and select **Open Size Chart**
## How it works?
Search for an item by name or SKU. After selecting an item, the window displays synchronized size rows for **US**, **EU**, and **UK** with a single horizontal scroll. The header shows the product image, name, and code so you always know which item you’re viewing.
### Tips
> Some brands have unique size scales or descriptors. If a size looks off, check the brand selection used elsewhere when listing or comparing to ensure consistency.
---
# Sales
Monitor payments, profits, and shipments across all sales channels.
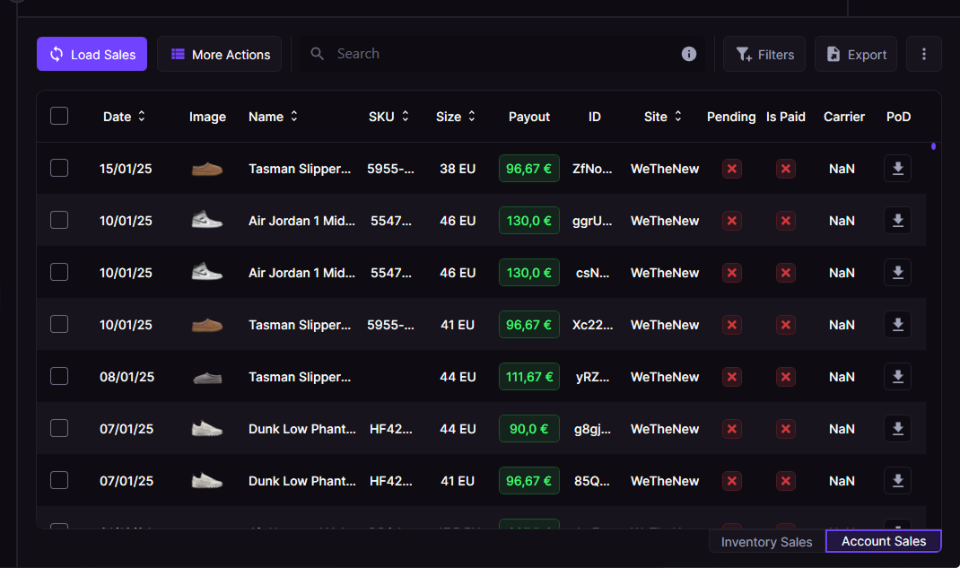
The **Sales** tab allows you to track and manage your sold items in two different ways. Use the toggle in the bottom-right corner of the Sales grid to switch views.
For an overview of payout and shipment tracking, see the [Sales & Payout Tracking feature page on restock.gg](https://restock.gg/features/sales-payout-tracking).
## **Account Sales**
This section retrieves sales data directly from your linked accounts. By clicking **"Load Sales"**, the tool scans all connected platforms and gathers sales information.
Once loaded, you can:
* Search and filter through your sales.
* View your **payout** for each transaction.
* Mark sales as **paid** or **pending payment**.
* Assign a **carrier** for shipment tracking.
* Download **Proof of Delivery (POD)** for completed sales.
> You can select multiple rows and use **Download PoD(s)** to fetch Proof of Delivery files in bulk. Supported carriers: **UPS**, **DHL**, and **DPD**.
For a full overview of PoD, see:
- [Proof of Delivery (PoD)](https://docs.restock.gg/problem-solving/tutorials/proof-of-delivery-pod): Learn how to download and access Proof of Delivery documents for your shipped orders.
## Inventory Sales
This section lists all inventory items with a **"Sold"** status. Unlike Account Sales, this allows for additional data storage, just like in your **Inventory tab**.
---
# Price Comparator
Compare prices, payouts, and sales across sites.
> Before using this feature, you need to setup:
>
> 1. [Preload Fees](/features/settings/preload-fees)
> 2. [StockX VAT settings and Alias settings](/features/settings/accounts/site-options)
> 3. [Proxy Settings](/features/settings/proxy)
> 4. [Accounts](settings/accounts/)
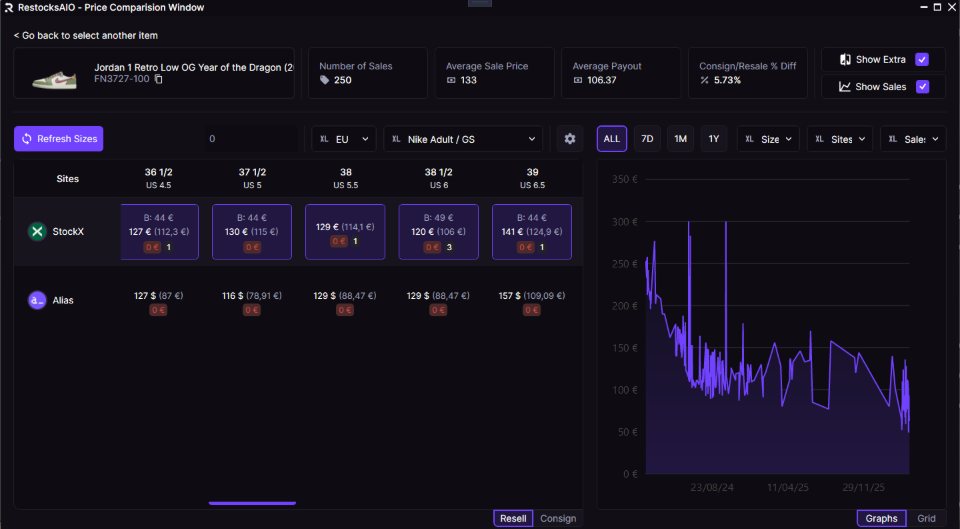
*The Price Comparator opens with your Recently Viewed items and a Trending Now shelf so you can jump back into research quickly.*
.png)
.png)
For a high-level overview of cross-site price and payout comparison, see the [Price Comparator feature page on restock.gg](https://restock.gg/features/price-comparator).
The **Price Comparator** is divided into three areas:
* **Common Data** – Item header with total sales, average sale price, and average payout.
* **Prices & Profit Grid** – Size-by-size comparison across your enabled sites. Profit chips appear when you enter a retail price.
* **Sales/Charts Panel** – Historical activity with filtering by platform, timeframe, and size.
> If the tool selected the wrong sizing, you can change it to your preferences.
> Right-click on any price in the Grid to instantly list the item on the selected platform.
> You can also easily hide sites in the settings by clicking on the **Cog** icon.
## Controls and views
* **Resell / Consign** – Toggle between resale and consignment views to adapt payouts and sites shown.
* **Graphs / Grid** – Switch between a time-series chart and a tabular grid.
* **Timeframe** – Quick filters: **ALL**, **7D**, **1M**, **1Y**.
* **Site selector (Charts)** – Focus charts on a single marketplace or view all.
* **Graph type** – Choose among **Sales**, **Asks**, or **Bids**.
* **Show Extra** – Reveals additional metrics like payout and profit chips in the grid.
* **Show Sales** – Displays sales rows with quantity, site, size, and price.
* **Full data** - Loads deeper StockX sales data per variant. Keep it enabled when you need more complete history; turn it off for a faster quick load.
* **Retail price input** – Enter retail to calculate and color-code per‑size profit.
* **Sizing controls** – Adjust preferred size type and brand sizing when needed.
> If the tool selected the wrong sizing, switch the size type or brand sizing to match your preferences.
## Actions & shortcuts
* Right‑click any row to quickly **List Item** on the selected platform or **Search Barcodes**.
* Use the gear icon to hide sites you don’t want to load/show.
* Home view includes **Recently Viewed** and **Trending Now** items to jump back into research.
## Sales panel
Review past sales from our database with filters by platform, timeframe, and size. Use the chart to visualize trends or switch to grid view for a sortable list.
---
# Consignment Diagnostics
Analyze consign vs resale performance with per-site averages, profits, and charts.
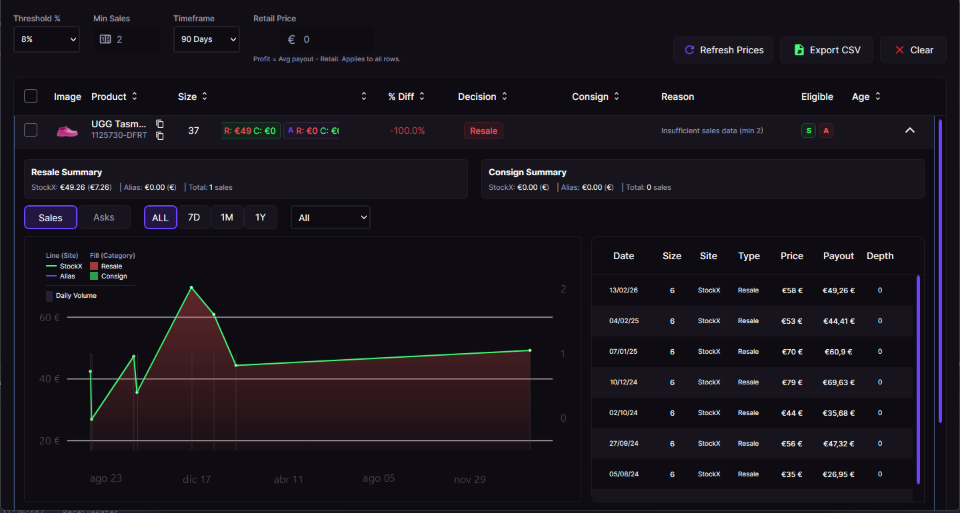
*Consignment Diagnostics compares Consign and Resale averages across supported sites and ranks decisions per row.*
Consignment Diagnostics helps you decide between Consign and Resale for each SKU/size using real sales history and current asks from supported sites.
> For a high-level overview, see the [Consignment Diagnostics feature page on restock.gg](https://restock.gg/features/consignment-diagnostics).
## What it shows
- StockX and Alias averages per category:
- StockX Resale Avg Payout / Consign Avg Payout
- Alias Resale Avg Payout / Consign Avg Payout
- Total sales (timeframe), per-row decision (Consign/Resale), and recommended site
- Profits computed from your Retail baseline
- Detail expander with site summaries, charts, and a day-by-day grid
## How profits are calculated
- Profits use average payouts, not store prices.
- Grid profits:
- Resale Profit = max(StockX Resale Avg, Alias Resale Avg) − Retail
- Consign Profit = max(StockX Consign Avg, Alias Consign Avg) − Retail
- In the detail expander, each site shows its own Avg Payout and its Profit (Avg − Retail) in parentheses.
- All payouts are normalized to your preferred currency before calculating averages.
## Controls
- Threshold %: Minimum improvement consign must have over resale to be recommended
- Min Sales: Minimum sales in timeframe to consider a signal “valid”
- Timeframe: 7D / 30D / 90D window for averages and totals
- Retail Price: Baseline used across all rows
- Placeholder: 0 (auto-clears on focus, restores if left empty)
- Profit = Avg payout − Retail. Applies to all rows
## Tips
- Use the detail expander to verify per-site averages and profits; the expander shows (Avg Payout) and (Avg Profit) for both StockX and Alias
- Copy buttons are available per row to quickly copy Product Name or SKU
- Export CSV to archive your analysis (includes baseline used and profits)
---
# Affiliate Program
Earn 40% recurring commission for 12 months on every customer you refer to RestocksAIO. Referrals are tracked through checkout and Stripe invoices, with payouts reviewed by our team.
*Your referral link and balances live in the affiliate dashboard.*
Share RestocksAIO and get paid every month for the customers you bring in. The affiliate program lives in your **[dashboard](https://restock.gg/dashboard) → Affiliate**. The full program rules are in the [Affiliate Program Terms](https://restock.gg/legal/affiliate-terms).
## Joining
Open **Dashboard → Affiliate** and accept the current version of the Affiliate Program Terms. Your referral link is activated as soon as the terms are accepted. There is no application step for the self-serve tier and no cost to join.
If the terms change materially in the future, you will be asked to accept the new version before your link is reactivated.
## Your referral link
Every affiliate gets a personal link in the format:
```
restock.gg/r/ra_xxxxxxxxxxxx
```
Anyone who opens the link gets a **60-day referral cookie**. If they complete a checkout inside that window, the referral is attributed to you. Copy or share the link directly from the affiliate dashboard, and use the **Share** page for ready-made banners.
## What your audience gets
Everyone who subscribes through your link gets **50% off their first month**. The discount is applied automatically at checkout when a valid referral is present.
## How referrals are tracked
1. A new visitor opens your referral link and checks out. This creates a **pending** referral tied to that checkout.
2. When the referred customer's **first invoice is paid** (their first real payment, via Stripe), the referral becomes **valid** and the first reward is created.
3. Every further paid invoice inside the earning window creates another reward.
4. Each reward stays **pending for 180 days** after its invoice, then clears and counts towards your payable balance.
> Free trials that never convert to a paid invoice don't earn until that first invoice is paid. Refunded, reversed, fraudulent or disputed invoices do not earn commission.
## Commission and payouts
* **Self-serve rate:** 40% of the amount actually paid on each eligible invoice, for **12 months** from the referral's first successful conversion.
* **Partner rate:** approved Partners earn 50% with no 12-month cap while the referral stays subscribed. Apply by email from the [affiliate page](https://restock.gg/affiliate).
* **Clearing:** rewards clear 180 days after their paid invoice to cover the standard payment-dispute window.
* **Minimum payout:** **EUR 25.00** of cleared balance before you can request a cash payout.
* **Review:** every cash payout and account-time credit is reviewed and completed manually by our team. Requesting a payout does not trigger an automatic transfer.
* **Payout methods:** cash (PayPal, bank transfer, or crypto) or account time credit.
Before your first cash payout you must fill in your payout details in the dashboard: individual or business status, legal name, country, invoice email and a tax or VAT identifier when applicable. We may ask for an invoice or receipt before paying a request.
The dashboard shows your **Payable balance**, **Pending rewards** (still inside the 180-day window), **Requested** (open payout requests), and **Earned – all time**, along with a table of your referred clients and recent payout requests.
> Referrals created before 15 July 2026 keep the former one-time 20% terms they were created under. Every new referral earns under the recurring terms above.
## Fair-use / fraud protection
To keep the program fair, referrals are automatically **canceled** when we detect:
* Self-referral (referrer and referred share an email address).
* A shared Stripe customer.
* A shared device fingerprint (e.g. claiming your own trial through a second account).
> Canceled referrals don't earn. Refer real, independent customers — attempts to refer yourself, cookie-stuff, run misleading claims or game the system are detected and voided, and can close your affiliate account.
---
# Settings
Configure and customize your account preferences and tool behavior.
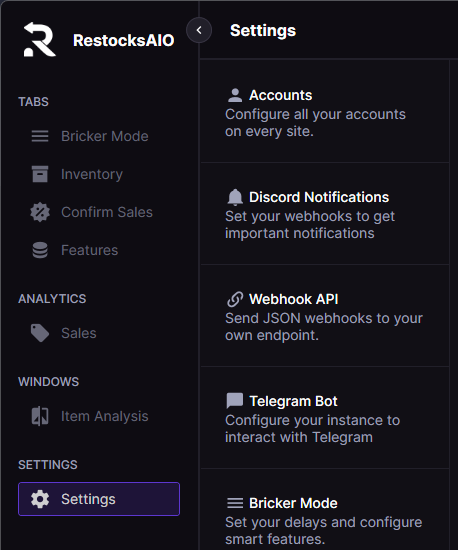
*The Settings hub groups Accounts, Discord, Telegram, Webhook, Bricker Mode, Proxy, Preload Fees, and Other settings in a single sidebar.*
- [Accounts](https://docs.restock.gg/features/settings/accounts): Manage your connected selling accounts.
- [Site Options](https://docs.restock.gg/features/settings/accounts/site-options): This guide covers all the customizable options available for each supported site.
- [Discord Notifications](https://docs.restock.gg/features/settings/discord-notifications): Configure your Discord alerts.
- [Telegram Bot](https://docs.restock.gg/features/settings/telegram-bot): Configure your Telegram bot for notifications and commands.
- [Bricker Mode](https://docs.restock.gg/features/settings/bricker-mode): Adjust your pricing automation.
- [Proxy](https://docs.restock.gg/features/settings/proxy): Set up proxy connections.
- [Preload Fees](https://docs.restock.gg/features/settings/preload-fees): Reduce bans and speed up operations with internal fee calculations instead of website queries.
- [Webhook API](https://docs.restock.gg/features/settings/webhook-api): Configure outbound webhook notifications to your own endpoint (Premium/Lifetime).
- [Other Settings](https://docs.restock.gg/features/settings/other-settings): Access additional configuration options.
---
# Accounts
Manage your connected selling accounts.
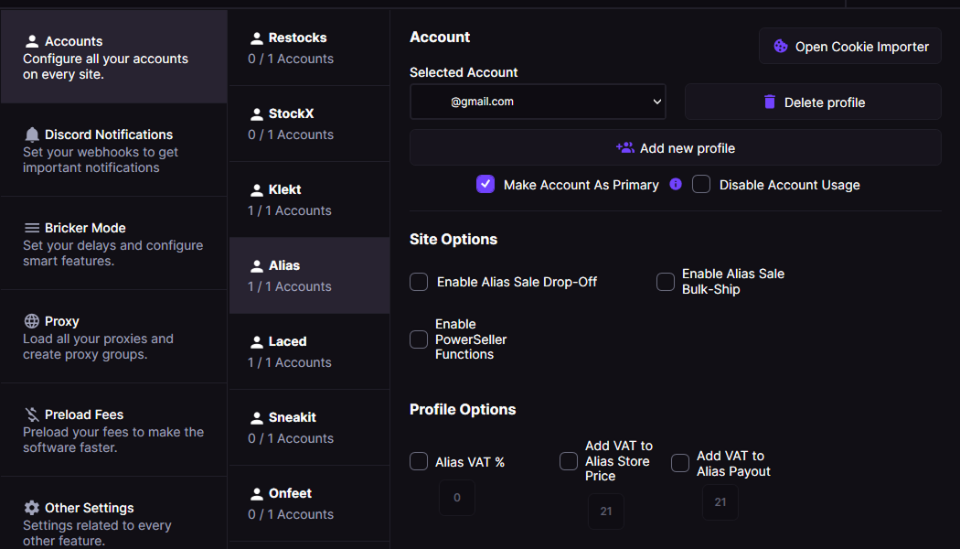
The **Accounts** tab allows you to manage your accounts across all supported platforms. If you need to add multiple accounts per site, you can do so by purchasing an [**extra slot here**](https://restock.gg/dashboard).
Some platforms include additional settings, so we recommend reviewing them carefully.
## Re-login Alerts
If an account login or session refresh fails, RestocksAIO marks that account as needing a re-login.
You will see a red alert badge on the Settings icon, on the Accounts row, and on the affected marketplace account card. Open **Settings > Accounts**, select the marked site, and log in again. The badge clears automatically after the account logs in successfully.
Failed login attempts are also shown in the **Notifications > Errors** tab, so you can see which account needs attention.
## POIZON OAuth Login
When **POIZON** is selected, the account view uses **Connect POIZON** instead of a username/password login.
RestocksAIO opens POIZON in your browser, you authorize the eligible seller account, and POIZON redirects through the RestocksAIO callback page so the desktop app can save the approved profile. This is required because POIZON seller access is API/OAuth based.
- [Connect POIZON](https://docs.restock.gg/features/settings/accounts/connect-poizon): Connect an eligible POIZON seller account to RestocksAIO with OAuth.
## Woovin API Token
When **Woovin** is selected, the account view asks for an **API Token** instead of a password.
Woovin has no OAuth and no password login. You generate a personal access token in the Woovin dashboard under **Vendor profile → API access**, then paste it here. The token is shown only once, one token is bound to one store, and it stays valid until you revoke it.
- [Connect Woovin](https://docs.restock.gg/features/settings/accounts/connect-woovin): Connect a verified Woovin store to RestocksAIO with an API token.
## SneakerAsk API Key
When **SneakerAsk** is selected, the account view asks for your account email and your **API key** instead of a password.
SneakerAsk accounts are approved by application — there is no open signup. Once approved, your API key is in your SneakerAsk account under the menu; it starts with `sak_`. Re-connecting with a new key replaces the old one and keeps your profile options.
- [Connect SneakerAsk](https://docs.restock.gg/features/settings/accounts/connect-sneakerask): Link your approved SneakerAsk consigner account to RestocksAIO with your API key.
## StockX Browser Login
When **StockX** is selected, the account view shows a **StockX Browser Login** button next to **Cookie Importer**.
Use this button when your StockX account uses a passkey, Windows Hello, Bitwarden, email verification, SMS verification, or any other browser-based login step. RestocksAIO opens the normal StockX login page, then saves the approved session after the browser sends the login callback back to the app.
- [StockX Login](https://docs.restock.gg/problem-solving/tutorials/stockx-login): How to connect a StockX account using browser login, passkeys, 2FA, or cookie fallback.
## Site Options
For site options, head over to our dedicated guide:
- [Site Options](https://docs.restock.gg/features/settings/accounts/site-options): This guide covers all the customizable options available for each supported site.
## Cookie Importer
If your account uses social login (Facebook/Google) or you prefer to import a session manually, open the **Cookie Importer** from the Profiles tab. Follow the tutorial to export cookies from your browser and paste them into the tool:
- [Import accounts under Facebook / Google login using our Cookie Importer](https://docs.restock.gg/problem-solving/tutorials/import-accounts-under-facebook-google-login-using-our-cookie-importer): This can be used to import your StockX or Wethenew account.
## Profile Options (Additional Fee)
You can also configure an extra fee by enabling the **"VAT %"** option and setting a percentage.
> **EXAMPLE**
>
> If you set a **21% VAT fee** for Hypeboost, your expected payout will be adjusted accordingly in the **Price Comparator.**
>
> For instance, if you're selling an item on Alias and set your **Lowest Payout Possible (LP) in Bricker Mode** to **€100**, the tool will automatically set the lowest price to **€121** to ensure you still receive **€100 after tax** (since €121 / 1.21 = €100). This impact will also be visible in the **Price Comparator** when reviewing per‑site payouts.
---
# Become a POIZON Seller
Register as a POIZON seller through the RestocksAIO channel and get your account ready to sync.
[Connect POIZON](/features/settings/accounts/connect-poizon) covers linking an account you already have. This page covers the step before that: becoming an approved POIZON seller in the first place.
POIZON (得物 / Dewu) is China's largest authenticated sneaker and fashion trading platform, with more than 200 million registered users across sneakers, streetwear, fashion and premium lifestyle categories. For European sellers it is a route into a market that is otherwise very hard to reach directly.
RestocksAIO has a dedicated onboarding channel with POIZON. Applications that come through the link on this page are routed to the POIZON team that handles RestocksAIO sellers, rather than into the general merchant queue.
> Onboarding is handled by POIZON, not by RestocksAIO. We can help with the sync and integration side; approval, contracts and settlement terms are decided by POIZON.
## Collaboration terms at a glance
For European business sellers:
| | |
| --- | --- |
| **Entry fee** | Free — no onboarding or platform fees |
| **Payment terms** | Weekly, biweekly or monthly — your choice |
| **Shipping** | Ship within 3 working days of order confirmation. You cover shipping to POIZON's warehouse |
| **Quality control** | POIZON runs QC at its international warehouse. Once an order passes, it is dispatched and you are settled |
| **Returns** | After QC approval, POIZON handles all return and exchange communication with the end consumer |
POIZON offers three collaboration models: **Marketplace** (you bid competitively by category, commission-based settlement), **Smart Listing** (you supply inventory at your own price point and POIZON manages listings, authentication and consumer service), and **Consignment** (fully hands-off). Which one fits you is part of the conversation during onboarding.
The catalogue spans sportswear — Nike, Jordan, Adidas, New Balance, Asics, Salomon, On Running, Puma, Arc'teryx — through to luxury houses including Gucci, Louis Vuitton, Miu Miu and Polo Ralph Lauren, plus thousands of other brands. The strongest conversion is in the **€80–€400** price range.
## Step 1 — Documentation and registration
Prepare these documents as **PDF**:
* **Company registration certificate.** Provide documentation for each entity you intend to sell under — if you operate an Italian account and a Spanish account, that is two sets.
* **Bank certificate.** The official PDF from your bank showing your IBAN.
Then register:

*Scan to open the RestocksAIO seller registration page*
Scan the QR code, or go straight to [the registration page](https://www.poizon.com/seller?channel=fed0d4a1d85b5e050cba50bc05e0bf5e).
> Use this link rather than registering from the POIZON homepage. It carries the RestocksAIO channel attribution, which is what routes your application to the dedicated onboarding team.
After registering, log in to the seller dashboard and complete three things:
1. Confirm your contract under **My Agreement**.
2. Add your warehouse address under **Information**.
3. Upload your bank certificate under **Finance**.
Applications tend to stall on these three rather than on the registration form itself.
## Step 2 — Price list and API integration
Once your account exists, POIZON starts the integration with your inventory system.
**This is the part RestocksAIO already covers.** POIZON's standard onboarding asks you to involve your IT provider and hand over a system URL, access credentials and API documentation. You do not need any of that — RestocksAIO is already built against POIZON's OpenAPI. Tell your onboarding contact that you are syncing through RestocksAIO, then follow [Connect POIZON](/features/settings/accounts/connect-poizon) to authorize the connection.
What still applies to you is the pricing and catalogue data:
* Provide **both the discounted price and the retail (original) price** for each product.
* The **supply price is the settlement amount** and must be **inclusive of VAT**.
* **Size group is mandatory** for footwear and apparel. Accepted values: `IT`, `US`, `FR`, `UNI`, `UK`.
> Size group is the most common cause of rejected or mis-sized listings. Set the correct size region on your inventory in RestocksAIO before you sync, not afterwards — a listing that goes out under the wrong region sells at the wrong size.
## Step 3 — Pre-launch operational meeting
When your documents are approved and the connection is live, POIZON schedules a short operational call before you go live. It covers:
* A walkthrough of the seller dashboard.
* The full order and fulfillment workflow.
* Any remaining questions before launch.
## Your five tasks as a POIZON merchant
| | Task | What it means |
| --- | --- | --- |
| **01** | Registration | Register as a seller on POIZON |
| **02** | Product sync | Sync your catalogue through RestocksAIO |
| **03** | Ship orders | Dispatch within 3 working days |
| **04** | Settlement | Manage your payout cycle |
| **05** | Update prices | Adjust pricing as needed |
Tasks 02 and 05 are the ones RestocksAIO handles for you — listing, inventory sync and repricing run alongside your other marketplaces instead of in a separate dashboard. See [Connect POIZON](/features/settings/accounts/connect-poizon) for what the connection supports.
## Downloads
* [POIZON platform introduction (PDF)](https://restock.gg/restocks-assets/poizon/poizon-platform-introduction-2026.pdf) — the full 2026 platform deck.
* [Merchant onboarding guide (DOCX)](https://restock.gg/restocks-assets/poizon/poizon-merchant-onboarding-guide.docx) — POIZON's own onboarding document, including direct contact details for the onboarding team.
## Next steps
1. Register through the link above and complete the three dashboard items.
2. Prepare your catalogue in RestocksAIO with correct size regions and VAT-inclusive pricing.
3. Follow [Connect POIZON](/features/settings/accounts/connect-poizon) to authorize the connection.
If you get stuck on the RestocksAIO side of the sync, contact RestocksAIO support. For anything about approval, contracts, settlement or your seller dashboard, use the contact details in the onboarding guide above — that goes straight to the POIZON team handling RestocksAIO sellers.
---
# Connect POIZON
Connect an eligible POIZON seller account to RestocksAIO with OAuth.
POIZON support lets eligible seller accounts bring POIZON listing, inventory, order and fulfillment context into the same RestocksAIO workflow used for the rest of your marketplaces.
> Do not have a POIZON seller account yet? Start with [Become a POIZON Seller](/features/settings/accounts/become-a-poizon-seller) — registration, required documents and the RestocksAIO onboarding channel.
POIZON is useful for resellers because it is built around authenticated premium goods and a broad international product surface. POIZON publicly describes global sourcing across more than 2 million products, 1,000+ brands and more than 18 countries and regions, including sneakers, apparel, bags, watches, accessories and other collectible categories.
> POIZON access is account and permission dependent. If your seller account does not have the required POIZON API permissions, some actions may not be available in RestocksAIO even if the account can log in.
## How the sign-in works
POIZON does not use a normal username and password form inside RestocksAIO. It uses OAuth authorization:
1. Open **Settings**.
2. Go to **Accounts**.
3. Select **POIZON**.
4. Click **Connect POIZON**.
5. RestocksAIO opens the POIZON authorization page in your browser.
6. Sign in with the eligible POIZON seller account and approve RestocksAIO access.
7. POIZON redirects back to `https://restock.gg/poizon-oauth-callback`.
8. The website passes the one-time authorization code back to the desktop app.
9. RestocksAIO exchanges the code for POIZON tokens and saves the connected profile.
After the connection succeeds, the profile normally appears as **[POIZON] - open_id** because POIZON returns an account identifier rather than a merchant display name.
## What happens after authorization
The callback page tries to open RestocksAIO through the `restocksaio://` app link. Keep RestocksAIO open while finishing the browser flow so Windows can hand the authorization code back to the app.
After the app link fires, the browser may redirect to the RestocksAIO dashboard and show **Successfully connected Poizon**. That dashboard message only appears if the same browser is already signed in to `restock.gg`. If the browser is not signed in, you may see the login page instead; the desktop app handoff can still succeed.
The callback page also includes an **Open RestocksAIO** fallback button. Use it if the browser does not automatically open the app or Windows blocks the custom link prompt.
## Before you connect
Make sure:
* You are using the POIZON seller account that should be linked to RestocksAIO.
* The account has the POIZON seller/API permissions needed for the actions you want to use.
* Your browser is allowed to open RestocksAIO callback links after authorization.
* You finish the flow in the same Windows user session where RestocksAIO is running.
If you manage multiple POIZON seller accounts, connect them one at a time and confirm which `[POIZON] - open_id` profile was added before starting marketplace work.
## What RestocksAIO uses the connection for
Depending on the permissions granted by POIZON, RestocksAIO can use the connection for:
* Listing and inventory context.
* Product and SKU identity matching.
* Order and fulfillment context.
* Price and market signals used by supported workflows.
* POIZON-specific seller actions where the account and API package allow them.
The goal is to reduce the amount of time power sellers spend switching into the POIZON seller dashboard. RestocksAIO groups POIZON work beside the rest of your marketplace stack so you can compare stock, react to sales and manage operational follow-up from one place.
## Troubleshooting
If the browser says authorization succeeded but RestocksAIO does not show the account, return to the app and check whether Windows asked for permission to open the `restocksaio://` link.
If the account connects but a POIZON action fails, the most common cause is missing POIZON API access for that seller account. Re-check the POIZON seller/developer panel or contact POIZON support for the required API package.
If your POIZON token expires or is revoked, remove the POIZON profile and run **Connect POIZON** again.
If you clicked **Connect POIZON** but the browser opened the wrong POIZON account, sign out of POIZON in the browser first, then restart the connection from RestocksAIO.
If the callback page opens but nothing changes in RestocksAIO, keep the app open and repeat the flow. Browser security prompts or blocked custom-link handlers can prevent the final handoff back to the desktop app.
If the same POIZON account appears more than once, keep the newest profile for that `open_id` and remove older duplicates before doing bulk work. Duplicate profiles usually mean the account was connected again before the old saved profile was cleaned up.
---
# Become a Woovin Seller
Open your own store on Woovin and get it ready to connect to RestocksAIO.
[Connect Woovin](/features/settings/accounts/connect-woovin) covers linking a store you already have. This page covers the step before that: opening and activating a Woovin store in the first place.
Woovin is a sneaker and apparel marketplace built out of individual verified resell stores. You open your own store, customers purchase directly from it, and you ship the orders yourself — there is no intake shipment to a central warehouse. The one exception: a customer can pay extra for authentication, and that order ships to Woovin's authentication center instead of straight to the buyer. Woovin is expanding quickly across Europe, and its top stores generate over 1,000 sales per month through the platform.
> Store approval, verification and payouts are handled by Woovin, not by RestocksAIO. Open a store on Woovin's [Become a Seller](https://woovin.com/en/become-a-seller) page. For anything about activation, contact the Woovin team at [t.laurey@woovin.com](mailto:t.laurey@woovin.com) or via WhatsApp at [+31 6 87070075](https://wa.me/31687070075).
## Fees and payout at a glance
Your payout is your listed price minus two fees — among the lowest in the industry:
| Fee | Rate |
| --- | --- |
| Transaction fee | 6.5% |
| Payment processing | 3.5% |
| **Payout** | **Your listed price minus the fees above (90%)** |
The price you enter is treated as a plain amount: Woovin does not add or split VAT on the goods themselves — VAT on your sales stays in your own accounting. The only VAT Woovin computes is on its own fees, and only for Dutch-based stores (0% for non-NL). Dutch stores that reclaim that fee VAT can enable the **Net Payout** option on their Woovin profile in RestocksAIO so the calculators show the reclaimed figure — see [Site Options](/features/settings/accounts/site-options).
## Available markets
Live today: the Netherlands, Belgium, Germany, France, Austria and Italy.
Announced for launch in August 2026: Spain, Czechia, Denmark, Poland, Portugal and Sweden.
## Before you start
Woovin stores are business accounts. To get your store activated:
* You must be a **registered business** and complete your company details in the store profile.
* Pass **identity verification** (Veriff) as the store owner — it usually takes under a minute.
* Provide a **valid VAT number**.
* Complete your **payout details**: account name and IBAN.
Once all of that is confirmed and Woovin activates the store, your listings can go live instead of staying in draft.
> Sneakers are open to every activated store. **Apparel requires separate approval** — submit a request to the Woovin team first, or apparel listings will be rejected.
## Shipping expectations
Orders must be shipped within **2 business days** by default. Stores can request an extended window of 7 business days — that option needs approval from the Woovin team.
## Connect the store
You only need to do this once:
1. In the Woovin vendor panel, open your vendor profile → **API access** and click **Generate API token**. The token is shown only once, so copy it right away.
2. Paste that token into the Woovin connection in RestocksAIO.
From there RestocksAIO manages your listings, stock, prices and orders alongside every other marketplace you sell on — see [Connect Woovin](/features/settings/accounts/connect-woovin).
---
# Connect Woovin
Connect a verified Woovin store to RestocksAIO with an API token.
Woovin support lets a verified Woovin store bring its listings, stock, pricing and orders into the same RestocksAIO workflow you already use for the rest of your marketplaces.
> Woovin works only with commercially registered and identity-verified stores. If you do not have a store yet, start at [Become a seller](https://woovin.com/en/become-a-seller) on Woovin — verification and store approval are handled entirely by Woovin.
Woovin is a marketplace built out of individual resell stores rather than a central warehouse. You keep your own stock and ship sold items directly to the customer, but Woovin supplies the shipping label and seller support — the store's manual post-sale step is to pack the item and hand the labelled parcel to the carrier. RestocksAIO keeps listings, stock levels and prices synchronized while the item is live. One exception exists on the buyer's side: a customer can pay extra to have their order authenticated, in which case you ship it to Woovin's authentication center and Woovin forwards it to the buyer after the check.
## How the sign-in works
Woovin does not use a username and password, and it does not use OAuth. It uses an **API token** that you generate yourself:
1. In the **Woovin dashboard**, open your **Vendor profile**.
2. Choose **API access** and generate an API token.
3. **Copy it immediately** — Woovin shows the token once and never again.
4. In RestocksAIO, open **Settings**.
5. Go to **Accounts**.
6. Select **Woovin**.
7. Fill in the fields:
* **Email** — a name for the store. It is shown as the profile label in your accounts list, and it **must be unique per store** (see the warning below).
* **API Token** — paste the token you generated.
8. Click **Log In**.
RestocksAIO validates the token against Woovin before saving. If the token is wrong or has been revoked, the connection is rejected at this point rather than saving a profile that silently returns nothing.
> **One token is one store.** A Woovin token is bound to a single store and cannot switch between stores. If you operate more than one Woovin storefront, connect each one as its own profile with its own token — **and give each one a different name in the Email field.**
>
> RestocksAIO identifies a Woovin profile by that name. Connecting a second store under a name you have already used is treated as re-authenticating the first one: the existing profile is **replaced**, and its listings and Bricker tasks re-point at the new store's token. Use the store name, not a shared mailbox.
## Before you connect
Make sure:
* Your Woovin store is verified and your **store profile is complete**, including company and payout details. Woovin rejects listings from an incomplete store profile, and that rejection only appears when you try to list — no screen in RestocksAIO can detect it in advance.
* You copied the token when it was shown. If you lost it, generate a new one; the old one cannot be retrieved.
* You are connecting the store you actually intend to sell from.
## What RestocksAIO uses the connection for
* Loading your live Woovin listings into the Listings view alongside every other marketplace.
* Creating listings from inventory you already track, matched to Woovin's catalogue by exact style code.
* Price monitoring and automatic repricing through Bricker Mode, inside your payout floors.
* Detecting sales and pulling the matching unit off your other connected marketplaces.
* Feeding Woovin orders into invoices and analytics.
Woovin issues a shipping label for each order, and RestocksAIO downloads it for you — open the sale in the Label Dialog like any other marketplace. The label is tied to your store's token, so it is only reachable through your connected profile.
## Multi-unit listings
A single Woovin listing can hold **several units** of the same size. RestocksAIO expands that into one row per unit, so selling one unit of a three-unit listing decrements the listing and leaves two live instead of retiring the whole thing.
This matters when Bricker Mode deletes sold items across sites: a Woovin row is only removed once its last unit is gone.
Deleting by hand works the same way: removing one of three identical rows from the Listings view lowers the offer's quantity by one and leaves the other two live. The offer itself is only deleted when you select every remaining unit.
One thing that is shared across units: the **price**. A Woovin listing has one price per size, so editing the store price on any row updates every unit of that listing — the other rows reflect the new price immediately.
## Repricing behaviour
Woovin publishes a lowest price per size that **includes your own listing**, with nothing marking it as yours. RestocksAIO treats that number as competition only when it is strictly below your own ask. When the lowest price on the board is yours, the tool holds your price instead of undercutting it.
This is deliberate. Repricing that follows the published lowest price blindly would undercut your own ask every cycle and walk the price down to your floor with no competitor involved at any point.
## Troubleshooting
**The connection is rejected right after pasting the token.** Confirm you copied the whole token, and that it has not been revoked in the Woovin dashboard. Tokens are shown once, so a partial copy is the most common cause.
**Your listings load but every attempt to list fails.** This is almost always an incomplete Woovin **store profile** — company details and payout information. Contact Woovin to complete it; nothing in RestocksAIO can fix it, and no screen can detect it in advance.
**Listings appear to be created but never sell.** The same incomplete store profile can produce a quieter version of the failure: Woovin accepts the listing and returns a real listing ID, but forces it to a non-active state, so it exists without ever being visible to buyers. Check the status of a new listing on Woovin itself after your first create rather than assuming a successful create means a live listing.
**The account works without a proxy but fails with one.** Clear the Woovin proxy group before you touch the token. Woovin sits behind bot protection that can challenge datacenter IPs, and a challenged proxy looks identical to a revoked token. Prefer clean or residential IPs if you assign a group at all — the default is no proxy.
**The token stopped working.** Woovin tokens do not expire and do not refresh; they die only when revoked. RestocksAIO re-checks the token periodically, so a revoked one surfaces as the usual red re-login badge on the Settings icon and the account card. Generate a new token in your vendor profile and log the account in again.
**A payout looks wrong compared with the Woovin dashboard.** RestocksAIO calculates listing payouts from Woovin's own fee schedule, which it reads from the API when you connect, and it mirrors Woovin's per-line rounding — so the figure should match to the cent. If it does not, check the **Woovin VAT %** option in **Settings → Accounts** (the Profile Options block, below the account list). That setting deducts a further percentage from every payout shown in Listings, Bricker Mode and the Price Comparator.
> The **Woovin** VAT box in the **Invoice Dialog** is a different setting. It only affects the VAT lines printed on generated invoices, and it has no effect on the payouts you see while pricing.
---
# Become a SneakerAsk Consigner
Apply to SneakerAsk's private consignment program and get your account ready to connect to RestocksAIO.
[Connect SneakerAsk](/features/settings/accounts/connect-sneakerask) covers linking an account you already have. This page covers the step before that: getting accepted as a SneakerAsk consigner in the first place.
SneakerAsk is a private, application-based consignment platform — not an open marketplace anyone can join. Based in Amsterdam and established in 2016, it has grown into one of the fastest-growing sneaker shops in the EU with over 200,000 customers, and it is not limited to sneakers: clothing, watches, Pokémon cards and designer bags sell there too.
> SneakerAsk is still a private, application-based marketplace. Apply on the [seller signup page](https://sell.sneakerask.com/seller/signup). The team reviews applications; it is not an open marketplace.
## Why consigners join
* **Returns come back to SneakerAsk**, not to you — unlike most other platforms.
* **Private marketplace** — sellers are admitted, not self-registered.
* **Higher payouts**, with an account manager at every level.
* **Two price options** — you don't have to be the cheapest to sell (see below).
## You don't have to be the cheapest
SneakerAsk adjusts its own prices automatically every night based on its competitors. As a consigner you normally need to be below that price to be the cheapest — but there is a **second price option**: if you can't beat the lowest price, you are allowed to price up to **30% higher** than SneakerAsk's sourcing price. Customers are often willing to pay more to get their sneakers on the fast 48-hour delivery, which means a potentially higher payout for you.
RestocksAIO's Bricker Mode prices against both options — the standard lane and the express lane — as separate markets.
## How it works
1. **Apply** — submit the [seller signup form](https://sell.sneakerask.com/seller/signup) and tell them what you sell and how much volume you move.
2. **Application review** — someone from the team looks at your request personally; it takes no more than 1 business day.
3. **Onboarding** — once approved, you are connected through RestocksAIO so your stock stays in sync automatically.
4. **List your stock** — add everything in RestocksAIO; it handles the connection with SneakerAsk for you.
5. **A buyer purchases** — the order flows straight into RestocksAIO.
6. **Ship** — the promise is **shipped within 48 hours**; anything beyond that is not tolerated.
7. **Get paid** — payouts within 14 days.
## Account setup
After approval you are invited into the SneakerAsk system:
1. Complete your account with your personal or business information.
2. Provide your bank details, and state whether you are a **VAT-0 seller or a margin seller**. If you sell both, you need two accounts. (VAT-21 for NL sellers is announced as coming.)
3. Find your **API key** in your account, under the menu — keep it safe.
4. Add that key to RestocksAIO and you're ready — the whole journey takes about 3 minutes. See [Connect SneakerAsk](/features/settings/accounts/connect-sneakerask).
## Apply
Apply on the [SneakerAsk seller signup page](https://sell.sneakerask.com/seller/signup).
---
# Connect SneakerAsk
Link your approved SneakerAsk consigner account to RestocksAIO with your API key.
SneakerAsk is a consignment platform: buyers purchase from SneakerAsk, you ship sold items within 48 hours, and returns go back to SneakerAsk rather than to you. Not a consigner yet? Start with [Become a SneakerAsk Consigner](/features/settings/accounts/become-a-sneakerask-consigner) — accounts are approved by application, there is no open signup.
## How the sign-in works
1. In your SneakerAsk account, open the menu and find your **API key**. It starts with `sak_`.
2. In RestocksAIO, go to **Settings → Accounts**, choose SneakerAsk, and enter your account email and the `sak_` key.
3. RestocksAIO verifies the key against SneakerAsk and creates the profile. There is no password login and no cookie import — the key is the credential.
## Before you connect
Make sure:
* Your SneakerAsk account is fully set up — personal or business details complete, bank details provided, and your VAT status (VAT-0 or margin) settled with the SneakerAsk team.
* You copied the API key exactly. RestocksAIO rejects keys that don't start with `sak_`.
* If you rotate the key later, just re-connect the profile with the new key — your profile options are kept, and the fresh key replaces the old one.
## What RestocksAIO uses the connection for
* Loading your live SneakerAsk listings into the Listings view alongside every other marketplace.
* Creating listings from inventory you already track, matched against SneakerAsk's catalogue.
* Price monitoring and automatic repricing through Bricker Mode — on both of SneakerAsk's price lanes (see below).
* Detecting sales, feeding them into invoices and analytics, and marking sold orders as packed from the Unconfirmed Sales view.
## Two price lanes
SneakerAsk sells each size two ways: the standard price, and a **48-hour express** option where buyers pay more for fast delivery. These are different markets with different competition, and RestocksAIO prices them separately — a listing that is not the cheapest on the standard lane can still be winning the express lane.
Your ask **is** your payout: SneakerAsk charges no fee on top of the consigner price.
## Multi-unit listings
A single SneakerAsk listing can hold several units of the same size. RestocksAIO expands that into one row per unit: a sale or a manual delete lowers the quantity and only removes the listing when the last unit goes. The price is shared — editing the store price on any row updates every unit of that listing.
## Troubleshooting
**The connection is rejected immediately.** The key is wrong or was regenerated in SneakerAsk after you copied it. Keys are shown in your SneakerAsk account menu — copy the current one and re-connect.
**A listing shows a blank or odd size.** SneakerAsk sizes are plain text on their side — EU numbers for shoes, letters for apparel, and a single one-size token for collectibles. RestocksAIO reads them all; if a size still looks wrong, the product is likely mis-categorized on SneakerAsk's side and their team can fix it.
**A sale appears on SneakerAsk but not in RestocksAIO yet.** Sales are picked up on the next sync cycle. If it never appears, check that the profile's connection is still valid under Settings → Accounts.
---
# Site Options
This guide covers all the customizable options available for each supported site.

*Site Options live under Settings → Accounts. Each site exposes its own toggles, VAT options, and API routing controls.*
## StockX Site Options
* **StockX Multiply x0.95 (Non-VAT Accounts)**: Adjusts payouts for accounts without VAT.
* **Prefer Earn More Indicator**: Prioritizes higher payouts when setting prices.
* **Prefer Sell Faster Indicator**: Prioritizes faster sales over higher payouts.
* **Allow Non-Flex Indicators for Flex Items**: When enabled, the tool considers **Earn More**, **Sell Faster**, and **Lowest Ask** prices instead of just the consign price.
* **Enable StockX Buyer-Direct Seller Mode**: Enable only if your StockX account is approved to ship directly to buyers. Uses direct market data for more accurate pricing. [**(Click for in-depth guide)**](/features/bricker-mode/stockx-direct-pricing)
### StockX API Routing
API Routing lets you choose which backend provider the tool uses for different operations on your StockX account. This appears in the Account Settings panel when a StockX profile is selected.
| Operation | Description |
| ---------------- | ---------------------------------------------------- |
| **Listing Load** | Loading listings, fetching sales, checking alive/sold status |
| **Listing Update** | Updating listing prices |
| **Listing Delete** | Deleting listings |
| **Listing Upload** | Creating and batch-creating new listings |
| **Monitor** | Bricker Mode monitoring (market data, pricing) |
For each operation, you can select:
* **Auto** (default) — Automatically selects the best provider based on your account configuration.
* **StockX API** — Uses the StockX REST API (v2 batch endpoints).
* **Legacy** — Uses the GraphQL/Pro endpoints.
> Most users should leave routing set to **Auto**. Only change this if you're experiencing issues with a specific provider or have been advised to use a particular route.
## Alias Site Options
* **Alias Sale Drop-Off**: Marks confirmed sales for drop-off at the Alias warehouse.
* **Alias Sale Bulk-Ship**: Marks confirmed sales to be packed together for bulk shipping.
* **Increase Ask Momentarily to Find Better Payouts**: Every 6 hours, your ask price is temporarily increased, and market prices are checked within 10 seconds. This often unlocks better payouts. _(Enabled by default.)_
* **Allow Non-Flex Indicators for Flex Items**: When enabled, the tool considers **Earn More**, **Sell Faster**, and **Lowest Ask** prices instead of just the consign price.
* **PowerSeller Functions**: Enables PowerSeller Dashboard APIs (if you have access). This allows creating bulks from non-bulk-ship sales and using internal APIs for loading listings and other functions.
* **Bricker Sales Check Only (Not Recommended)**: This system skips listing checks and only verifies sales. It’s not recommended for most users and is only suitable for those with a large number of listings.
* **Enable OpenAPI**: Enables integration with Alias’s REST API for smoother and more reliable listing operations. Access is granted by Alias managers — once you have a token, check the box, paste it, and click **Test Token** to validate. Once validated, the token is saved and the tool can use the OpenAPI for listing loads, uploads, price updates, and monitoring.
### Alias API Routing
Similar to StockX, Alias also supports API Routing to control which backend provider is used per operation:
| Operation | Description |
| ---------------- | ---------------------------------------------------- |
| **Listing Load** | Loading listings, fetching sales, checking alive/sold status |
| **Listing Update** | Updating listing prices |
| **Listing Delete** | Deleting listings |
| **Listing Upload** | Creating and batch-creating new listings |
| **Monitor** | Bricker Mode monitoring (price analytics) |
For each operation, you can select:
* **Auto** (default) — Uses the best available provider based on your account capabilities.
* **App** — Legacy Alias REST endpoints.
* **PowerSeller** — PowerSeller Dashboard APIs (requires PowerSeller access).
* **OpenAPI** — Alias REST API (requires OpenAPI token to be enabled and validated).
> The **OpenAPI** option only appears if you have enabled and validated your OpenAPI token. If you don’t have OpenAPI access, the tool will automatically use **App** or **PowerSeller** depending on your account features.
## Laced Site Options
* **Allow non-Flex indicators for Flex items:** When enabled, the tool considers **Earn More**, **Sell Faster**, and **Lowest Ask** prices instead of just the consign price.
## WeTheNew Site Options
* **Snipe w/o Proxy**: The Wethenew sniper will operate without using proxies.
* **Wethenew Sale Drop-Off**: When enabled, confirmed sales will be marked for drop-off at the Wethenew warehouse.
* **Decline WTN Offers Below LP**: Automatically declines offers that are below your **Lowest Payout (LP)** threshold.
* **Allow Non-Flex Indicators for Flex Items**: When enabled, the tool considers **Earn More**, **Sell Faster**, and **Lowest Ask** prices instead of just the consign price.
* **Send Hook on Failed Snipe**: Sends a Discord webhook notification when a snipe attempt fails.
* **Do Not Apply VAT for Margin Snipes**: When enabled, VAT is not calculated for items under the margin scheme.
## HypeBoost Site Options
* **Allow non-Flex indicators for Flex items:** When enabled, the tool considers **Earn More**, **Sell Faster**, and **Lowest Ask** prices instead of just the consign price.
* **Deducht 5€ UPS Fee:** In certain countries, Hypeboost allows shipping via UPS but charges a fee. When enabled, this option deducts 5€ from the payout calculation to account for the UPS fee.
* **Include DPD Drop-Off Label Sheet:** Enabled by default. Controls whether the DPD drop-off slip (page 2) is included in the generated label PDF. Leave enabled if you physically drop packages off at a DPD access point; disable it if you don't use drop-off and want labels without the extra sheet.
## LimitedResell Site Options
* **LimitedResell VAT Type**: Select how VAT is applied to your LimitedResell listings. Options:
* **Marge** (default) — Margin scheme, no VAT added.
* **0%** — Zero-rated VAT.
* **20%** — Standard 20% VAT applied to payouts.
## NordicSneakers Site Options
* **NordicSneakers VAT Type**: Select the VAT scheme applied to your NordicSneakers listings. Options:
* **VAT25** (default) — Standard 25% Danish VAT.
* **Margin scheme** — Margin scheme, VAT is calculated on the profit margin only.
## KicksCrew Site Options
> KicksCrew is **invite-only**. You need an API key issued directly by KicksCrew to connect an account — there is no public sign-up. Reach out to your KicksCrew contact to request access.
KicksCrew is integrated through their official partner API. Authentication is done with an **API key** instead of a username/password login.
### Adding a KicksCrew account
1. Obtain your API key from KicksCrew.
2. In **Settings → Accounts**, add a new account and pick **KicksCrew** as the site.
3. Paste the API key into the credentials field (either username or password slot is accepted) and save.
4. The tool validates the key against the KicksCrew stock endpoint. An invalid or missing key is rejected with `KicksCrew API key is required.`
### Site options
* **VAT %**: Set the VAT percentage applied to your KicksCrew payouts. Configurable per profile from the Invoice Dialog → Profile Settings.
> KicksCrew listings inherit the **size region** (US / EU / UK) directly from the marketplace's `size_system` value for each listing. There is no manual region override — the tool reads the region from the live API response so each listing is matched against the correct size chart.
KicksCrew supports the standard Bricker Mode flow (price monitoring, queue, sales detection) — no marketplace-specific bricker toggles are required.
## Woovin Site Options
> Woovin requires a **commercially registered and identity-verified store**. Authentication uses an API token you generate yourself — there is no username/password login and no OAuth. See [Connect Woovin](/features/settings/accounts/connect-woovin).
* **Woovin VAT %**: Found in the **Profile Options** block below the account list, once a Woovin profile is selected. Enabling it deducts that percentage from every Woovin payout shown in Listings, Bricker Mode and the Price Comparator — so it is the setting to check first if a payout does not match the Woovin dashboard.
* **Net Payout (excl. fee VAT)**: For Dutch stores, Woovin charges VAT on its own fees, which a VAT-registered business reclaims. Enabling this option makes every Woovin payout calculation ignore that fee VAT, so the tool shows the net figure you actually keep (90% of your listed price on the standard fee schedule) instead of the lower pre-reclaim number.
> Do not confuse this with the **Woovin** box in the **Invoice Dialog → Profile Settings**. That one only affects the VAT lines on generated invoices; it never changes a payout you price against.
Woovin has no bricker or listing toggles of its own. The two remaining settings live outside this panel because of what they affect:
| Setting | Where it lives | Why |
| ------- | -------------- | --- |
| **Proxy group** | **Settings → Proxy** | Proxies are assigned per site across the whole app, not per profile. Woovin defaults to **no proxy** (direct). |
| **Show Woovin** | Price Comparator | It controls a column in the comparator view, so it belongs to that window rather than to the account. |
> Woovin listings use **EU sizing** natively, and RestocksAIO reads the region from the marketplace rather than asking you to set it. There is no manual region override.
> **Leave the proxy group empty unless you have a reason not to.** Woovin sits behind bot protection that can challenge datacenter IPs, and a challenged proxy produces the same error as a revoked token. If Woovin authentication fails only on proxied runs, clear the proxy group before you replace the token.
Woovin supports the standard Bricker Mode flow (price monitoring, queue, sales detection). One behaviour is Woovin-specific and automatic: because Woovin's published lowest price per size **includes your own listing**, the tool only treats it as competition when it is strictly below your ask, and otherwise holds your price rather than undercutting itself.
## SneakerAsk Site Options
> SneakerAsk is a **private, application-based consignment platform** — accounts are approved by the SneakerAsk team, and authentication uses your account email plus an API key (`sak_...`). See [Connect SneakerAsk](/features/settings/accounts/connect-sneakerask).
SneakerAsk has no site-specific toggles in the Profile Options block. What you should know instead:
* **Your ask is your payout.** SneakerAsk charges no fee on top of the consigner price, so there is no VAT or fee setting to configure — the price you set is the amount you receive.
* **Two price lanes.** Each size sells at a standard price and a 48-hour express price. Bricker Mode monitors and prices the two lanes as separate markets automatically; there is nothing to switch on.
* **Proxy group** lives in **Settings → Proxy** like every other site, and defaults to no proxy.
> SneakerAsk sizes are plain text on the marketplace side — EU numbers for shoes, letters for apparel, one token for one-size items. RestocksAIO classifies each row by its own size token, so there is no manual region override.
---
# Discord Notifications
Configure your Discord alerts.
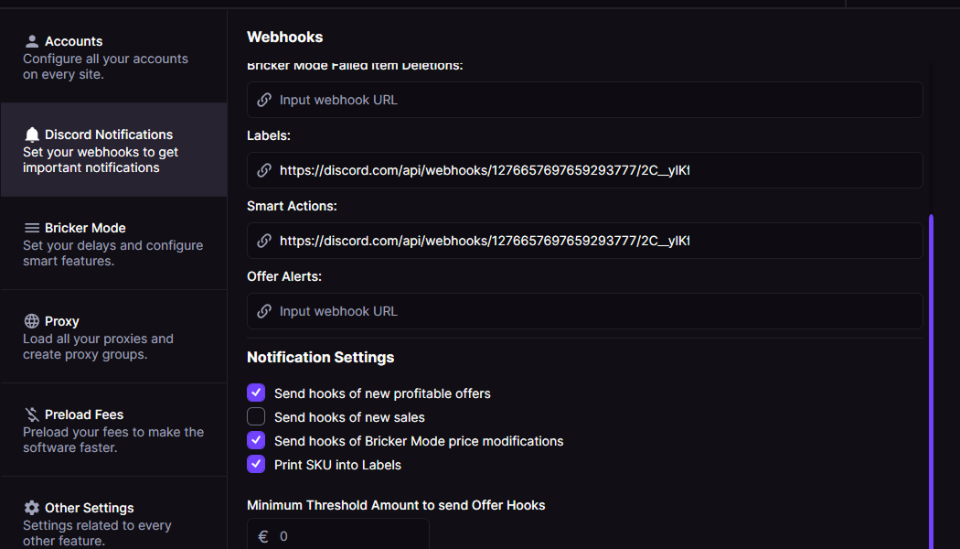
In this tab, you can set up your **Discord Webhooks** to receive real-time notifications. Stay updated on sales, download labels instantly. You may as well manage your notification preferences to suit your needs.
For an overview of real-time alerts, see the [Discord & Telegram Notifications feature page on restock.gg](https://restock.gg/features/discord-telegram-notifications).
## How to create a webhook?
https://www.youtube.com/watch?v=TiQvq3KvAPc
## Offer Alerts
Paste a webhook URL into the **Offer Alerts** field to get a Discord message whenever an offer is detected on one of your listings. This is separate from your sales webhook, so you can route offers to a dedicated channel.
### Minimum offer required to send alerts
Offer alerts can be noisy when buyers spam low-ball offers. This control filters out offers below a threshold you set, so you only get pinged for offers worth your attention. Choose how the threshold is measured from the dropdown:
* **Fixed amount** — Only send an alert when the offer is at least this many units of your main currency. Offers made in other currencies are converted before the comparison.
*Fixed-amount mode: alerts only fire for offers at or above the amount you set.*
* **Percentage of listing price** — Only send an alert when the offer is at least this percentage of that listing's current price. For example, `80%` means an offer of 400 on a 500 listing qualifies, but a 350 offer does not.
*Percentage mode: alerts scale with each listing's own price.*
> Leave the value at **0** to apply no minimum — every detected offer sends an alert, which matches the previous behavior. In percentage mode the value is capped at 100.
---
# Telegram Bot
Configure your Telegram bot for notifications and commands.
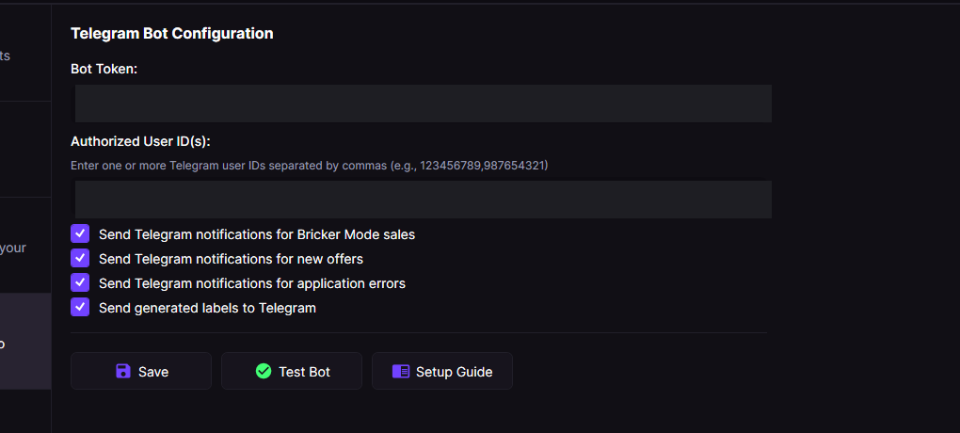
*The Telegram Bot panel in Settings — paste your BotFather token and authorized user IDs, then toggle which event types notify you.*
RestocksAIO includes a Telegram bot integration that allows you to receive notifications and interact with your instance through Telegram commands.
## Getting Started
### Step 1: Create a Telegram Bot
1. Open Telegram and search for **@BotFather**
2. Start a conversation with BotFather and send `/newbot`
3. Follow the prompts to choose a name and username for your bot
4. BotFather will provide you with a **bot token** (e.g., `123456789:ABCdefGHIjklMNOpqrsTUVwxyz`)
5. **Save this token** - you'll need it in the next step
### Step 2: Get Your Telegram User ID
1. Search for **@userinfobot** on Telegram
2. Start a conversation with @userinfobot
3. The bot will immediately reply with your **User ID** (a numeric value like `123456789`)
4. **Save this User ID** - you'll need it to authorize yourself
> You must add your User ID to the authorized list, otherwise the bot will ignore your messages for security reasons.
### Step 3: Configure in RestocksAIO
1. Open RestocksAIO and navigate to **Settings**
2. Click on **Telegram Bot** in the settings sidebar
3. Enter your **Bot Token** in the "Bot Token" field
4. Enter your **User ID** (or multiple IDs separated by commas) in the "Authorized User ID(s)" field
5. Configure notification preferences:
- **Send Telegram notifications for Bricker Mode sales**: Enable to receive sale notifications
- **Send Telegram notifications for new offers**: Enable to receive offer detection notifications
- **Send generated labels to Telegram**: Enable to receive shipping labels as PDF attachments when labels are generated
- **Send Telegram notifications for application errors**: Enable to forward application errors to Telegram (disabled by default)
6. Click **Save** to save your settings
7. Click **Test Bot** to verify the connection
> If the test is successful, you'll receive a confirmation message in Telegram. The bot is now ready to use!
## Available Commands
Once configured, you can interact with your RestocksAIO instance using these commands:
### `/help`
Shows a list of all available commands.
**Example:**
```
/help
```
**Response:**
```
Available commands:
/info - Instance information
/notifications - Notification toggles
/notify_bricker_sales - Toggle Bricker Mode sales notifications
/notify_offers - Toggle offer detection notifications
/bricker_stats - Bricker stats snapshot
/bricker_start_all - Start all Bricker tasks
/bricker_stop_all - Stop all Bricker tasks
/labels - Single labels — paged, multi-select + Generate (with site & status filters)
/bulk_labels - Bulks — one bulk per page with its contents + Generate (with site & status filters)
/scan - Open a scannable view (UPS rows with tracking) and submit to USS
/label - Look up a single label by OrderID with Generate / Scan actions
/help - Show this help message
```
### `/info`
Retrieves detailed information about your RestocksAIO instance, including:
- **License Key**: Your current license key
- **Subscription**: Your subscription type (Trial, Standard, Premium, or Lifetime)
- **Server Connection**: Whether the instance is connected to the RestocksAIO server
- **Database Status**: Status of the database connection
- **Last Sync**: Time since last synchronization
**Example:**
```
/info
```
**Response:**
```
📊 RestocksAIO Instance Information
🔑 License Key: ABC123XYZ789
💳 Subscription: Premium
🌐 Server Connection: ✅ Connected
💾 Database Status: ✅ Online
🔄 Last Sync: Sync: Just now
```
### `/notifications`
Shows the current notification settings for your RestocksAIO instance with interactive buttons to toggle each setting:
- **Bricker Mode Sales**: Whether notifications for Bricker Mode sales are enabled or disabled
- **Offer Detections**: Whether notifications for offer detections are enabled or disabled
- **Label Notifications**: Whether generated shipping labels are sent as PDF attachments
- **Error Forwarding**: Whether application errors are forwarded to Telegram (disabled by default)
**Example:**
```
/notifications
```
**Response:**
```
🔔 Notification Settings
Bricker Mode Sales: ✅ Enabled
Offer Detections: ✅ Enabled
Error Forwarding: ❌ Disabled
Tap a button to change the setting.
```
The response includes **On/Off buttons** for each notification type. Simply tap the button to toggle the setting - no need to type commands!
> Notification settings are saved immediately when you tap a button. The bot will confirm your change with a message like "✅ Bricker Mode sales notifications enabled."
### `/notify_bricker_sales`
Shows the current status of Bricker Mode sales notifications with interactive **On/Off buttons** to toggle the setting. When enabled, you'll receive notifications whenever a sale is made through Bricker Mode.
**Example:**
```
/notify_bricker_sales
```
**Response:**
```
Bricker Mode sales notifications are currently ✅ On.
```
The response includes **On/Off buttons** - tap the button to change the setting.
### `/notify_offers`
Shows the current status of offer detection notifications with interactive **On/Off buttons** to toggle the setting. When enabled, you'll receive notifications when offers are detected on your listings.
**Example:**
```
/notify_offers
```
**Response:**
```
Offer detection notifications are currently ✅ On.
```
The response includes **On/Off buttons** - tap the button to change the setting.
> Notification settings are saved immediately when you tap a button and will apply to all future notifications. You can check your current settings at any time using `/notifications`.
### `/bricker_stats`
Retrieves comprehensive statistics about your Bricker Mode tasks, including:
- **Controllers**: Running, stopped, and total controller counts
- **Tasks**: Running, stopped, sold, and error task counts
- **Session Sales**: Total sales during the current session
- **Session Errors**: Total errors encountered
- **Queue**: Items currently in queue
- **Lowest Ask**: Items with lowest ask vs. not lowest ask
- **Price Changes**: Price changes in the last 24 hours
The response includes **Start All** and **Stop All** buttons for quick control.
**Example:**
```
/bricker_stats
```
**Response:**
```
📈 Bricker Mode Stats
Controllers: 5 running / 2 stopped / 7 total
Tasks: 12 running / 3 stopped / 8 sold / 1 errors
Session Sales: 8
Session Errors: 1
Queue: 5
Lowest Ask: 10 | Not Lowest: 5
Price Changes (24h): 15
```
### `/bricker_start_all`
Starts all Bricker Mode tasks. This command will initiate all stopped tasks across all controllers.
**Example:**
```
/bricker_start_all
```
**Response:**
```
▶️ Started all Bricker tasks.
```
### `/bricker_stop_all`
Stops all Bricker Mode tasks. This command will halt all running tasks across all controllers.
**Example:**
```
/bricker_stop_all
```
**Response:**
```
⏹ Stopped all Bricker tasks.
```
> You can also use the **Start All** and **Stop All** buttons that appear when you run `/bricker_stats` for quick access to these controls.
## Label Dialog Commands
The Telegram bot mirrors the desktop **Label Dialog** so you can refresh, generate, scan, and inspect labels from your phone. All four commands operate on the same underlying label set the WPF app uses — selecting a row in Telegram also checks it in the desktop UI if you have the window open.
> **Label notifications must be enabled** (`Send generated labels to Telegram` toggle in Settings → Telegram Bot, or `/notifications` from the bot) for the PDF to land in the chat after `🏷️ Generate`. The chat shown by these commands is interactive regardless.
### `/labels`
Opens the **singles** view — every non-bulk label across all your configured sites, paged 5 per page. Each row shows the marketplace, SKU, product name, and size. Tap rows to multi-select, then use the action buttons at the bottom.
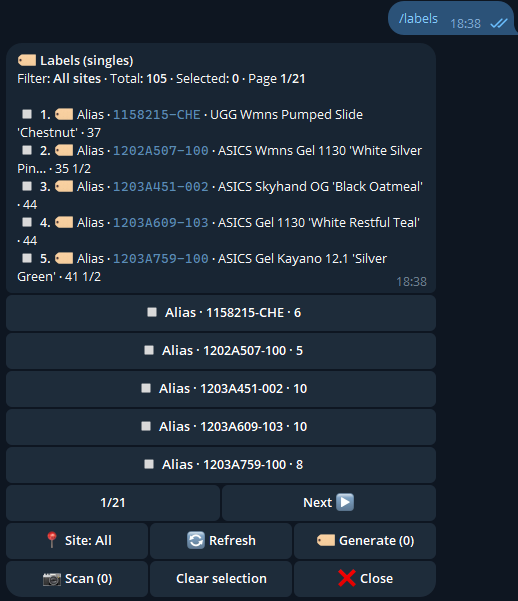
*/labels — singles view with multi-select, site + status filters, and the Generate / Scan action buttons.*
**Filters (cycle buttons):**
- **📍 Site** — cycles `All → Alias → StockX → …` (only sites with currently-loaded singles appear).
- **📋 Status** — cycles `All → ToFullfill → Inhand → Arriving → Packed → InTransit`. Only statuses present in the data appear.
The default sort is by status priority so **ToFullfill** and **Inhand** rows surface first, even when no status filter is set.
**Actions:**
- **🔄 Refresh** — re-pulls sales/bulks from every configured marketplace (StockX, Alias, Klekt, Laced, HypeBoost, Sneakit, WeTheNew, LimitedResell, NordicSneakers, Kickscrew, Onfeet).
- **🏷️ Generate (N)** — generates label PDFs for the N selected rows. With "Send generated labels to Telegram" enabled, the PDFs arrive in this chat right after.
- **📷 Scan (N)** — submits the selected UPS rows with tracking to Scanuss (USS). Non-UPS rows are reported as ineligible. See `/scan` below.
- **Clear selection** / **❌ Close**.
### `/bulk_labels`
Opens the **bulks** view — one bulk per page with its full contents listed (SKU · product name · size for every item). Use the pager to walk through your bulks.
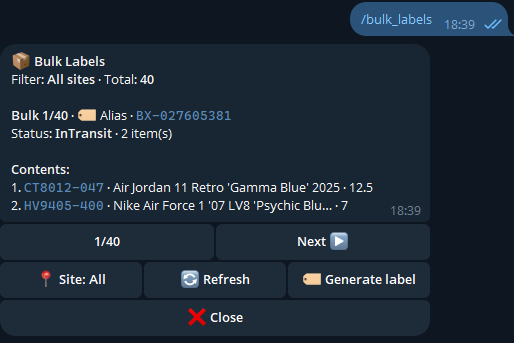
*/bulk_labels — one bulk per page, all the contained items listed, with the same Site + Status filters as /labels.*
Same Site and Status filter cycles as `/labels`. The Generate button generates the displayed bulk's label in one tap — no selection needed because each page **is** a single bulk.
### `/scan`
Opens the same view as `/labels` but pre-filtered to **scannable rows only** — UPS carrier with valid tracking, no `untrackable` placeholders. Identical UPS + tracking gate as the desktop "Send to USS" pill.
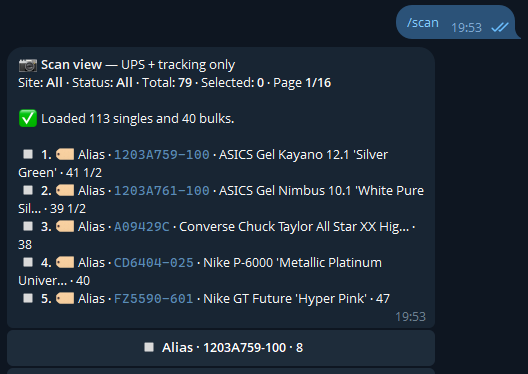
*/scan — scannable view filtered to UPS rows with tracking. Multi-select rows, then 📷 Scan submits them to USS.*
Multi-select the rows you want to submit, then tap **📷 Scan (N)**. Each row consumes 1 USS credit. The status line afterwards reports submitted / failed / ineligible counts and, on failure, the rejection reason (e.g. insufficient credits, label URL missing).
> USS must be linked to your Discord account first — the bot will reply with the OAuth link if it isn't.
### `/label `
Look up a **single label** by its OrderID and act on it directly — no need to scroll through pages.
```
/label 58887372
```
The bot replies with a card showing site, status, SKU, product name, size, tracking, and carrier. For bulks, the contents list is included. The action row at the bottom has **🏷️ Generate label**, **📷 Scan** (only when the row is UPS + tracking eligible), **🔄 Refresh**, and **❌ Close**.
### Site & Status filters in detail
*Both filters are cycle buttons — one tap moves to the next value, wrapping back to All. The total row above updates to reflect the filtered count.*
The filter buttons only include values **actually present** in the current data, so you never click into an empty bucket. Cycling on `/labels` resets pagination back to page 1; cycling on `/bulk_labels` resets to bulk 1.
## Notification Features
### Bricker Mode Sales Notifications
When enabled, you'll receive rich notifications whenever a sale is made through Bricker Mode, including:
- Product name and image
- Site where the sale occurred
- Style code (SKU)
- Size
- **Category** (`Resale`, `Direct`, or `Consign`) — tells you which bricker bucket the sale came from
- Store price and payout information
- Order ID
- Sale timestamp
### Offer Detection Notifications
When enabled, you'll receive notifications when offers are detected on your listings, including:
- Product name and image
- Site where the offer was made
- Style code (SKU)
- Size
- Offer amount and payout
- Profit if accepted
- **Accept Offer button** - Tap to accept the offer directly from Telegram
### Label Notifications
When enabled, you'll receive generated shipping labels as PDF attachments directly in Telegram whenever a label is created, including:
- Site where the label was generated
- File name
- The label file as a PDF attachment
This is useful for quickly accessing your labels from your phone without needing to open the application or navigate to the labels folder.
### Error Forwarding
When enabled (disabled by default), application errors will be automatically forwarded to Telegram, including:
- Error type and function
- Alert level (Warning or Important)
- Error description
- Solution description (if available)
- Stack trace (truncated if too long)
> Error forwarding is disabled by default to prevent notification spam. Enable it only if you want to monitor application errors remotely.
## Multiple User IDs
You can authorize multiple Telegram users to interact with your bot by entering multiple User IDs separated by commas:
**Example:**
```
123456789,987654321,555666777
```
Each authorized user will be able to use all bot commands and receive notifications.
## Troubleshooting
### Bot Not Responding
- **Check your Bot Token**: Make sure you copied the complete token from BotFather
- **Verify User ID**: Ensure your User ID is correctly entered in the authorized list
- **Test Connection**: Use the "Test Bot" button in settings to verify connectivity
- **Check Bot Status**: Make sure the bot is running (it should start automatically when you save valid settings)
### "Unauthorized" Messages
If you receive no response from the bot, it means your User ID is not in the authorized list:
1. Double-check your User ID using @userinfobot
2. Ensure the User ID is correctly entered in settings (no extra spaces)
3. Save settings and test again
### Connection Errors
If you see connection errors:
- Verify your internet connection
- Check that Telegram is accessible from your network
- Ensure the bot token is valid and hasn't been revoked
- Try stopping and restarting the bot using the Test button
## Security Notes
- **Keep your Bot Token secret**: Never share your bot token publicly
- **Authorized Users Only**: Only users whose IDs are in the authorized list can interact with your bot
- **Regular Updates**: Keep RestocksAIO updated to receive the latest security improvements
## Next Steps
Once your Telegram bot is configured, you can:
- Monitor your instance status remotely using `/info`
- Receive real-time notifications for sales, offers, and errors
- Control Bricker Mode tasks remotely using `/bricker_stats`, `/bricker_start_all`, and `/bricker_stop_all`
- Drive the Label Dialog from your phone with `/labels`, `/bulk_labels`, `/scan`, and `/label ` — refresh sales, generate label PDFs, create bulks, and submit UPS labels to USS, all without opening the desktop app
- Toggle notification settings easily using interactive buttons
- Accept offers directly from Telegram notifications
- Interact with your RestocksAIO instance from anywhere
---
# Bricker Mode
Adjust your pricing automation.
This tab lets you customize **Bricker Mode** settings and adjust delays to optimize pricing and automation.
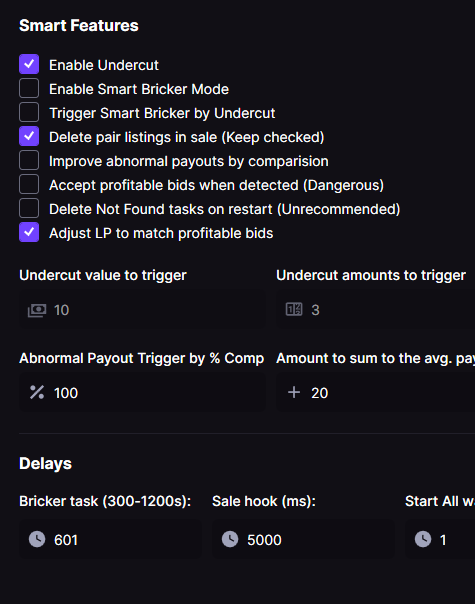
## Bricker Mode Features
* **Enable Undercut** – If enabled, the tool will price your item below the lowest price. If disabled, it will match the lowest price instead.
* **Enable Smart Bricker Mode** – [**(Click for in-depth guide)**](/features/bricker-mode/smart-bricker-mode)
* **Delete Pair Listings on Sale** – Automatically removes the item's listing once it's sold.
* **Delete matching Direct/Resale category on sale** – If the same product and size is live in both Direct and Resale, selling one category can remove the matching opposite category. Consign/Flex tasks are not affected.
* **Full inventory reload when new Bricker listings are missing after sync** – After creating listings with Bricker tasks, RestocksAIO can do one full inventory reload if the new listings do not appear after the normal refresh. Keep this enabled for reliability; disable it only if your inventory is very large and the extra reload is too slow.
* **Improve Abnormal Payouts by Comparison** – Prevents unrealistically high prices by comparing the item’s price across multiple platforms. You can fully customize these settings based on your preferences.
* **Accept profitable bids when detected (Dangerous)** - If a site with a profitable offer gets detected (Offer Payout > LP), it will get accepted automatically. This can be dangerous, since wrong LP settings can cause accidents.
* **Delete Not Found tasks on restart (Unrecommended)** - For users with large amount of tasks, this might be recommended.
* **Adjust LP to match profitable bids** - If an offer is detected with a bigger payout than the LP, the LP will be changed to the offer payout. This helps to set the baseline as another site could sell for less if Parallel Price Check is disabled.
### Abnormal Payouts
**Abnormal Payout Trigger by % Comparison:**
* **What it does:** Defines the percentage difference in payout that will trigger a price comparison.
* **Value Range:** 100% – 300%.
* **Purpose:** If an item's payout significantly exceeds the average payout across platforms, it will be flagged as an abnormal price.
**Amount to sum the average payout:**
* **What it does:** Adds a set amount to the average payout when making comparisons.
* **Purpose:** This adjustment helps prevent the system from bricking payouts to the same level as other marketplaces, ensuring a more balanced and competitive pricing strategy.
## Delays & Refresh Timings
* **Bricker Delay (300–1200 sec)** – Time interval before Bricker Mode refreshes to check for price changes or sales.
* **Sales Monitor Loop Delay (mins)** – How often the Analytics Monitor checks for new sales or status updates.
* **Bricker Start All Delay (sec)** – Delay applied when starting multiple tasks in Bricker Mode.
* **Pause Duration in Smart Bricker Mode (mins)** – How long tasks pause when Smart Mode is triggered.
* **Sales Webhook Notification Delay (ms)** – Controls the delay before sending webhook notifications for new sales.
---
# Proxy
Set up proxy connections.
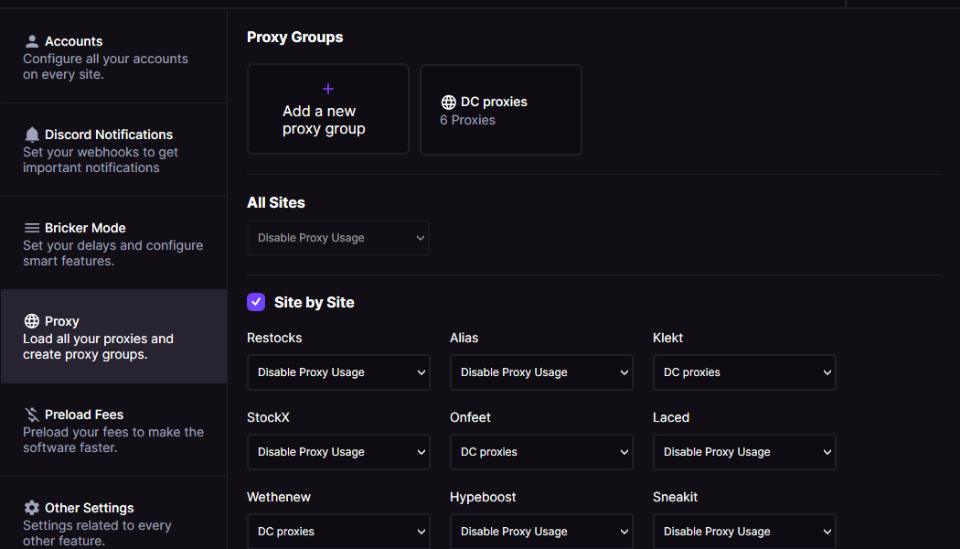
On the **Proxy Settings** tab, we support saving internal proxies on groups to switch proxies whenever you need them easily.
* If you don't have any issues with the sites, you shouldn't use any proxy. Set up proxies if you have errors and cannot use the functions.
* **We recommend** **using ISP/DC proxies** to avoid errors. You can use residential proxies, but they might not work.
We support ip auth proxies and credential proxies:
```
ip:port
ip:port:user:pass
```
You can assign a proxy group for all sites at once or customize proxy settings individually for each platform.
---
# Preload Fees
Reduce bans and speed up operations with internal fee calculations instead of website queries.
## What does Preload Fees mean?
If your fees are preloaded, the bot calculates them internally instead of taking them from the websites. The result is less proxy usage, fewer bans, and a faster bot.
## How do I set it up?
The Preload Fees page has separate panels for **StockX**, **Alias**, **Laced**, and **Klekt**.
For each site you use:
1. Click **Preload**.
2. Wait until the status changes from **Not Preloaded** to **Preloaded**.
3. Enable **Use Preloaded Fee** for that site.
The page also shows the last time each site's fee data was updated. Re-run **Preload** whenever your marketplace fee structure changes or payouts start looking wrong.
> Only enable **Use Preloaded Fee** after that site has been preloaded. If the toggle is enabled without saved fee data, payout calculations for that site may fail until you preload again.
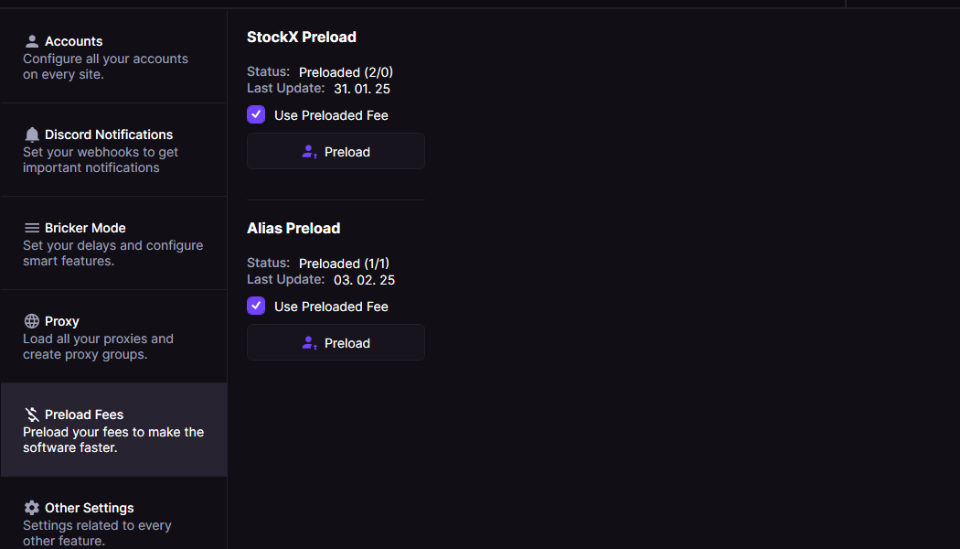
---
# Webhook API
Configure outbound webhook notifications to your own endpoint (Premium/Lifetime).
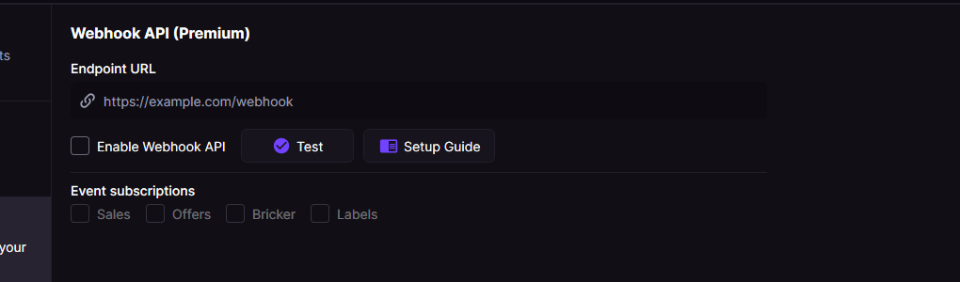
*The Webhook API panel lets you point at your own HTTPS endpoint and toggle per-event subscriptions (Sales, Offers, Bricker, Labels).*
Premium/Lifetime users can send real-time JSON notifications from RestocksAIO to their own HTTPS endpoint. You can pick which event types to send.
For a high-level overview, see the [Webhook API feature page on restock.gg](https://restock.gg/features/webhook-api).
> **Want to sync a marketplace we don't support (eBay, Vinted, …)?** The webhook is your escape hatch. When a pair sells on a supported platform, RestocksAIO POSTs a `sale.detected` event to your endpoint — your own code can then end the matching listing on eBay, Vinted or anywhere else, so you never oversell. See [Use case: DIY eBay / Vinted sync](#use-case-diy-ebay-vinted-sync) below, or the full walkthrough: [Build your own eBay & Vinted sync with the Webhook API](https://restock.gg/blog/build-your-own-marketplace-sync-webhook-api).
## Enable
1. Open **Settings → Webhook API (Premium)**.
2. Enter your HTTPS endpoint.
3. Toggle **Enable Webhook API** and enable the event types you want.
## Payload
```json
{
"event": "event.name",
"timestampUtc": "2025-01-01T12:00:00Z",
"data": { /* event-specific fields */ },
"meta": {
"appVersion": "3.x",
"subscription": "Premium|Lifetime",
"username": "your-login"
}
}
```
## Events
| Event | When it fires | `data` fields (type) |
| --- | --- | --- |
| `sale.detected` | New sale or status change | `saleId` (string), `saleName` (string), `sku` (string), `site` (string), `size` (string), `payout` (string), `status` (string) |
| `offer.detected` | Offer detected | `productName` (string), `sku` (string), `site` (string), `size` (string), `sizeRegion` (string), `itemId` (string), `offerAmount` (number), `offerPayout` (number), `profitIfAccepted` (string), `currency` (string) |
| `bricker.price_change` | Bricker raises/lowers price | `taskId` (string), `site` (string), `size` (string), `oldStorePrice` (string), `newStorePrice` (string), `currency` (string), `reason` (string) |
| `bricker.item_sold` | Bricker item sold | `taskId` (string), `site` (string), `size` (string), `size_eu` (string, optional), `size_us` (string, optional), `size_uk` (string, optional), `sku` (string), `orderId` (string), `storePrice` (number), `sitePayout` (number), `sitePayoutAfterFees` (number), `currency` (string), `isConsign` (boolean) |
| `bricker.item_deleted` | Item deletion attempt | `status` (string: `success`/`failure`), `sellingSite` (string), `productName` (string), `styleCode` (string), `size` (string), `sneakerId` (string) |
### sale.detected example
```json
{
"event": "sale.detected",
"timestampUtc": "2025-01-01T12:00:00Z",
"data": {
"saleId": "12345",
"saleName": "Jordan 1 Retro",
"sku": "555088-105",
"site": "StockX",
"size": "10",
"payout": 245.50,
"status": "Detected a new sale!"
},
"meta": {
"appVersion": "3.x",
"subscription": "Premium|Lifetime",
"username": "your-login"
}
}
```
### offer.detected example
```json
{
"event": "offer.detected",
"timestampUtc": "2025-01-01T12:00:00Z",
"data": {
"productName": "Jordan 4 SB Pine Green",
"sku": "DR5415-103",
"site": "Wethenew",
"size": "10",
"sizeRegion": "EU",
"itemId": "987654",
"offerAmount": 320.0,
"offerPayout": 300.0,
"profitIfAccepted": "+45.00",
"currency": "EUR"
},
"meta": {
"appVersion": "3.x",
"subscription": "Premium|Lifetime",
"username": "your-login"
}
}
```
### bricker.price_change example
```json
{
"event": "bricker.price_change",
"timestampUtc": "2025-01-01T12:00:00Z",
"data": {
"taskId": "BRK-001",
"site": "StockX",
"size": "9.5",
"oldStorePrice": "250.00",
"newStorePrice": "242.50",
"currency": "EUR",
"reason": "We lowered the price of your sneaker!"
},
"meta": {
"appVersion": "3.x",
"subscription": "Premium|Lifetime",
"username": "your-login"
}
}
```
### bricker.item_sold example
```json
{
"event": "bricker.item_sold",
"timestampUtc": "2025-01-01T12:00:00Z",
"data": {
"taskId": "BRK-002",
"site": "Alias",
"size": "10",
"size_eu": "44",
"size_us": "10",
"size_uk": "9",
"sku": "DD1391-100",
"orderId": "ALIAS-7788",
"storePrice": 180.0,
"sitePayout": 190.5,
"sitePayoutAfterFees": 185.0,
"currency": "EUR",
"isConsign": false
},
"meta": {
"appVersion": "3.x",
"subscription": "Premium|Lifetime",
"username": "your-login"
}
}
```
### bricker.item_deleted example
```json
{
"event": "bricker.item_deleted",
"timestampUtc": "2025-01-01T12:00:00Z",
"data": {
"status": "success",
"sellingSite": "StockX",
"productName": "Jordan 1 Retro",
"styleCode": "555088-105",
"size": "10",
"sneakerId": "12345"
},
"meta": {
"appVersion": "3.x",
"subscription": "Premium|Lifetime",
"username": "your-login"
}
}
```
## Use case: DIY eBay / Vinted sync
RestocksAIO drives 10+ marketplaces natively, but **eBay and Vinted are not among them** — there is no first-party integration that reads or writes those accounts. Many resellers still cross-list the same stock there, which risks overselling when a pair sells on a supported platform but stays live on eBay/Vinted.
The Webhook API closes that gap without us building an integration: it turns *"a sale happened"* into an HTTP `POST` to an endpoint **you** control, and your code does the platform-specific work.
**The flow**
1. Enable the **Sales** event and point the Webhook API at your HTTPS endpoint (a small always-on server — a VPS under €10/month works well; `localhost` behind a tunnel like Cloudflare Tunnel or ngrok is fine for testing).
2. On each `sale.detected`, read `data.sku` (style code) and `data.size` — your join key across every platform.
3. Look those up in your own `sku + size → listing ID` map and end the matching listing on the other platform.
```js
app.post('/restocks-webhook', (req, res) => {
const { event, data } = req.body;
if (event === 'sale.detected') {
// your code: end the matching eBay / Vinted listing by SKU + size
delistEverywhereElse(data.sku, data.size, data.site);
}
res.sendStatus(200); // ack fast, do the API calls async
});
```
**Honest limits**
- **eBay** has official APIs for ending a listing or zeroing its quantity — a supported path.
- **Vinted** has *no* official public API. Any Vinted automation is unofficial and yours to maintain; many resellers automate eBay and treat Vinted as *notify-and-remove-manually* (the webhook still tells them the instant it sold).
- This bridge is **one-way**: a sale that happens *on* eBay/Vinted never reaches RestocksAIO.
- RestocksAIO supports the webhook (event delivery). The downstream eBay/Vinted code is **your** DIY integration — not covered by support.
**Production notes:** de-duplicate on `saleId` (delivery is at-least-once), verify the signed request before acting, and return `200` immediately while doing the API calls in the background.
For the full walkthrough with payload breakdowns and the other events you can hang logic on (`bricker.item_sold`, `bricker.item_deleted`, `offer.detected`, `bricker.price_change`), see [Build your own eBay & Vinted sync with the Webhook API](https://restock.gg/blog/build-your-own-marketplace-sync-webhook-api).
---
# Other Settings
Access additional configuration options.
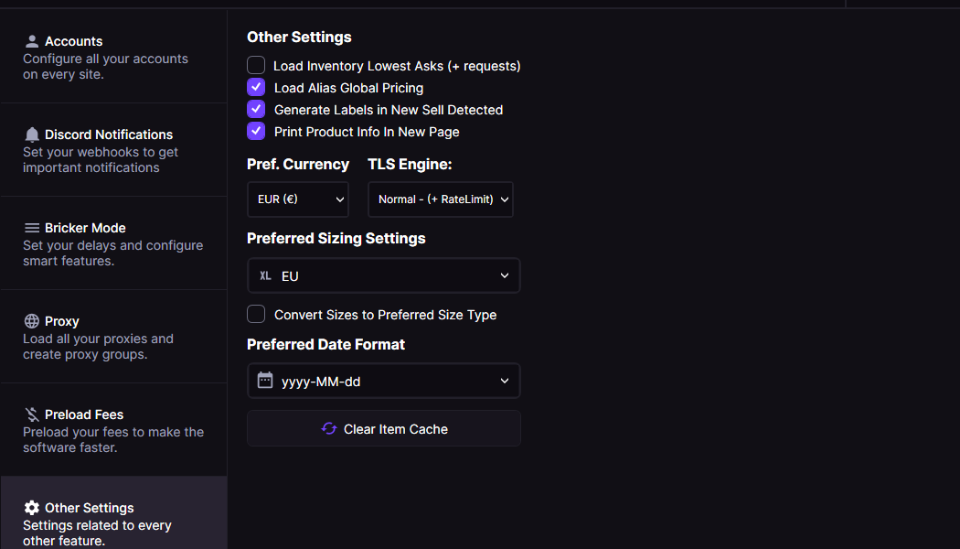
Here, you can configure additional options.
* **Load Inventory Lowest Asks (+ requests)** – The inventory will show the lowest ask. However, this increases the number of requests, leading to higher proxy usage and potential bans.
* **Load Alias Global Pricing** – We recommend activating this. You will be able to sell worldwide and not just in your region.
* **Generate Labels on New Sale** – Automatically sends shipping labels to your webhook whenever a new sale is detected.
* **Print Product Info on a Separate Page** – Splits the shipping label and product details into two different pages.
---
# Tutorials
Navigate to specific how-to guides and problem-solving tutorials.
- [StockX Login](https://docs.restock.gg/problem-solving/tutorials/stockx-login): How to connect a StockX account using browser login, passkeys, 2FA, or cookie fallback.
- [Proof of Delivery (PoD)](https://docs.restock.gg/problem-solving/tutorials/proof-of-delivery-pod): Learn how to download and access Proof of Delivery documents for your shipped orders.
- [How can I ship electronics, sneakers, t-shirts, and all type of StockX sales in a bulk shipment?](https://docs.restock.gg/problem-solving/tutorials/how-can-i-ship-electronics-sneakers-t-shirts-and-all-type-of-stockx-sales-in-a-bulk-shipment): How can I ship electronics, sneakers, t-shirts, and all type of StockX sales in a bulk shipment?
- [Shortcuts](https://docs.restock.gg/problem-solving/tutorials/shortcuts): Learn keyboard shortcuts to navigate RestocksAIO more efficiently.
- [Receive more Wethenew Offers](https://docs.restock.gg/problem-solving/tutorials/receive-more-wethenew-offers): Optimize your settings to increase Wethenew offers.
- [Add Item to Database](https://docs.restock.gg/problem-solving/tutorials/add-item-to-database): Guide for manually adding new products to the database.
- [Sell As Business](https://docs.restock.gg/problem-solving/tutorials/sell-as-business): Learn how to register as a business seller and manage VAT for each supported platform.
- [Import accounts under Facebook / Google login using our Cookie Importer](https://docs.restock.gg/problem-solving/tutorials/import-accounts-under-facebook-google-login-using-our-cookie-importer): This can be used to import your StockX or Wethenew account.
- [How to do proper invoices](https://docs.restock.gg/problem-solving/tutorials/how-to-do-proper-invoices): Generate invoices with automatic tax calculations and proper business details.
- [How I can get access to the public StockX API?](https://docs.restock.gg/problem-solving/tutorials/how-i-can-get-access-to-the-public-stockx-api): Steps to request and integrate StockX's public API.
- [Recreate Bricker Mode Tasks](https://docs.restock.gg/problem-solving/tutorials/recreate-bricker-tasks): Rebuild existing Bricker Mode tasks that are outdated or stuck in an error state.
---
# StockX Market Adjusted Prices
The latest update features a fix for StockX Accounts that do not have B2B and have their ask modified to comply with VAT rules.
We will automatically figure out the market-adjusted price that is the proper lowest price.
.png)
> This feature works inside [bricker-mode](../../features/bricker-mode/ "mention"), where our task monitors will extract the lowest ask prices, and then figure out the actual market-adjusted price to be the lowest ask.
---
# StockX Login
How to connect a StockX account using browser login, passkeys, 2FA, or cookie fallback.
The recommended way to connect StockX is **StockX Browser Login**. This opens the normal StockX login page in your browser and lets StockX handle the login method attached to your account.
Once connected, RestocksAIO handles your StockX listing, pricing, and sales automation — see the [StockX automation overview on restock.gg](https://restock.gg/platforms/stockx).
This works with:
* Email and password
* Passkeys / Windows Hello
* Bitwarden or browser password managers
* SMS or email verification when StockX requests it
* Cloudflare or captcha checks shown by StockX in the browser
RestocksAIO does not need to read your passkey or browser password. After StockX approves the login, the browser sends the approved callback back to RestocksAIO and the tool saves the account session.
## Browser Login
1. Open **Settings > Accounts**.
2. Select **StockX** as the account site.
3. Click **StockX Browser Login** next to **Cookie Importer**.
4. Complete the login in the browser window that opens.
5. If Windows asks whether to open RestocksAIO from the browser, allow it.
6. Wait until RestocksAIO finishes saving the profile.
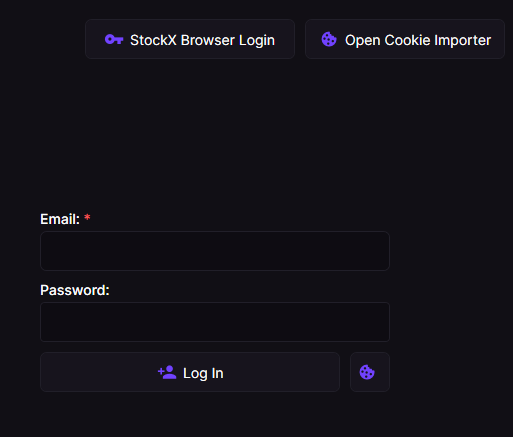
*The StockX Browser Login button appears in the StockX account view next to Cookie Importer.*
> Use this option first if StockX is not sending SMS codes. If your account supports passkey login, Windows Hello, Bitwarden, Chrome, or another password manager can complete the login in the browser.
## If the Browser Does Not Return to RestocksAIO
Keep RestocksAIO open while logging in. The browser needs to hand the approved StockX callback back to the running app.
If nothing happens after login:
1. Click the browser login button again.
2. Approve the browser prompt to open RestocksAIO, if shown.
3. Make sure your default browser is not blocking external app links.
4. Close duplicate StockX login tabs and retry from RestocksAIO.
## Cookie Fallback
If browser login is unavailable, you can still use the cookie fallback. This is mainly useful for troubleshooting or when support asks for it.
We will log in to StockX using the value of their security cookie. If you don't know how to get the value of a cookie, you can download a cookie extension to export it; the link is [here](https://chromewebstore.google.com/detail/cookie-editor/hlkenndednhfkekhgcdicdfddnkalmdm).
1. Go to [https://stockx.com/](https://stockx.com) and reload the page. While on the StockX website, open the extension and search for "\_px3". If you can't find "\_px3", try logging into the bot more frequently and refresh the StockX website. Repeat this process until you encounter a captcha. After solving the captcha, you should be able to find "\_px3" in the extension. You can also browse for different products which may make it appear.
Copy the _px3 cookie value.
2. After copying the value, paste it into the tool and hit log in.
.png)
The account should have logged in, if it didn't, repeat the process. If you are stuck, feel free to contact us and we will help during the process.
> Do not share your StockX cookies, login callback, access tokens, or refresh tokens with anyone except support when explicitly requested. Cookies and tokens can give access to your account.
### Additional Steps
If you don't have access to the public StockX API yet, make sure to ask. Otherwise, you will miss out on several features and may run into problems. Find out how to do this [here](/problem-solving/tutorials/how-i-can-get-access-to-the-public-stockx-api).
---
# Proof of Delivery (PoD)
Learn how to download and access Proof of Delivery documents for your shipped orders.
## What is a PoD?
**Proof of Delivery** is a carrier-issued confirmation that a parcel was delivered. It typically includes the delivery date/time, recipient details/signature, service information, and the tracking number. PoDs are usually provided as **PDF** files.
> Proof of Delivery is part of RestocksAIO's shipping toolkit — see the [Pickup & POD feature page on restock.gg](https://restock.gg/features/pickup-and-pod).
## Why it matters
- **Dispute resolution**: Resolve buyer disputes by showing carrier-confirmed delivery.
- **Carrier claims**: Support claims for lost/misdelivered packages with official proof.
- **Record-keeping**: Keep a complete audit trail of fulfilled orders.
## Supported carriers
RestocksAIO supports automatic PoD downloads for:
- **UPS**
- **DHL**
- **DPD**
PoD availability may vary by region, service type, and delivery status.
## How to use it?
1. Navigate to the [Sales Tab](/features/sales).
2. Select "Account Sales" at bottom right of the grid.
3. Select one or multiple sales, right click then "Download PoD(s)".
4. Go to your RestocksAIO folder and look for "Delivery PDFs".
.png)
.png)
## How it works in RestocksAIO
- In the **Sales → Account Sales** grid, you can:
- Use the PoD column button on a row to download a single file.
- Multi-select rows and use **Download PoD(s)** to fetch in bulk.
- Downloaded files are saved under `Delivery PDFs/` with the **tracking number** as the filename.
- The app updates the sale with a "Has PoD" indicator once the file is present locally.
## Limitations & troubleshooting
- A shipment must be **delivered**; pending items cannot produce PoD.
- Error you may see: “Pending Sales cannot have its Proof of Delivery downloaded!”
- Some services or regions may not expose PoD; carriers can also delay its availability.
- Error you may see: “Proof of Delivery is not available for this Tracking!”
- Verify the tracking number is correct and belongs to UPS/DHL/DPD.
- If the carrier site is temporarily failing, wait and retry.
---
# How can I ship electronics, sneakers, t-shirts, and all type of StockX sales in a bulk shipment?
How can I ship electronics, sneakers, t-shirts, and all type of StockX sales in a bulk shipment?
Our Bulk Creator in our [Label Dialog](/features/functions/generate-labels) supports creating bulk shipments for StockX, which bypasses the StockX restriction of only bulk shipments for sneakers.
With our bypass, you can enjoy the bulk ship discount for electronics and other restricted items.
> Learn more about how RestocksAIO streamlines shipping and fulfillment on the [Pickup & POD feature page on restock.gg](https://restock.gg/features/pickup-and-pod).
(add picture)
Click on the Bulk Creator, select the items to bulk ship together, and click on Create Shipment.
### StockX Bulk-Shipping with Level 1.
You can also bypass the level restriction using our Bulk Creator function.
> There are no reports of any seller being banned for doing this.
---
# Shortcuts
Learn keyboard shortcuts to navigate RestocksAIO more efficiently.
## Item Selection Shortcuts
### ⌨️ Space:
Pressing the Space key will check or uncheck the currently focused item.
### ⌨️ **Ctrl + A**:
Select/Deselect All Items.
### ⌨️ **Shift + Click**:
Select Range of Items.
### ⌨️ Shift + Up/Down Arrow:
Extend Selection Upwards/Downwards.
### ⌨️ Ctrl + Click:
Select/Deselect Individual Item.
---
# Receive more Wethenew Offers
Optimize your settings to increase Wethenew offers.
We strongly advise using our "Undercut/Match Price" feature on all your Wethenew listings. This strategic approach can increase your chances of receiving more substantial offers.
To automatically catch and act on the best offers, see the [Offer Sniper feature on restock.gg](https://restock.gg/features/offer-sniper).
Applying this feature will adjust your list price to equal the lowest asking price, with an additional 20 value units added. This maintains your presence in the marketplace and could yield a higher payout!
To utilize this feature, go to the Listings section. From there, select the listings you wish to modify. After selection, right-click and choose the "Undercut / Match price..." option from the drop-down menu.
---
# Add Item to Database
Guide for manually adding new products to the database.
Add Single Items
1. Take the SKU of your item.
2. Type `/add-item SKU` in the #bot discord channel, wait about 5 seconds until it's finished. (Link to channel: [https://discord.com/channels/766302900624293889/797525225741877280](https://discord.com/channels/766302900624293889/797525225741877280))
3. Now click "Clear Item Cache" in your settings and you're good to go!
> If the SKU is already in the database but one or more sites are showing as missing (red pill) in the Item Addition Window, you can skip Discord and click **Recheck sites** directly on the item. It rescrapes the product across all supported sites in place. See [Adding Items › Recheck Sites](/features/inventory/adding-items#recheck-sites).
.png)
## Add Bulk Items
1. Go to [https://pastebin.com/](https://pastebin.com/) and add one SKU per line.
2. Get the raw link to the textfile content.
3. Type `/add-bulk-items PASTEBIN LINK` in the #bot discord channel and wait till its finished with uploading. (Link to channel: [https://discord.com/channels/766302900624293889/797525225741877280](https://discord.com/channels/766302900624293889/797525225741877280))
4. Now click "Clear Item Cache" in your settings and you're good to go!
.png)
> Users are allowed to add up to 100 style codes at once. In case you have a larger list, open a ticket and the RestocksAIO team will submit it for you.
## Pastebin Guide
---
# Sell As Business
Learn how to register as a business seller and manage VAT for each supported platform.
> **Confirm this information with your accountant or tax advisor. THIS IS NOT FINANCIAL ADVICE (NFA).**
Running your reselling as a business? See how RestocksAIO scales with you on the [sneaker reseller software page on restock.gg](https://restock.gg/solutions/sneaker-reseller-software).
## B2B 0% (Intra-EU supply of goods)
* StockX (NL) - Add your VAT ID in settings: [https://stockx.com/settings/regulatory](https://stockx.com/settings/regulatory). You dont need to send them your invoices.
* Alias (NL) - Send Alias User ID and VAT ID to tax-info@goat.com. Send your invoices once a month to tax-invoices@goat.com. FAQ: [https://support.goat.com/hc/en-us/articles/9838042778893-Invoicing-Guidelines-for-VAT-Sellers-in-EU-UK](https://support.goat.com/hc/en-us/articles/9838042778893-Invoicing-Guidelines-for-VAT-Sellers-in-EU-UK)
* WeTheNew (FR) - Contact them on messenger and tell them you want to sell B2B: [https://www.facebook.com/sell.wethenew/](https://www.facebook.com/sell.wethenew/). After they switched your account to B2B your payout will be :1,2. Send invoices once a month to compta@wethenew.com.
## B2C
* Hypeboost (NL 21%)
* Klekt (DE 19%)
---
# Import accounts under Facebook / Google login using our Cookie Importer
This can be used to import your StockX or Wethenew account.
> If it's your first time selling on these sites, please **manually list an item** to see if everything works smoothly before importing them to the tool.
1. Download the "Cookie-Editor" extension:
- [https://chromewebstore.google.com/detail/cookie-editor/hlkenndednhfkekhgcdicdfddnkalmdm?pli=1](https://chromewebstore.google.com/detail/cookie-editor/hlkenndednhfkekhgcdicdfddnkalmdm?pli=1)
2. Log in on the website you need cookies from.
3. Open the extension while you are on the website and click the Export button on the bottom right corner, then export as JSON.
.png)
4. Your cookies are copied to your clipboard, and you can paste them into the bot.
.png)
---
# How to do proper invoices
Generate invoices with automatic tax calculations and proper business details.
Read the guide about the Invocie Dialog Window below, which contains all the information about everything in the Invoice Dialog, including all the options and features.
For an overview of automated, tax-ready invoicing in RestocksAIO, see the [Generate Invoices feature page on restock.gg](https://restock.gg/features/generate-invoices).
- [Generate Invoices](https://docs.restock.gg/features/functions/generate-invoices): Speed up your invoice creation.
## Follow the guide
### 1. Fill up your Profile Settings
.png)
### 2. Modify the Invoice Text if needed
.png)
> You have an invoice description box on the bottom of the Invoice Settings that you can fill out, for example, with the text needed to showcase that the invoice is a B2B invoice.
> A new preset will be made whenever you press Edit Preset on one of our three default presets. (The default presets cannot be deleted or edited, so a copy will be made)
### 3. Fill in the API keys related to our supported Invoicing platforms (if needed)
The platforms that we currently support are LexOffice SevDesk, Fakturownia and Infakt.
.png)
### 4. Create the Invoices.
To create the invoices, we will set the type, the language preset for the invoice, the type of reference, and additional settings.
.png)
## Frequently Asked Questions
> H**ow do I not miss any sale that can be pending?**\
> \
> To not miss any sales that can be pending, these can be generated in the next quarter following the next settings.
>
> 1. Use a timeframe of two quarters, the current one and the past one, for example (01/01/2023 - 30/06/2023).
> 2. Check the checkbox "Import old CSV to remove dupe".
> 3. Click Generate Invoices or Import a Normal CSV.
> 4. Import the old CSV.
>
> For example, using a timeframe of two quarters and importing a past CSV with the sales that we generated for the first quarter will only make appear the sales that do not appear on the CSV of the first quarter, so in this way, you do not miss any sales.
---
# How I can get access to the public StockX API?
Steps to request and integrate StockX's public API.
> We support both API and Non-Public API access, but some accounts may be flagged within StockX and become unable to use our tool. Therefore, it is important to gain access to their public StockX API.
RestocksAIO automates your StockX listings, pricing, and sales without you having to build anything against the API yourself — see [what RestocksAIO does for StockX sellers on restock.gg](https://restock.gg/platforms/stockx).
## Sign up for their developer's platform
Find the link [here](https://developer.stockx.com/). Click sign up, and authorize access to your account. You will come up with a link to request access.
## Submit the application and wait till approved
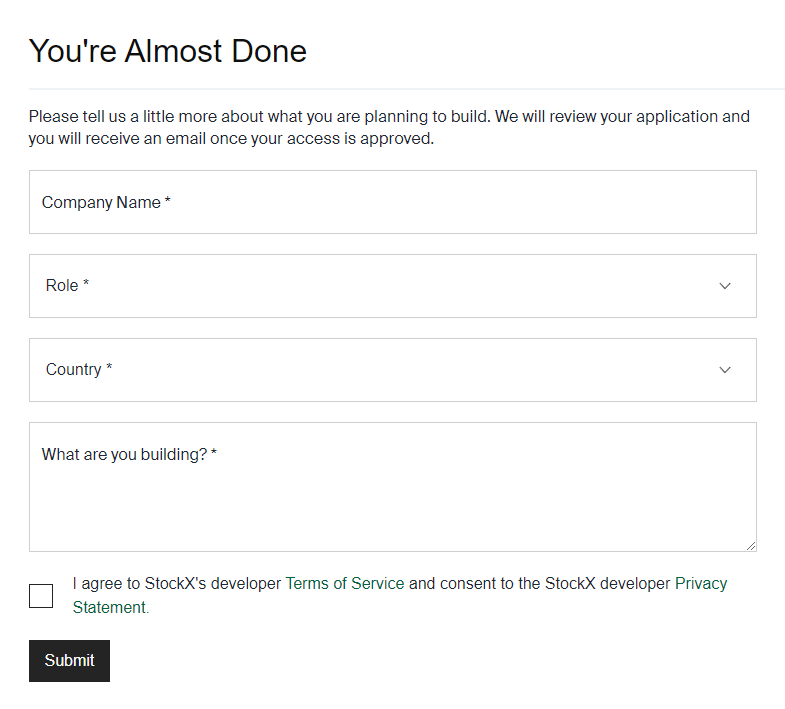
Fill your details. In case you don't know what to fill, we recommend something along the next details:
* Role: Project Manager
* What are you building? I'm looking forward to creating a tool to manage my listings and improve my sales within the platform.
## I've got access, what now?
In order for the tool to recognize your API access, you will need to create an API key and a Application in the developer portal, make sure it looks like this:
You must set the callback URL to: [https://stockx.com/](https://stockx.com/)
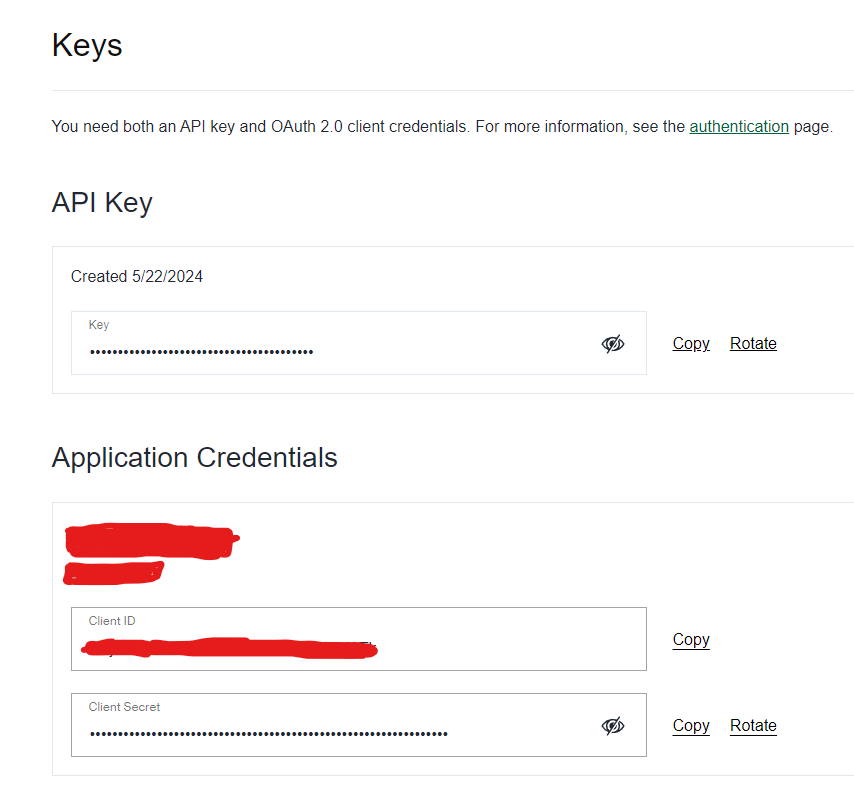
That's it! Now, remove and add your profile again for the software to detect your API Key and Application Credentials. You will be able to check and uncheck the option for the usage of their public API.
---
# Recreate Bricker Mode Tasks
Rebuild existing Bricker Mode tasks that are outdated or stuck in an error state.
## When you need this
Use this flow whenever a Bricker Mode task:
- Shows an **error** (hover the mouse over the red status indicator to see the exact reason), or
- **Doesn't work properly** (no price updates, stuck in a bad state), or
- Is **outdated** after a listing change and simply needs to be rebuilt.
Editing the task often isn't enough. Recreating it from a fresh import is the reliable fix.
> Make sure your **account is working correctly** and your **listings are reloaded** before starting — the tool will rebuild tasks against the current list of listings.
## Step-by-step
### 1. Open the Item Addition Window
Go to **Inventory → Add Item** to open the Item Addition Window.

*The Item Addition Window. Everything in this flow happens here.*
### 2. Import your existing Bricker tasks
Click **Import -> from Bricker Mode**. A dialog lets you choose which bucket to pull in:
*Pick the Bricker category you want to rebuild. Use Resale, Consign, or Direct depending on the task type.*
Your Bricker controllers now appear as rows in the Item Addition list. Repeat the import for each category you run. Direct, Resale, and Consign are intentionally separate because the same SKU and size can exist in more than one StockX selling bucket.
### 3. Copy variables from the existing tasks
**Right-click any item in the list** → **Copy Variables**. This copies the Lowest Payout, Max Payout, and other per-task settings so the rebuilt tasks keep the same configuration.
> The right-click menu only appears when there is **at least one item in the list**. If you haven't imported yet, do step 2 first.
*You'll see a green toast confirming the variables were copied from your existing Bricker tasks.*
### 4. Delete the old Bricker tasks
Go to **Bricker Mode**, select all controllers, and delete them. The imported items stay in the Item Addition Window — you're just clearing the old (broken / outdated) task objects so they can be rebuilt cleanly.
### 5. Create tasks for matching listings
Back in the Item Addition Window, open **Create Tasks for Matching Listings** and pick the matching scope:
- **Create Tasks (Resale, All Sites)** for normal resale listings.
- **Create Tasks (Consign, All Sites)** for consignment / Flex listings.
- **Create Tasks (Direct, All Sites)** for StockX Direct listings.
The tool will match each item against your loaded listings in that category and build fresh Bricker tasks per site, using the variables you copied in step 3. If no tasks are created, reload your listings and make sure you selected the same category you imported.
> The app may appear unresponsive while this runs — that's normal. Rebuilding many tasks is heavy work; **just wait for it to finish** instead of closing the window.
## After it finishes
Your Bricker Mode controllers are regenerated. Start them and confirm the error / stuck state is gone. If a single task still shows an error, hover over the red indicator to see the new reason and address that one directly — you don't need to redo the whole flow again.
---
# Errors
Error explanations and solutions.
- [Status Code: None](https://docs.restock.gg/problem-solving/errors/status-code-none): Connection error.
- [Status Code: Too Many Requests](https://docs.restock.gg/problem-solving/errors/status-code-too-many-requests): Rate Limit Reached.
- [There's no available proxies for the current assignation](https://docs.restock.gg/problem-solving/errors/theres-no-available-proxies-for-the-current-assignation): Solving proxy unavailability errors.
- [Error](https://docs.restock.gg/problem-solving/errors/error)
- [Stuck on "Successful login, setting up your key..."](https://docs.restock.gg/problem-solving/errors/stuck-on-successful-login-setting-up-your-key...): Fixing authentication stalls during login.
- [My wethenew tasks are not sniping offers](https://docs.restock.gg/problem-solving/errors/my-wethenew-tasks-are-not-sniping-offers): Troubleshooting guide for Wethenew sniper functionality issues.
- [Program crashes when adding profile](https://docs.restock.gg/problem-solving/errors/program-crashes-when-adding-profile): Diagnosing and resolving application crashes during profile creation.
---
# Status Code: None
Connection error.
Possible cause: Bad proxy or no connection detected.
Solution:
* Start using proxies
* Switch to working proxies
---
# Status Code: Too Many Requests
Rate Limit Reached.
Possible cause: Rate limit reached.
Solution:
* Wait and retry later
* Start using proxies
* Switch to working proxies
---
# There's no available proxies for the current assignation
Solving proxy unavailability errors.
* You have proxies enabled in your settings, but there are no proxies in the proxy file.
* Start using proxies
* Switch to working proxies
---
# Error
* Make sure you are not on a public network such as school networks.
---
# Stuck on "Successful login, setting up your key...
Fixing authentication stalls during login.
When your bot is stuck like this follow the steps below to solve this issue:
.png)
1. Hit your windows button and search for "Set regional format".
.png)
2. Change the Regional format to "English (United States)".
.png)
---
# My wethenew tasks are not sniping offers
Troubleshooting guide for Wethenew sniper functionality issues.
> In 99% of cases, this issue is caused by user-related factors, such as incorrect settings, non-working proxies, or other configuration errors.
If you’ve ruled these out, follow these steps to resolve the problem:
1. **Check Your Listing VAT Type**: \
Ensure your account profile is set to the correct **Listing VAT rate**.
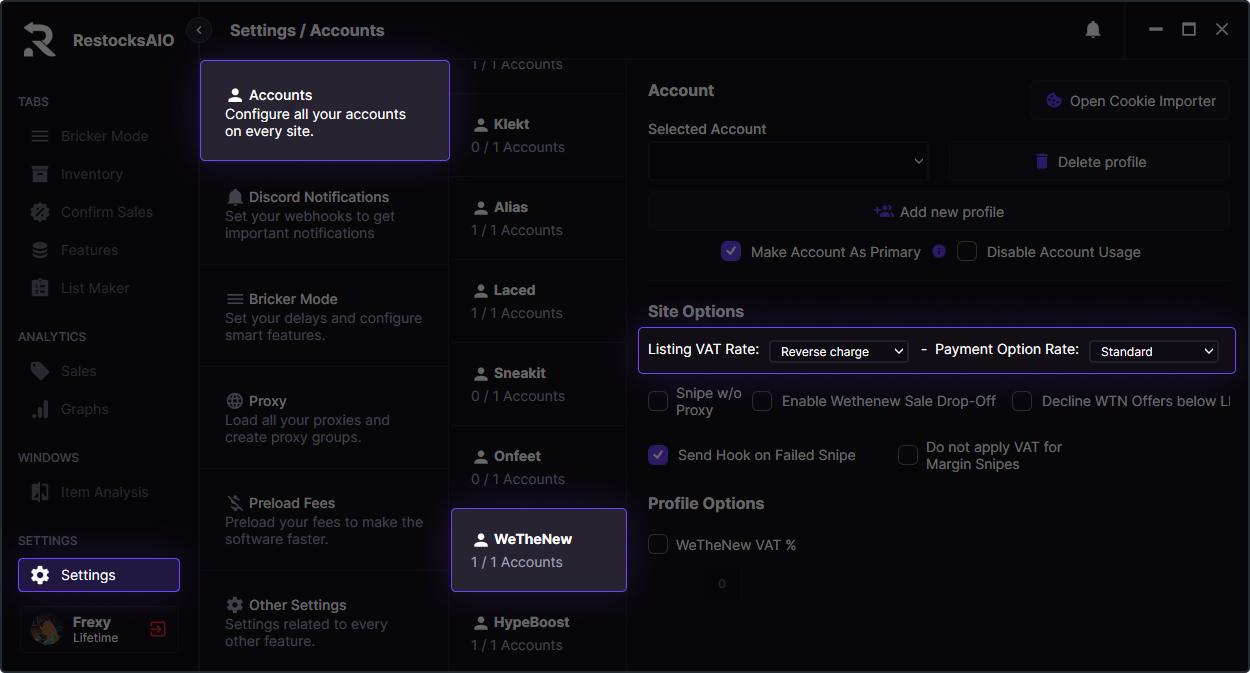
2. **Switch Between Proxy and No Proxy**:\
Your connection to Wethenew’s servers might be rate-limited. Try switching between using a proxy and no proxy, then restart the app.
3. **Re-add Your Profile**:\
Remove your Wethenew profile, restart the app, and add it again.
After following these steps, your sniper should be back up and running.
## **FAQ: Wethenew Sniper Issues**
> **I can load items, but the sniper isn’t working!**\
> \
> Yes, this is right. This can happen because the sniper and the module work in different ways.\
> Follow the said steps to solve these issues.
> **My sniper ignored an upcoming offer, and I didn’t get a webhook notification.**
>
> \
> Actually, the sniper tried to catch the offer, but it got snatched by another user, just move on and wait for future offers.
> **I got X LP but bigger offer was ignored.**\
> \
> No, the offer wasn’t ignored. If you have a **20% VAT** applied to your payout, the incoming offer might have been below your adjusted **Lowest Payout (LP)**.
---
# Program crashes when adding profile
Diagnosing and resolving application crashes during profile creation.
If you are trying to add a profile and the software crashes during the process, it means that a system we use internally is incompatible with your computer.
To solve this, head to Other Settings -> TLS Engine and set it to Normal / New.
.png)
.png)
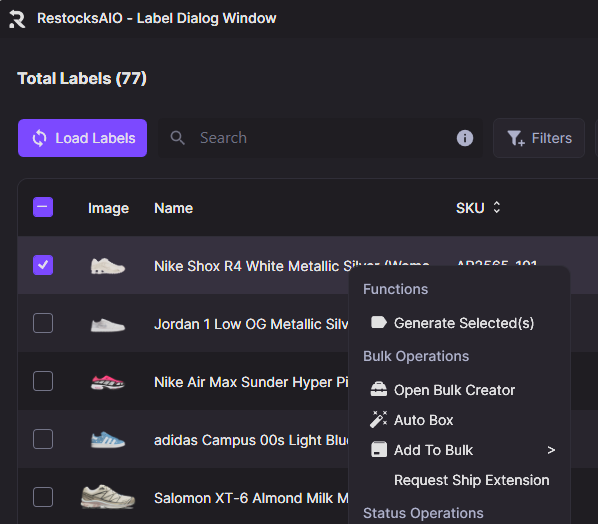
.png)

.png)
.png)