 RestocksAIO Docs
Connect Shopify
Connect a Shopify store to RestocksAIO with your own Shopify app, and set its location, sales channel and on-demand sizes.
You connect a Shopify store with your own Shopify app. You create the app in the Shopify Dev Dashboard, install it on your store, and copy two values into RestocksAIO. RestocksAIO renews the access token automatically. You do not copy a token or a consent code.
The Shopify tools are included in Premium.
Create the Shopify app
Use an app and a store in the same Shopify organization.
- Create an app in the Shopify Dev Dashboard.
- Create and release a version of the app with the scopes in the table below.
- On the Home page of the app, choose Install app and select your store.
- Open the Settings of the app. Copy its Client ID and Client secret.
The Shopify setup guide button in the connect form opens Shopify's own instructions for these steps.
Scopes
| Needed for | Scopes |
|---|---|
| Connect and read (required) | read_products, read_inventory, read_locations, read_publications, read_orders |
| Publish and update listings | write_products, write_inventory, write_publications |
| Mark orders as shipped | write_merchant_managed_fulfillment_orders, read_fulfillments |
| Read and edit delivery profiles (optional) | read_shipping, write_shipping |
| Payout state (optional) | read_shopify_payments_payouts |
A missing read scope makes the account unusable. A missing write scope blocks only the actions that need it. Without read_shopify_payments_payouts, Shopify payouts stay Pending in Sales and everything else works.
To add a scope later, add it to the app in the Shopify Dev Dashboard, release the version, then reconnect the account.
Connect the store
- Open Settings → Accounts.
- Select Shopify, then click Connect account.
- Fill in the three fields:
- Shop domain: use
your-store.myshopify.com. Do not use the custom domain of your storefront or a Shopify admin URL. - Client ID
- Client secret
- Shop domain: use
- Click Connect Shopify.
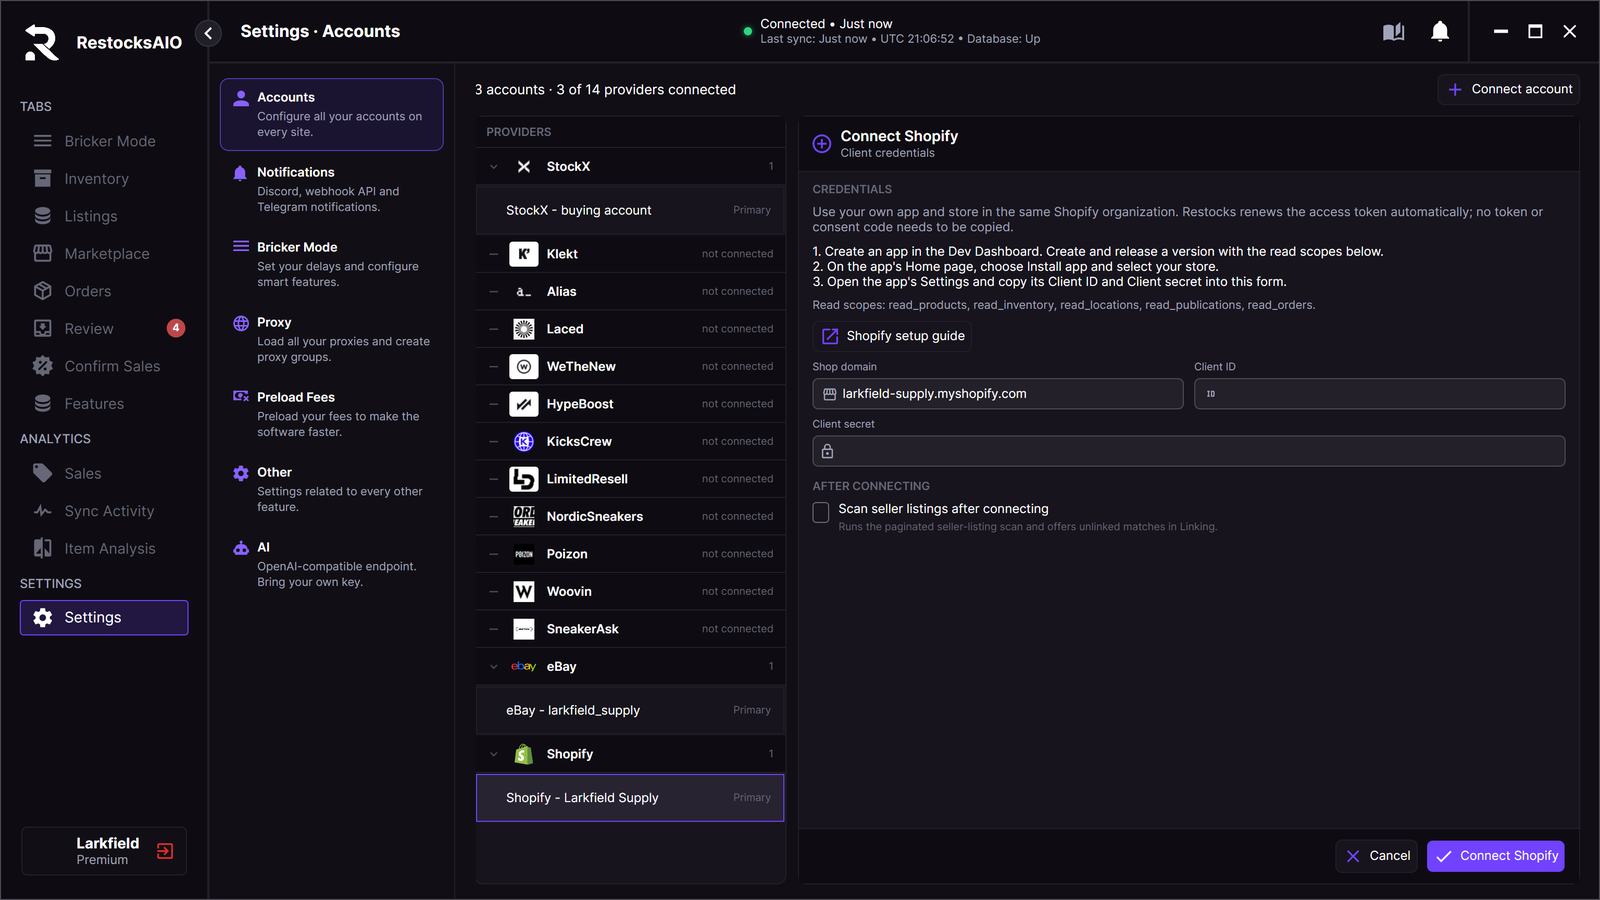
The connect form. The Client ID and the Client secret come from your own Shopify app.
Under After connecting, the box Scan seller listings after connecting reads the products already on your store. RestocksAIO then offers the unlinked matches in Linking.
The Client secret gives access to your store. Do not share it, and do not post it in a support ticket or a screenshot.
Publishing defaults
Select the Shopify account in Settings → Accounts and open Publishing defaults. Click Refresh to read the choices again from Shopify.
| Field | What to choose |
|---|---|
| Product status | Active or Draft for the products RestocksAIO creates. |
| Publication | The sales channel that shows the product, for example your online store. Without a publication, a created product stays Active and invisible. |
| Inventory location | The location whose stock RestocksAIO sets. |
| Delivery profile | Optional. Empty means Shop default. |
| On-demand sizes | How your store marks the sizes it sells without stock. See On-demand sizes. |
If your store has more than one location or sales channel, choose them here once. RestocksAIO does not guess.
These values are shown for information: Variant taxable and Inventory policy read Merchant default, because you manage them in Shopify. Merchant content reads Merchant stays authoritative.
Click Save settings when the fields are set.
Listing photos, under the publishing defaults, holds the watermark and the preferred picture source of this store. Both are off until you set them. See Listing photos.
Delivery profiles
With read_shipping and write_shipping, Add and Edit open a delivery profile. A profile has a Name and a table of zones. Each zone has its countries, a Free box and a rate in the currency of the store. Type country codes such as ES, FR, DE. Use * for the rest of the world.
Shopify does not allow you to delete the default profile of the shop.
More than one Shopify store
You can connect several stores. Each store is its own account, with its own app, defaults and store chip in the Marketplace tab.